 百木园
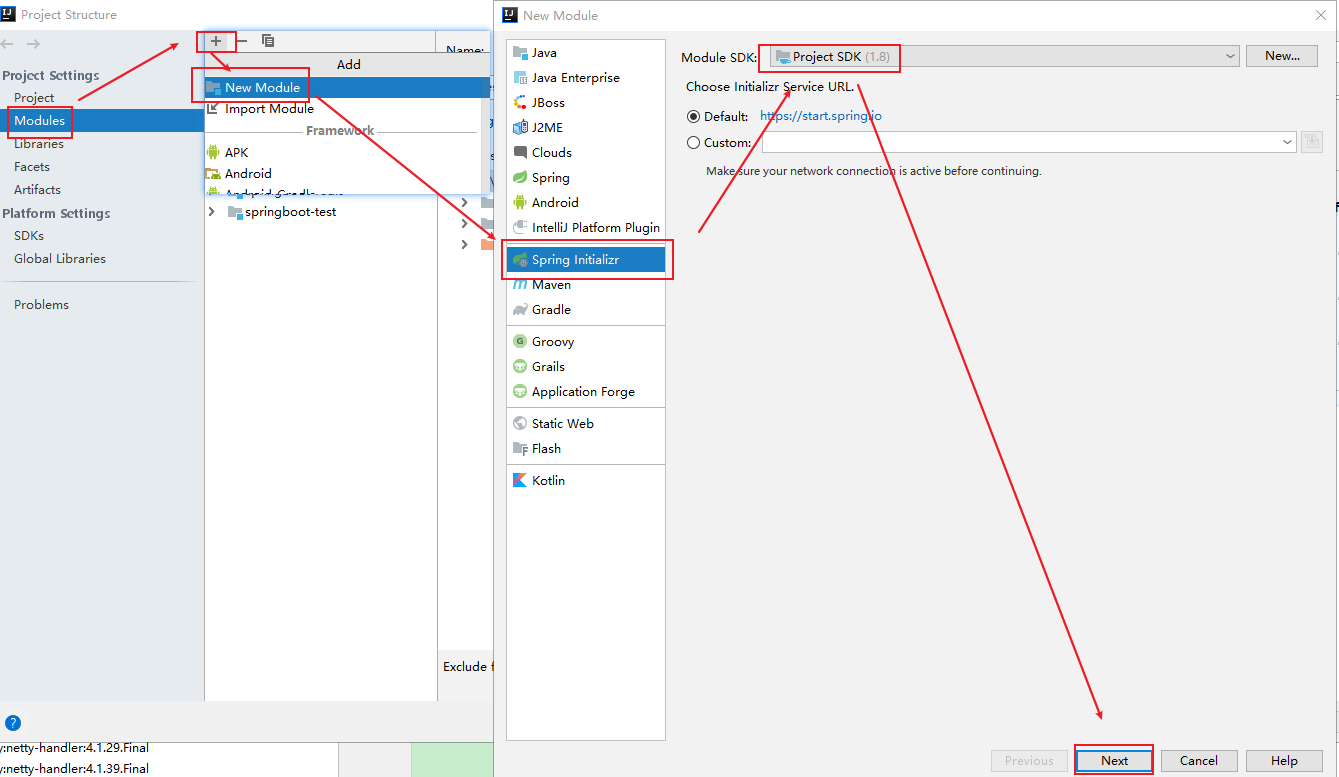
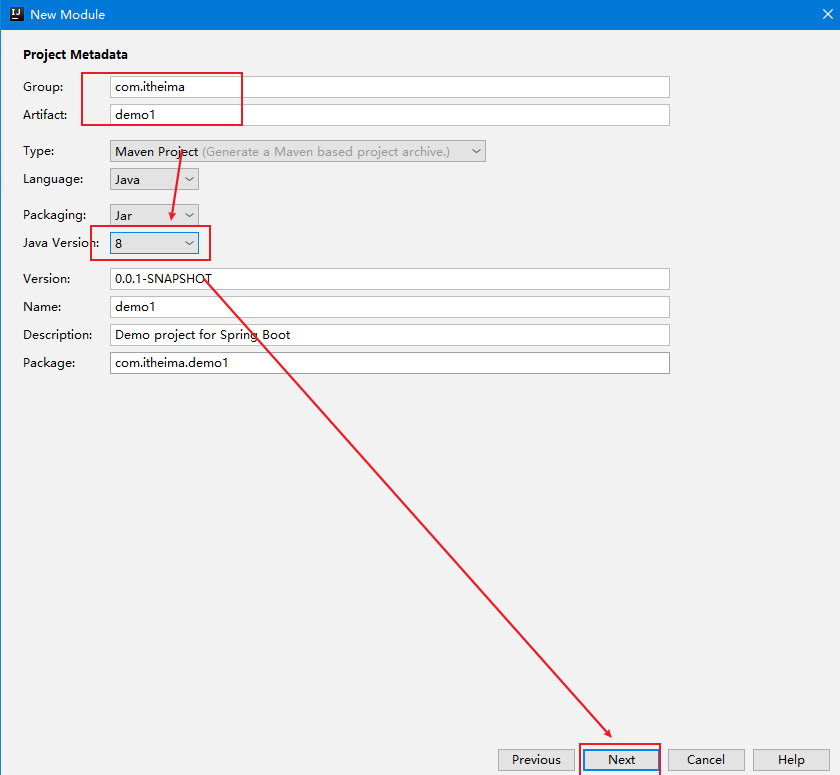
百木园1.1 快速构建-官方脚手架
- 新建模块,新建好之后项目整合就好了。
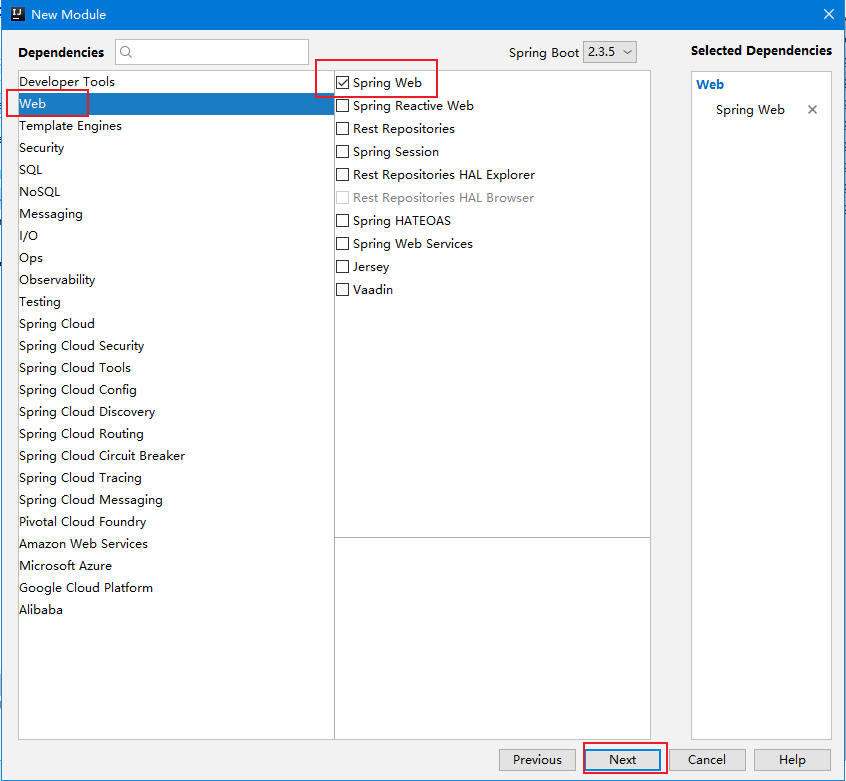
- 编写业务代码,`Controller`
package com.itheima.web.controller;

import org.springframework.web.bind.annotation.GetMapping;
import org.springframework.web.bind.annotation.PathVariable;
import org.springframework.web.bind.annotation.RequestMapping;
import org.springframework.web.bind.annotation.RestController;

/**
 * 用户控制器类
 *
 * @Author Vsunks.v
 * @Blog blog.sunxiaowei.net/996.mba
 * @Description: 用户控制器类
 */
@RestController
@RequestMapping(\"/users\")
public class UserController {


    // Handler
    @GetMapping(\"/{id}\")
    public String save(@PathVariable Integer id){
        System.out.println(\"id = \" + id);
        return \"save success\";
    }
}
1.2 SpringBoot工程启动
只需要找到启动类的main方法,运行即可只需要找到启动类的main方法,运行即可
2 概念
作用:为了快速开发Spring项目:简化配置 ,简化依赖引入。
Spring的缺点:配置繁琐、依赖繁琐。
可以使用SpringBoot的自动配置和场景启动器(起步依赖)克服上述缺点。
SpringBoot提供了一种快速使用Spring的方式,基于约定优于配置的思想。不需要关注配置,重点关注业务逻辑开发,缩短了项目周期。
SpringBoot实现了0配置,1个依赖完成项目搭建。
SpringBoot通过两点实现了上述效果:
-
自动配置
内部提供了大量默认配置,按照约定方式编码即可
-
起步依赖
针对不同的场景封装了
启动器,比如:web场景启动器中引入了所有web需要的依赖,我们只需要引入web场景启动器坐标即可。
SpringBoot还提供了一些嵌入式web服务器、安全、指标、健康监测、外部配置等。
注意:SpringBoot只是提供了一种快速开发Spring项目的方式,而非对Spring功能上的增强。
2.2 起步依赖
又名场景启动器
2.2.1 使用
起步依赖,就是依赖。可以理解为一个依赖组,一组依赖。
像导入普通依赖一样,导入即可。
2.2.2 原理
-
starter-
SpringBoot中常见项目名称,定义了当前项目使用的所有项目坐标,以达到减少依赖配置的目的<?xml version=\"1.0\" encoding=\"UTF-8\"?> <project xmlns=\"http://maven.apache.org/POM/4.0.0\" xmlns:xsi=\"http://www.w3.org/2001/XMLSchema-instance\" xsi:schemaLocation=\"http://maven.apache.org/POM/4.0.0 https://maven.apache.org/xsd/maven-4.0.0.xsd\"> <modelVersion>4.0.0</modelVersion> <parent> <groupId>org.springframework.boot</groupId> <artifactId>spring-boot-starter-parent</artifactId> <version>2.5.0</version> </parent> <groupId>com.itheima</groupId> <artifactId>springboot-01-quickstart</artifactId> <version>0.0.1-SNAPSHOT</version> <dependencies> <dependency> <groupId>org.springframework.boot</groupId> <artifactId>spring-boot-starter-web</artifactId> </dependency> </dependencies> </project><project xmlns=\"http://maven.apache.org/POM/4.0.0\" xsi:schemaLocation=\"http://maven.apache.org/POM/4.0.0 http://maven.apache.org/xsd/maven-4.0.0.xsd\" xmlns:xsi=\"http://www.w3.org/2001/XMLSchema-instance\"> <modelVersion>4.0.0</modelVersion> <groupId>org.springframework.boot</groupId> <artifactId>spring-boot-dependencies</artifactId> <version>2.5.0</version> <packaging>pom</packaging> <properties> <servlet-api.version>4.0.1</servlet-api.version> ... </properties> </project>
-
-
实际开发
-
使用任意坐标时,仅书写
GAV中的G和A,V由SpringBoot提供 -
如发生坐标错误,再指定
version(要小心版本冲突)<dependency> <groupId>junit</groupId> <artifactId>junit</artifactId> <version>${junit.version}</version> </dependency> <dependency> <groupId>javax.servlet</groupId> <artifactId>javax.servlet-api</artifactId> <version>${servlet-api.version}</version> </dependency><?xml version=\"1.0\" encoding=\"UTF-8\"?> <project xmlns=\"http://maven.apache.org/POM/4.0.0\" xmlns:xsi=\"http://www.w3.org/2001/XMLSchema-instance\" xsi:schemaLocation=\"http://maven.apache.org/POM/4.0.0 https://maven.apache.org/xsd/maven-4.0.0.xsd\"> <parent> <groupId>org.springframework.boot</groupId> <artifactId>spring-boot-starter-parent</artifactId> <version>2.5.0</version> </parent> <dependencies> <dependency> <groupId>org.springframework.boot</groupId> <artifactId>spring-boot-starter-web</artifactId> </dependency> <dependency> <groupId>org.springframework.boot</groupId> <artifactId>spring-boot-starter-test</artifactId> <scope>test</scope> </dependency> </dependencies> </project>
-
2.2.3 切换web容器
- Jetty比Tomcat更轻量级,可扩展性更强(相较于Tomcat),谷歌应用引擎(GAE)已经全面切换为Jetty
<dependencies>
    <dependency>
        <groupId>org.springframework.boot</groupId>
        <artifactId>spring-boot-starter-web</artifactId>
        <!--web起步依赖环境中,排除Tomcat起步依赖-->
        <exclusions>
            <exclusion>
                <groupId>org.springframework.boot</groupId>
                <artifactId>spring-boot-starter-tomcat</artifactId>
            </exclusion>
        </exclusions>
    </dependency>
    <!--添加Jetty起步依赖,版本由SpringBoot的starter控制-->
    <dependency>
        <groupId>org.springframework.boot</groupId>
        <artifactId>spring-boot-starter-jetty</artifactId>
    </dependency>
</dependencies>
3. 配置
3.1 配置文件分类
SpringBoot支持yml/yaml和properties等格式的配置文件。
按照约定,配置文件的文件名为application.xxx
三种配置文件的优先级:properties > yml > yaml,
多个配置(文件)中配置了相同的key,优先级高的生效;多个配置(文件)中配置了不同的key,同时生效。
示例如下:
-
propertiesserver.port=8080 -
xml(SpringBoot不支持)<server> <port>8080</port> </server> -
yml/yaml-简洁,层次结构清晰,以数据为核心(推荐)server: port: 8080
3.2 yml 语法
-
大小写敏感
-
数据值前边必须有空格,作为分隔符
-
行头使用缩进表示层级关系
-
缩进时不允许使用
Tab键,只允许使用空格(各个系统 Tab对应的 空格数目可能不同,导致层次混乱)。 -
缩进的空格数目不重要,只要相同层级的元素左侧对齐即可
-
#表示单行注释,从这个字符一直到行尾,都会被解析器忽略。# 这是一行注释 lesson: SpringBoot server: port: 80 -
数组:一组按次序排列的值,使用 “ - ”表示数组每个元素
lesson: SpringBoot

server:
  port: 80

enterprise:
  name: itcast
  age: 16
  tel: 4006184000
  subject:
    - Java
    - 前端
    - 大数据
3.3.1 封装全部数据到Environment对象
-
获取方式
首先在当前类中注入
Environment对象,然后通过该对象的getProperty(“key”)方法获取对应的值 -
关系图示
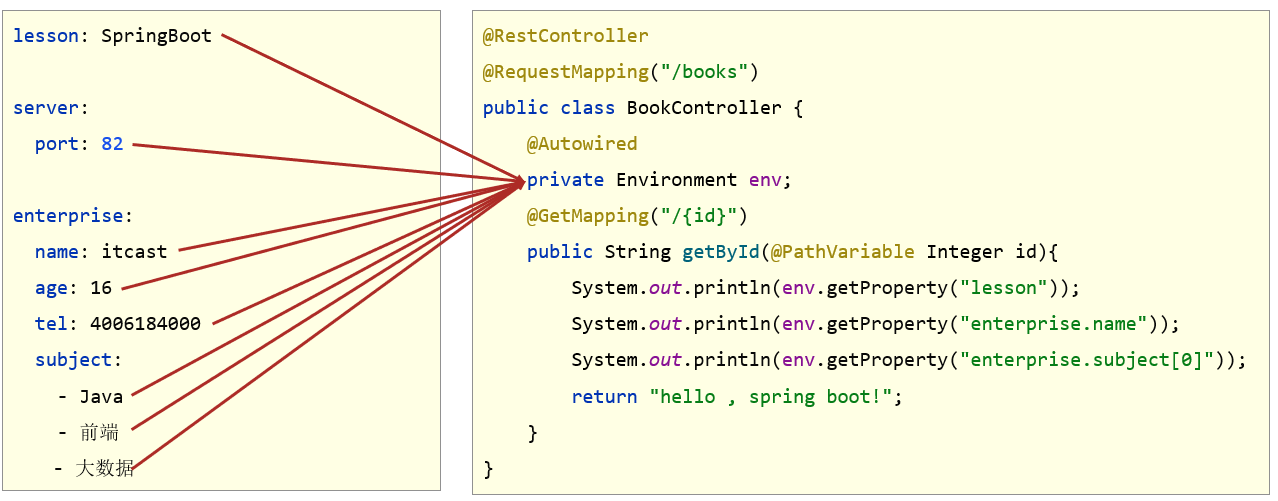
-
Yaml文件lesson: SpringBoot server: port: 80 enterprise: name: itcast age: 16 tel: 4006184000 subject: - Java - 前端 - 大数据 -
读取代码
@RestController
@RequestMapping(\"/books\")
public class BookController {
    //使用Environment封装全配置数据
    @Autowired
    private Environment environment;


    @GetMapping(\"/{id}\")
    public String getById(@PathVariable Integer id){
        System.out.println(environment.getProperty(\"lesson\"));
        System.out.println(environment.getProperty(\"server.port\"));
        System.out.println(environment.getProperty(\"enterprise.age\"));
        System.out.println(environment.getProperty(\"enterprise.subject[1]\"));
        return \"hello , spring boot!\";
    }

}
3.3.2自定义对象封装指定数据
- 映射图示
-
Yaml文件lesson: SpringBoot server: port: 80 enterprise: name: itcast age: 16 tel: 4006184000 subject: - Java - 前端 - 大数据 -
准备实体类
@Data // 装配进Spring容器 @Component // 添加注解,并指定访问前缀。前缀与配置文件中对应的一级属性名一致 @ConfigurationProperties(prefix = \"enterprise\") public class Enterprise { // 实体类中成员变量名和二级属性名一致 private String name; private Integer age; private String tel; private String[] subject; } -
读取代码
@RestController @RequestMapping(\"/books\") public class BookController { // 注入Enterprise,该对象就读取了配置文件,并封装配置文件属性到该对象中。 @Autowired private Enterprise enterprise; @GetMapping(\"/{id}\") public String getById(@PathVariable Integer id){ System.out.println(enterprise); return \"hello , spring boot!\"; } } -
自定义对象封装数据警告且无提示的问题

-
解决方案(配置依赖)
<!--  SpringBoot配置处理器。解决配置文件无提示和实体类飘红问题 -->
<dependency>
    <groupId>org.springframework.boot</groupId>
    <artifactId>spring-boot-configuration-processor</artifactId>
    <optional>true</optional>
</dependency>
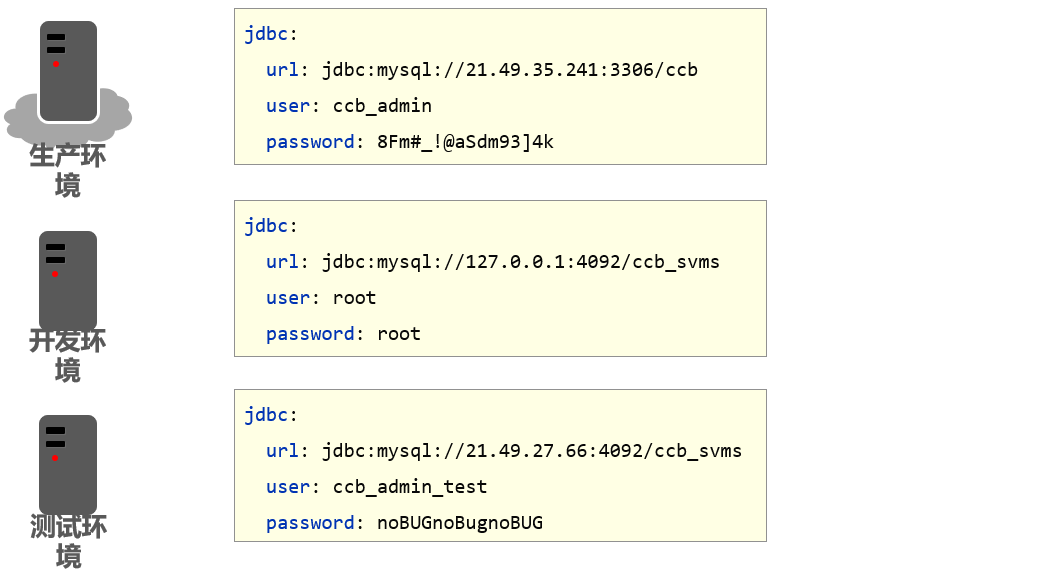
3.4 多环境
在实际开发中,项目的开发环境、测试环境、生产环境的配置信息不一致。SpringBoot支持快速切换。
3.4.1 多环境配置并启用
3.4.1.1 yaml文件多环境
yaml单文件多文件
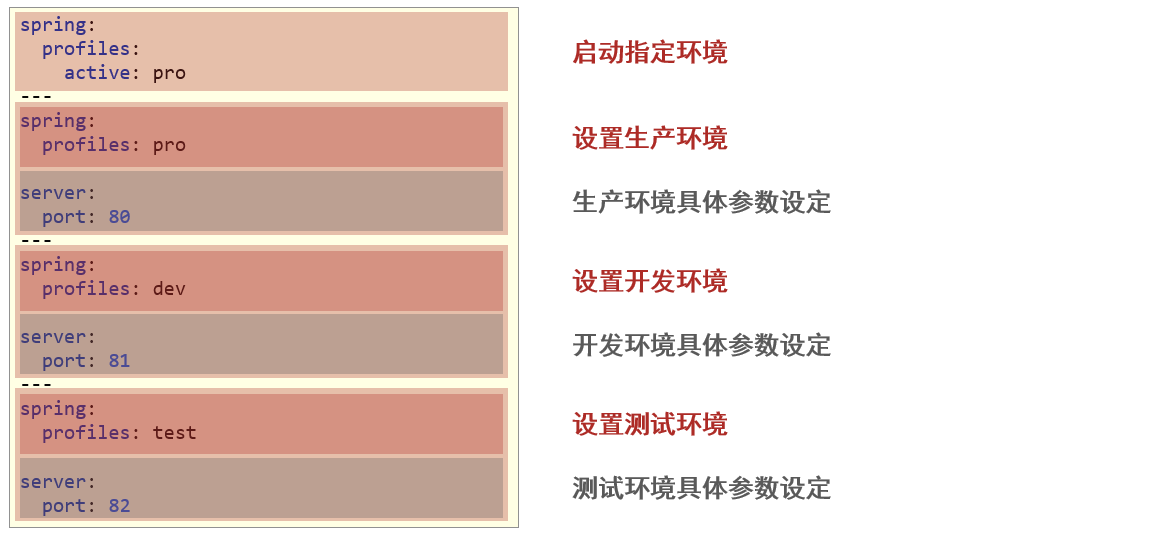
-
演示配置文件(单位件多文档)
#设置启用的环境
spring:
  profiles:
    active: dev

---  #文档分隔线,上下分别表示不同的文档
#开发。
# 高版本的springBoot中,spring.profiles:文档名 的命名方式已经被标记为过时
# 推荐使用 spring.config.activate.on=profile:文档名 的命名方式
# 激活方式保持不变
spring:
  config:
    activate:
      on-profile: dev
server:
  port: 80
---
#生产
spring:
  profiles: pro
server:
  port: 81
---
#测试
spring:
  profiles: test
server:
  port: 82
---
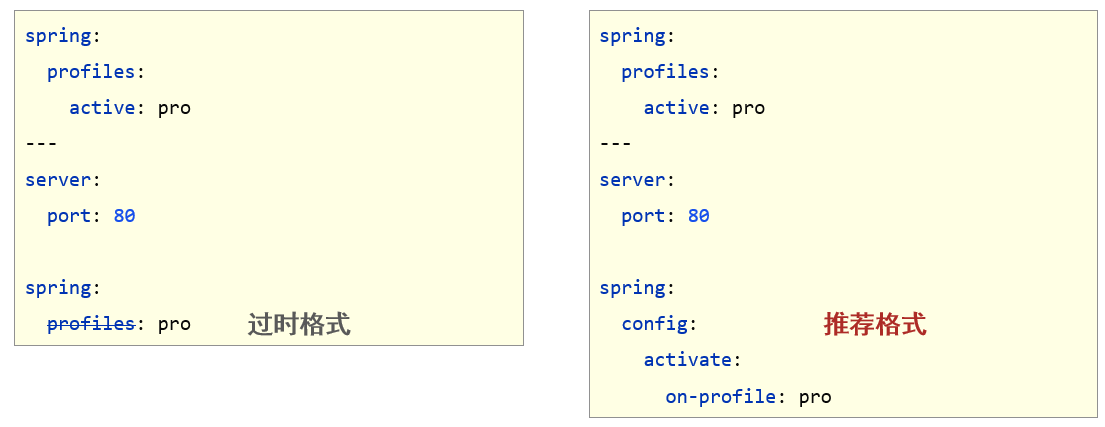
注意:
-
为文档命名的方式,在不同的
SpringBoot版本中会稍有差异低版本中只支持:
spring.profiles:文档名高版本还支持并推荐使用:
spring.config.activate.on=profile:文档名 -
默认激活方式保持不变。
3.4.2 总结
不要记,配置的时候,最终要的是结果;只要结果符合预期,怎么配置都可以。
想了解配置细节规则,可以查看官网文档。
4. 整合其他技术
最终目的是为了能够完成SSM的整合
SpringBoot整合Spring(不需要)SpringBoot整合SpringMVC(导入web起步依赖)SpringBoot整合MyBatis(主要)
4.1 整合Mybatis
4.1.1 对比Spring整合Mybatis
-
配置一对依赖
-
SpringConfig配置类 -
JdbcConfig配置类- 定义数据源(加载properties配置项:driver、url、username、password)
-
MyBatisConfig配置类-
定义
SqlSessionFactoryBean -
定义
MapperScannerConfigurer
-
4.1.2 SpringBoot整合Mybatis
- 新建
SpringBoot模块 - 导入一个起步依赖
- 配置文件中配置连接四要素
相同的步骤:
- 编写
dao层接口和SQL语句
4.1.3 代码演示
-
新建
SpringBoot项目 -
配置起步依赖,及MySQL数据库驱动和Druid数据源
<!-- 导入Mybatis起步依赖:version --> <dependency> <groupId>org.mybatis.spring.boot</groupId> <artifactId>mybatis-spring-boot-starter</artifactId> <version>2.2.2</version> </dependency> <!-- mysql数据库驱动 --> <dependency> <groupId>mysql</groupId> <artifactId>mysql-connector-java</artifactId> <version>5.1.48</version> </dependency> <!-- druid数据源 --> <dependency> <groupId>com.alibaba</groupId> <artifactId>druid</artifactId> <version>1.1.16</version> </dependency> -
配置数据源参数(主要是连接四要素)
server: port: 80 spring: # 配置连接池参数 datasource: # 连接四要素 driver-class-name: com.mysql.jdbc.Driver url: jdbc:mysql:///ssm_spring username: root password: root # 数据源类型,值为对应的数据源全类名 type: com.alibaba.druid.pool.DruidDataSource -
编写Dao接口和SQL语句
package com.itheima.dao; import com.itheima.entity.Book; import org.apache.ibatis.annotations.Select; /** * Book持久层接口 * * @Author Vsunks.v * @Blog blog.sunxiaowei.net/996.mba * @Description: Book持久层接口 */ // @Mapper // 把该接口的代理对象装配进Spring(Boot)容器 和@MapperScan二选一即可 public interface BookDao { @Select(\"select * from ssm_spring.t_book where id= #{id}\") public Book selectById(Integer id); } -
装配
Dao进Spring(Boot)容器(启动类上开启Mapper扫描)package com.itheima; import org.mybatis.spring.annotation.MapperScan; import org.springframework.boot.SpringApplication; import org.springframework.boot.autoconfigure.SpringBootApplication; /** * 整合其他技术的启动类 * * @Author Vsunks.v * @Blog blog.sunxiaowei.net/996.mba * @Description: 整合其他技术的启动类 */ @SpringBootApplication @MapperScan(\"com.itheima.dao\") // 扫描指定位置的mapper接口,一劳永逸 public class IntegrateApplication { public static void main(String[] args) { SpringApplication.run(IntegrateApplication.class,args); } }
4.2 整合Junit
4.2.1 步骤说明
- 新建SpringBoot模块
- 导入起步依赖(脚手架方式创建的模块会自动添加)
- 在主包下编写测试入口类(脚手架方式创建的模块会自动添加)
4.2.2 代码演示
-
新建SpringBoot模块
-
导入起步依赖(脚手架方式创建的模块会自动添加)
<!-- test起步依赖(脚手架建的boot项目默认导入) --> <dependency> <groupId>org.springframework.boot</groupId> <artifactId>spring-boot-starter-test</artifactId> <scope>test</scope> </dependency> -
在主包下编写测试入口类(脚手架方式创建的模块会自动添加)
package com.itheima.test;

import com.itheima.IntegrateApplication;
import com.itheima.dao.BookDao;
import com.itheima.entity.Book;
// import org.junit.Test; // junit4
import org.junit.jupiter.api.Test;  // Junit4
// import org.junit.runner.RunWith;
import org.springframework.beans.factory.annotation.Autowired;
import org.springframework.boot.test.context.SpringBootTest;
import org.springframework.test.context.junit4.SpringRunner;

/**
 * BookDao测试类
 *
 * @Author Vsunks.v
 * @Date 2022/8/5 16:48
 * @Blog blog.sunxiaowei.net/996.mba
 * @Description: BookDao测试类
 */
// @RunWith(SpringRunner.class)    // 使用junit4  需要配置该运行器
// 标注该类是一个SpringBoot中的测试类,该类要放在主包下
// 如果不在主包下,需要通过其classes属性指定启动类的字节码对象
@SpringBootTest
public class BookDaoTest {

    // 测谁就注入谁
    @Autowired
    BookDao bookDao;

    // 测试
    @Test
    public void testSelectById(){
        Book book = bookDao.selectById(14);
        System.out.println(\"book = \" + book);
    }
}
4.3 整合SpringMVC
配置起步依赖即可。
4.3.1 实现步骤
-
配置Web异步依赖
-
编写Controller
4.3.2 代码演示
-
BookControllerpackage com.itheima.web.controller; import com.itheima.entity.Book; import com.itheima.service.BookService; import org.springframework.beans.factory.annotation.Autowired; import org.springframework.web.bind.annotation.GetMapping; import org.springframework.web.bind.annotation.PathVariable; import org.springframework.web.bind.annotation.RequestMapping; import org.springframework.web.bind.annotation.RestController; /** * Book控制器类 * * @Author Vsunks.v * @Blog blog.sunxiaowei.net/996.mba * @Description: Book控制器类 */ @RestController @RequestMapping(\"/books\") public class BookController { @Autowired BookService bookService; // 根据id查询 @GetMapping(\"/{id}\") public Book getById(@PathVariable Integer id) { return bookService.getById(id); } }
来源:https://www.cnblogs.com/andanlife/p/16559206.html
本站部分图文来源于网络,如有侵权请联系删除。