一、后端工作
1、创建数据库
数据库名shop_v1.0,字符集utf8,排序规则utf8_general_ci,执行脚本。
CREATE TABLE `t_user` (
  `id` bigint NOT NULL AUTO_INCREMENT,
  `username` varchar(64) NOT NULL COMMENT \'用户名\',
  `password` varchar(128) DEFAULT NULL COMMENT \'密码\',
  `name` varchar(64) DEFAULT NULL,
  `email` varchar(64) DEFAULT NULL,
  `telephone` varchar(32) DEFAULT NULL,
  `birthday` date DEFAULT NULL,
  `gender` char(1) DEFAULT NULL,
  `status` char(1) DEFAULT NULL,
  `create_time` timestamp NOT NULL DEFAULT CURRENT_TIMESTAMP,
  `update_time` timestamp NULL DEFAULT NULL ON UPDATE CURRENT_TIMESTAMP,
  PRIMARY KEY (`id`) USING BTREE
) ENGINE=InnoDB AUTO_INCREMENT=1 DEFAULT CHARSET=utf8;
2、创建springboot工程
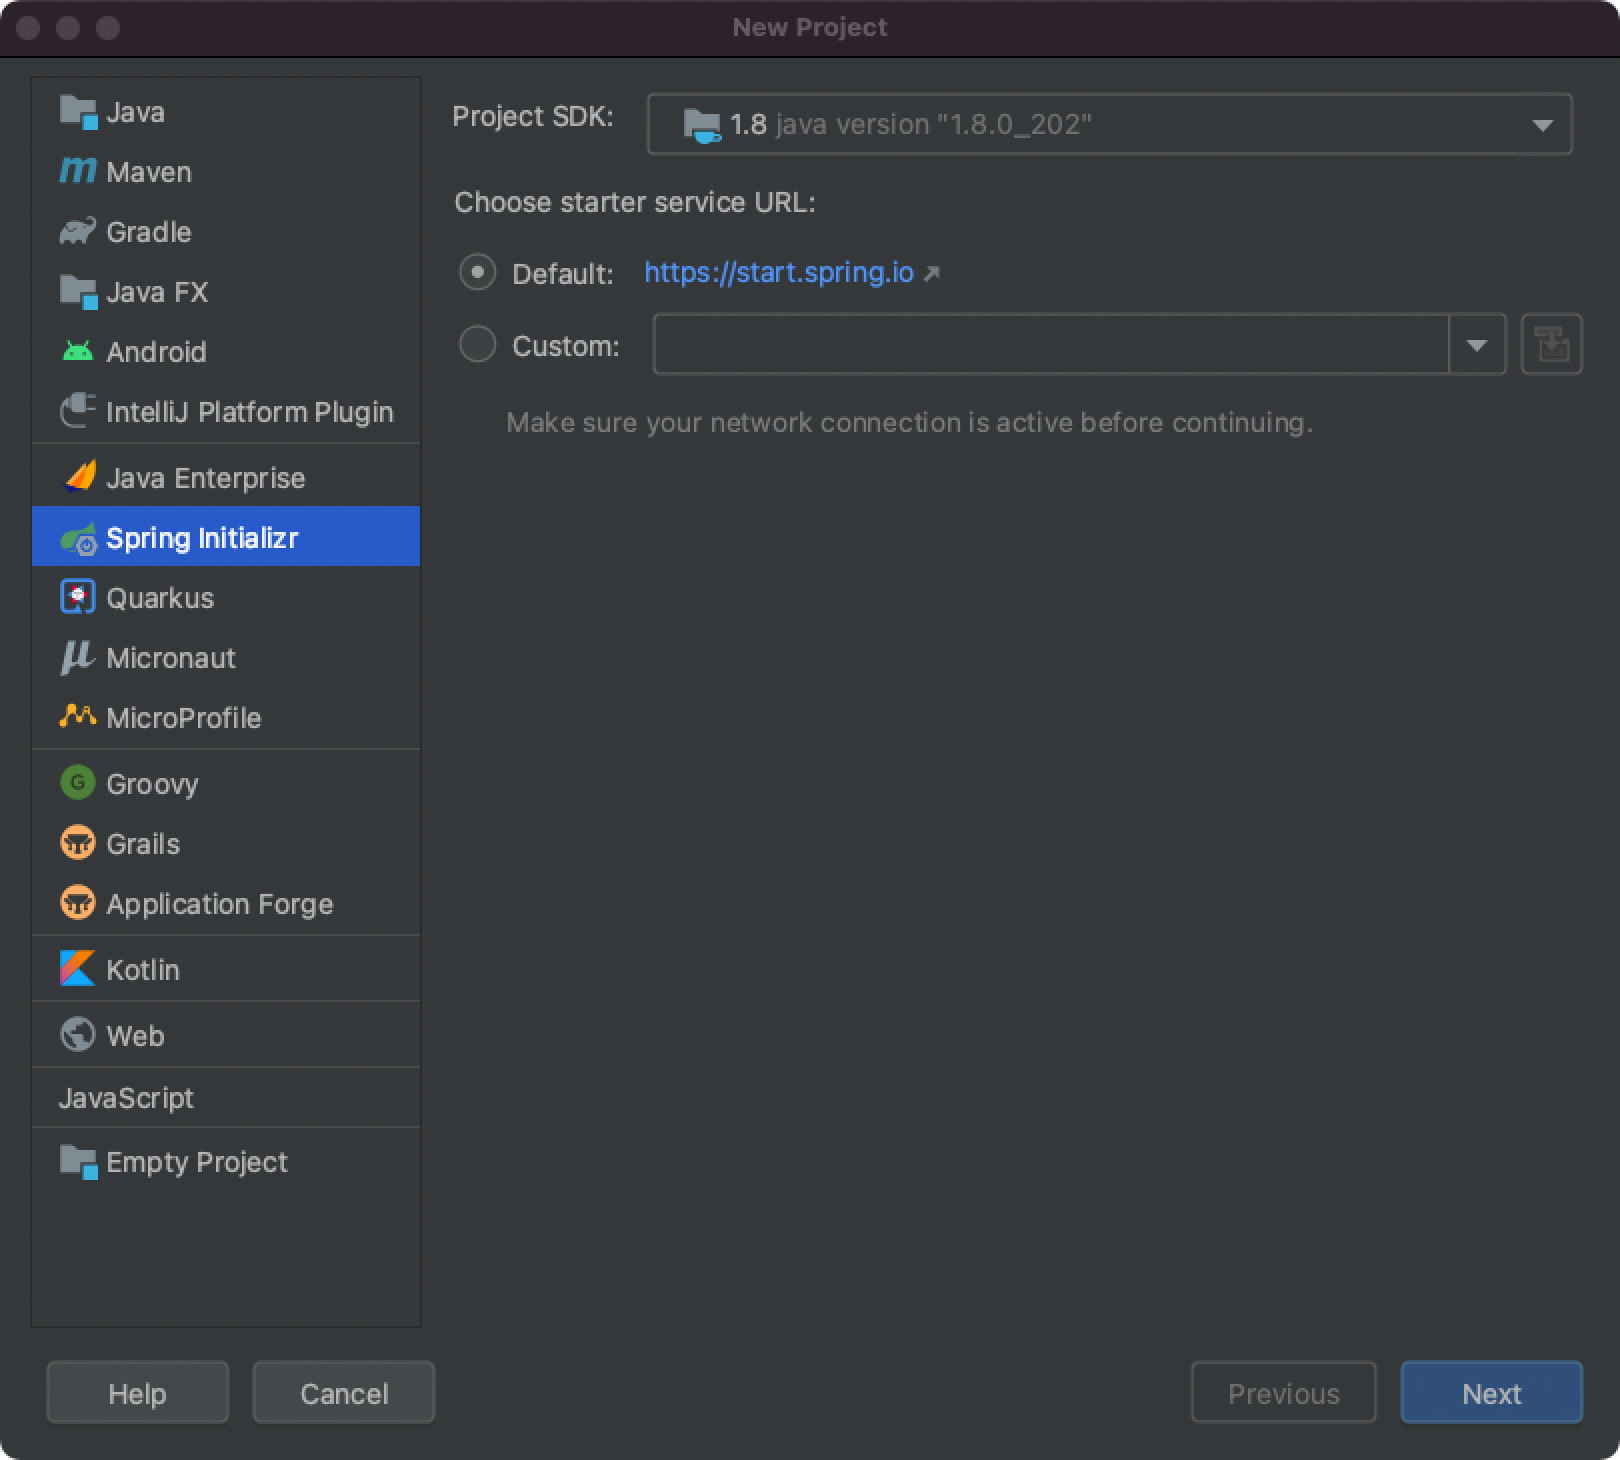
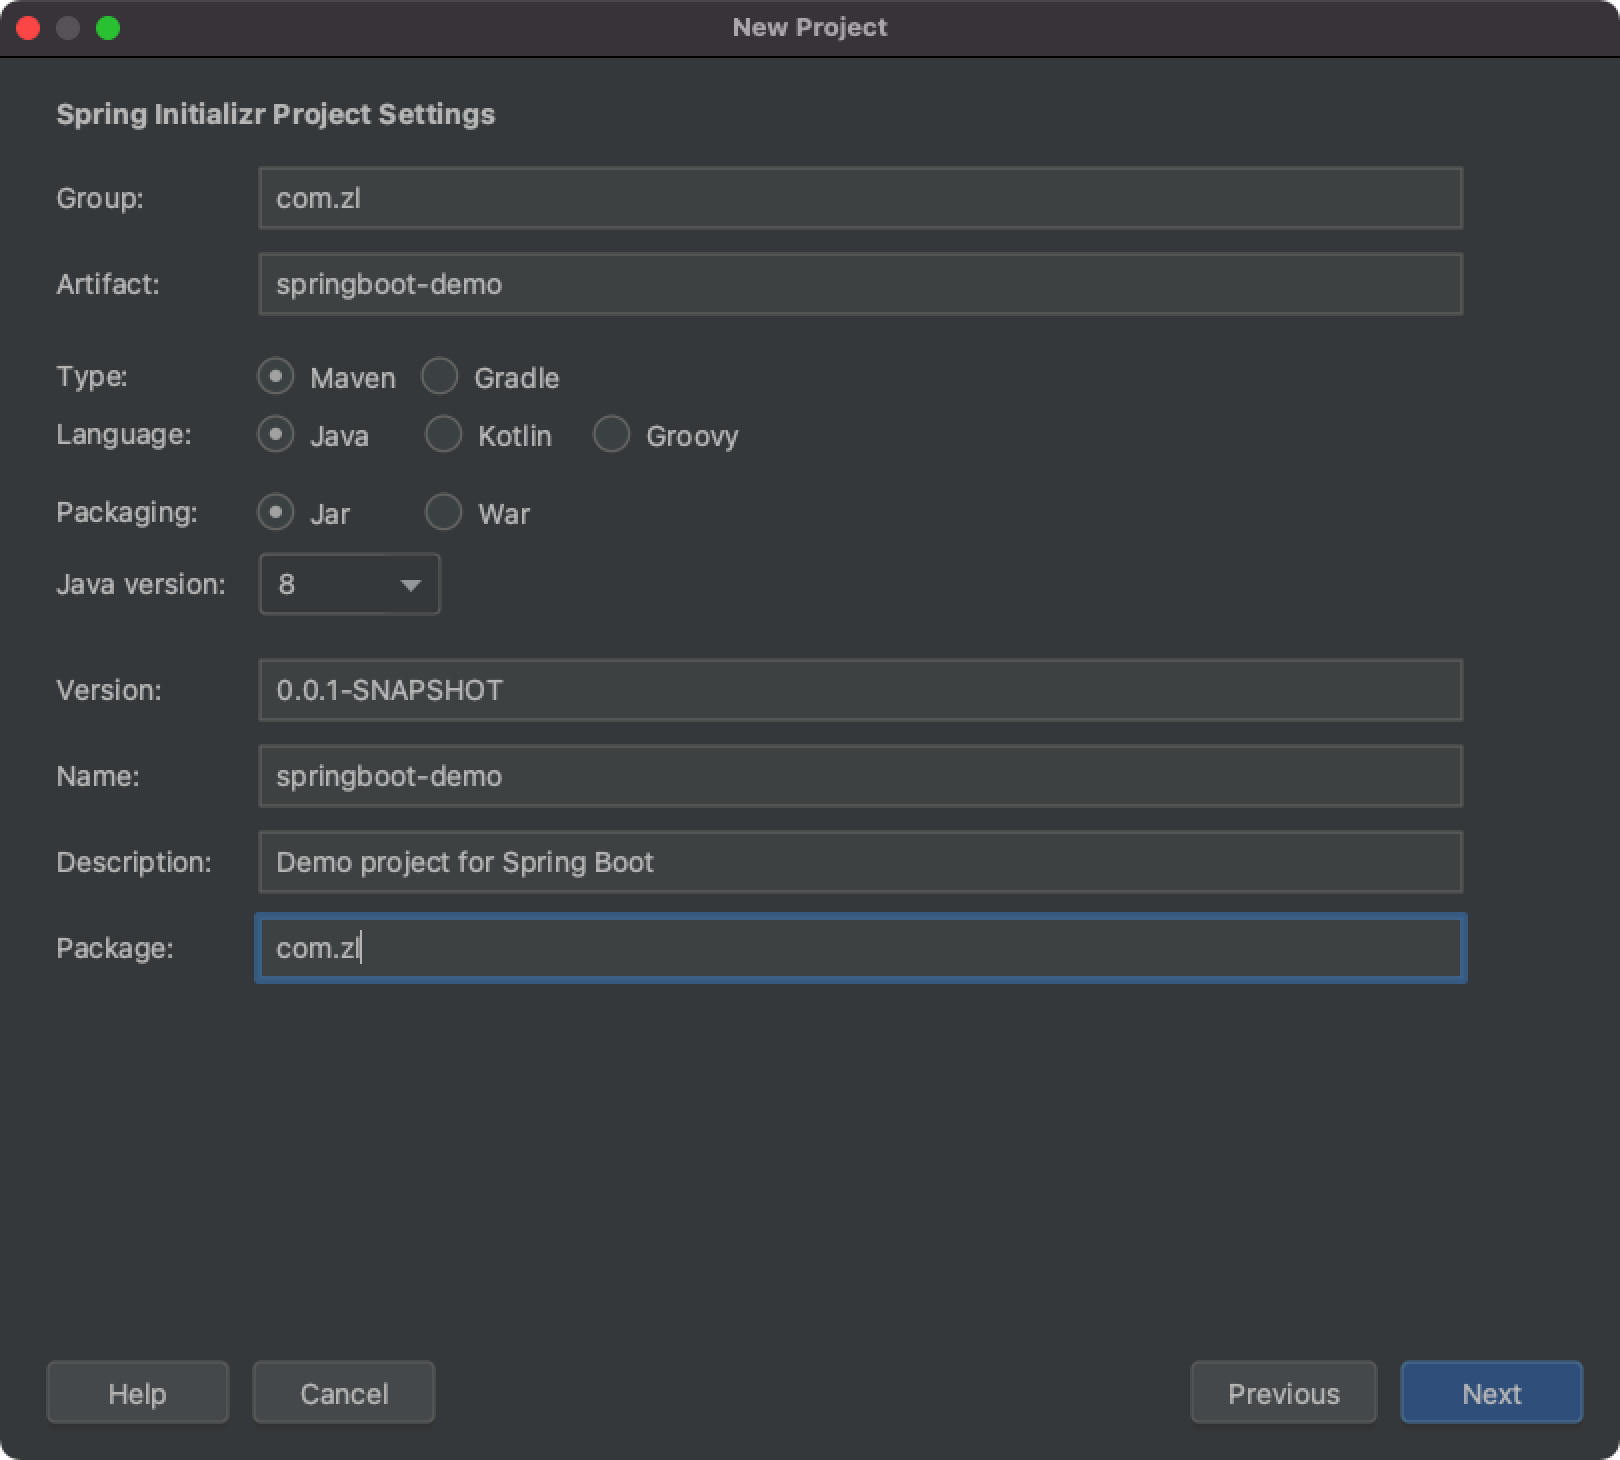
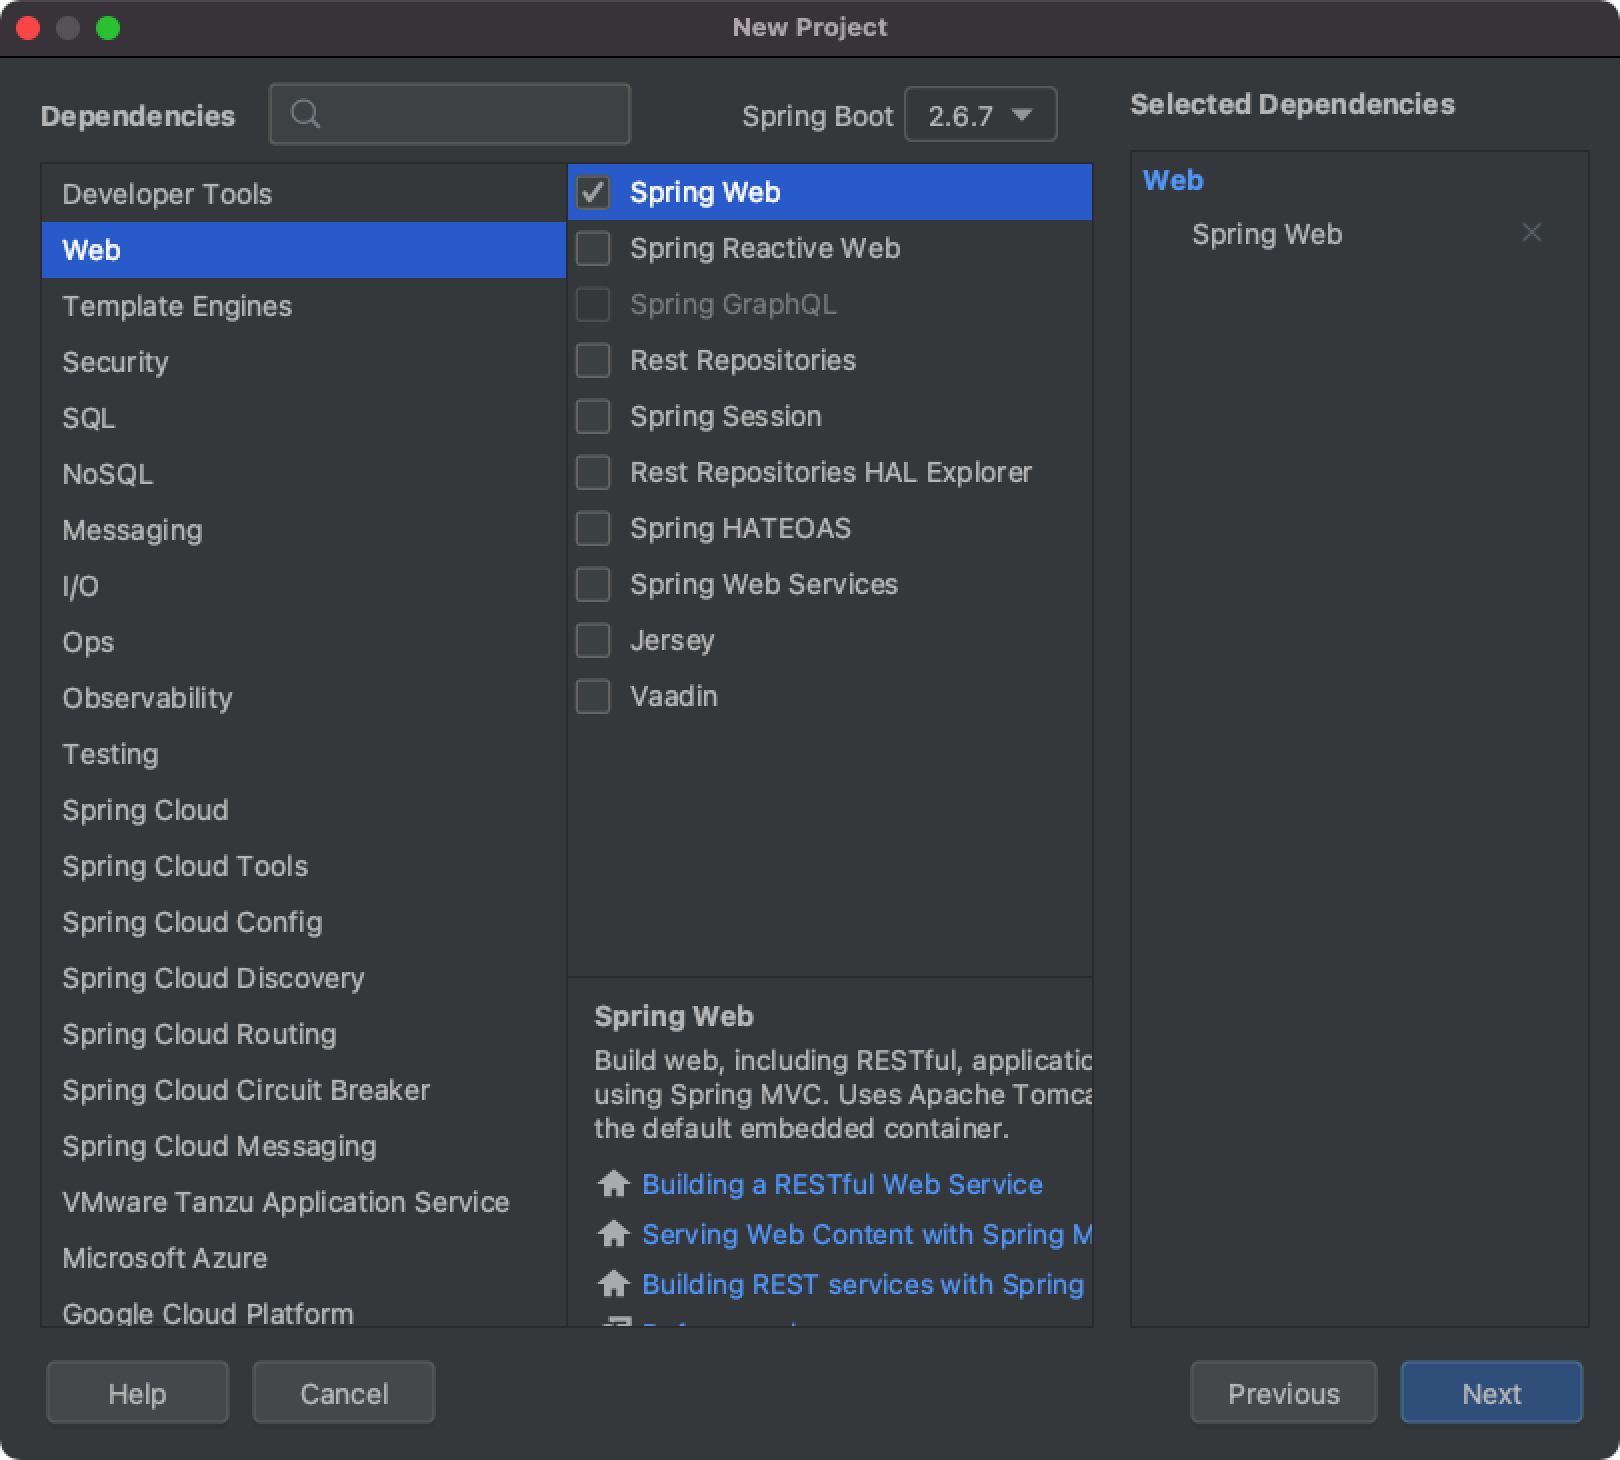
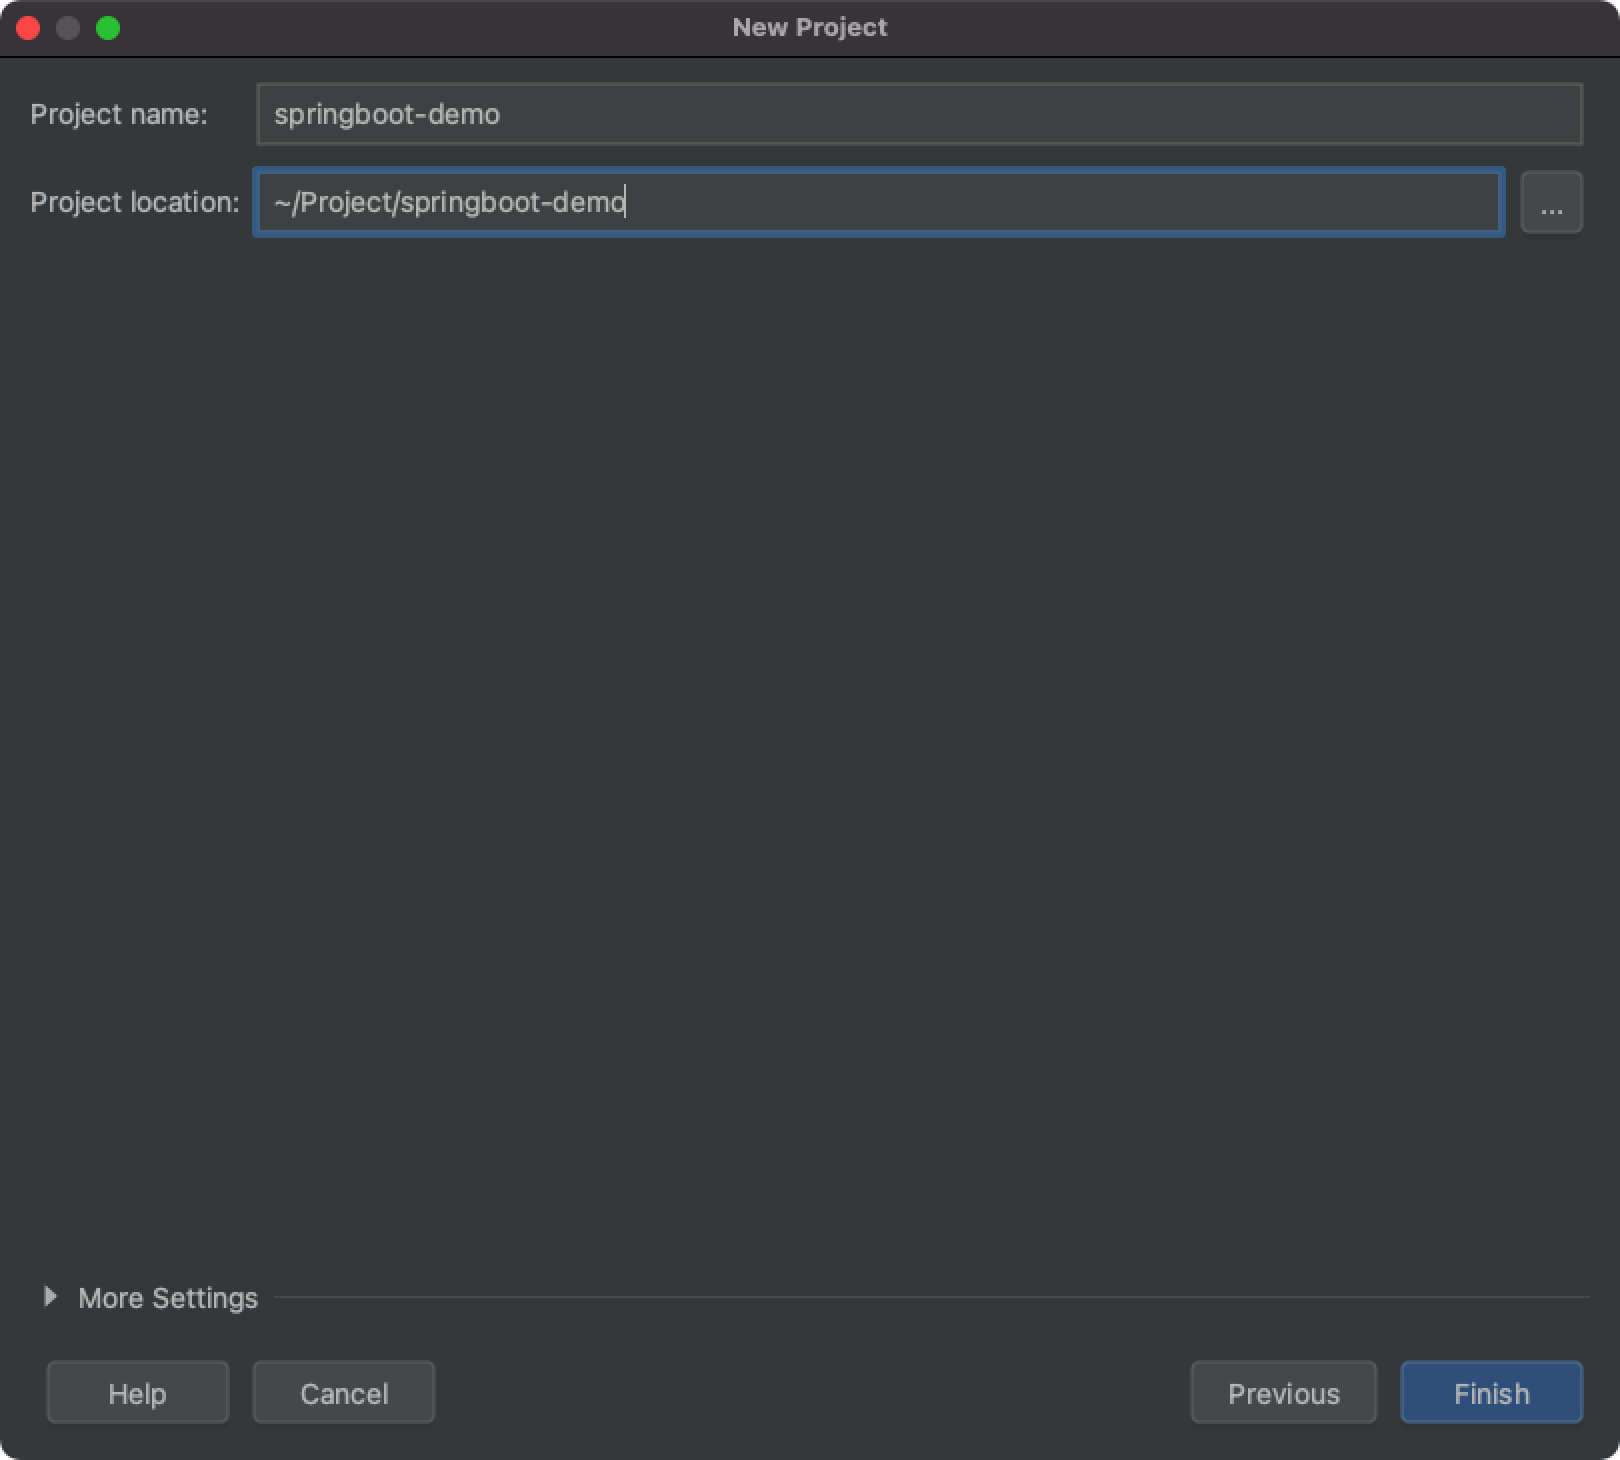
File -- New -- Project -- Spring Initializr。
3、添加Maven依赖,完整pom.xml
<?xml version=\"1.0\" encoding=\"UTF-8\"?>
<project xmlns=\"http://maven.apache.org/POM/4.0.0\" xmlns:xsi=\"http://www.w3.org/2001/XMLSchema-instance\"
         xsi:schemaLocation=\"http://maven.apache.org/POM/4.0.0 https://maven.apache.org/xsd/maven-4.0.0.xsd\">
    <modelVersion>4.0.0</modelVersion>
    <parent>
        <groupId>org.springframework.boot</groupId>
        <artifactId>spring-boot-starter-parent</artifactId>
        <version>2.1.10.RELEASE</version>
        <relativePath/> <!-- lookup parent from repository -->
    </parent>
    <groupId>com.zl</groupId>
    <artifactId>springboot-demo</artifactId>
    <version>0.0.1-SNAPSHOT</version>
    <name>springboot-demo</name>
    <description>Demo project for Spring Boot</description>

    <properties>
        <java.version>1.8</java.version>
    </properties>
    <dependencies>
        <dependency>
            <groupId>org.springframework.boot</groupId>
            <artifactId>spring-boot-starter</artifactId>
        </dependency>
        <dependency>
            <groupId>org.springframework.boot</groupId>
            <artifactId>spring-boot-starter-web</artifactId>
        </dependency>
        <dependency>
            <groupId>org.springframework.boot</groupId>
            <artifactId>spring-boot-starter-test</artifactId>
            <scope>test</scope>
        </dependency>
        <!-- 数据库驱动 -->
        <dependency>
            <groupId>mysql</groupId>
            <artifactId>mysql-connector-java</artifactId>
            <scope>runtime</scope>
        </dependency>
        <!-- mp -->
        <dependency>
            <groupId>com.baomidou</groupId>
            <artifactId>mybatis-plus-boot-starter</artifactId>
            <version>3.4.1</version>
        </dependency>
        <!-- mp代码生成器 -->
        <dependency>
            <groupId>com.baomidou</groupId>
            <artifactId>mybatis-plus-generator</artifactId>
            <version>3.4.1</version>
        </dependency>
        <!-- mp代码生成器模板 -->
        <dependency>
            <groupId>org.springframework.boot</groupId>
            <artifactId>spring-boot-starter-freemarker</artifactId>
        </dependency>
        <!-- Swagger2 -->
        <dependency>
            <groupId>io.springfox</groupId>
            <artifactId>springfox-swagger2</artifactId>
            <version>2.7.0</version>
        </dependency>
        <dependency>
            <groupId>io.springfox</groupId>
            <artifactId>springfox-swagger-ui</artifactId>
            <version>2.7.0</version>
        </dependency>
        <!-- swagger2美化 -->
        <dependency>
            <groupId>com.github.xiaoymin</groupId>
            <artifactId>swagger-bootstrap-ui</artifactId>
            <version>1.9.3</version>
        </dependency>
        <!-- lombok -->
        <dependency>
            <groupId>org.projectlombok</groupId>
            <artifactId>lombok</artifactId>
            <optional>true</optional>
        </dependency>
    </dependencies>

    <build>
        <plugins>
            <plugin>
                <groupId>org.springframework.boot</groupId>
                <artifactId>spring-boot-maven-plugin</artifactId>
            </plugin>
        </plugins>
    </build>

</project>
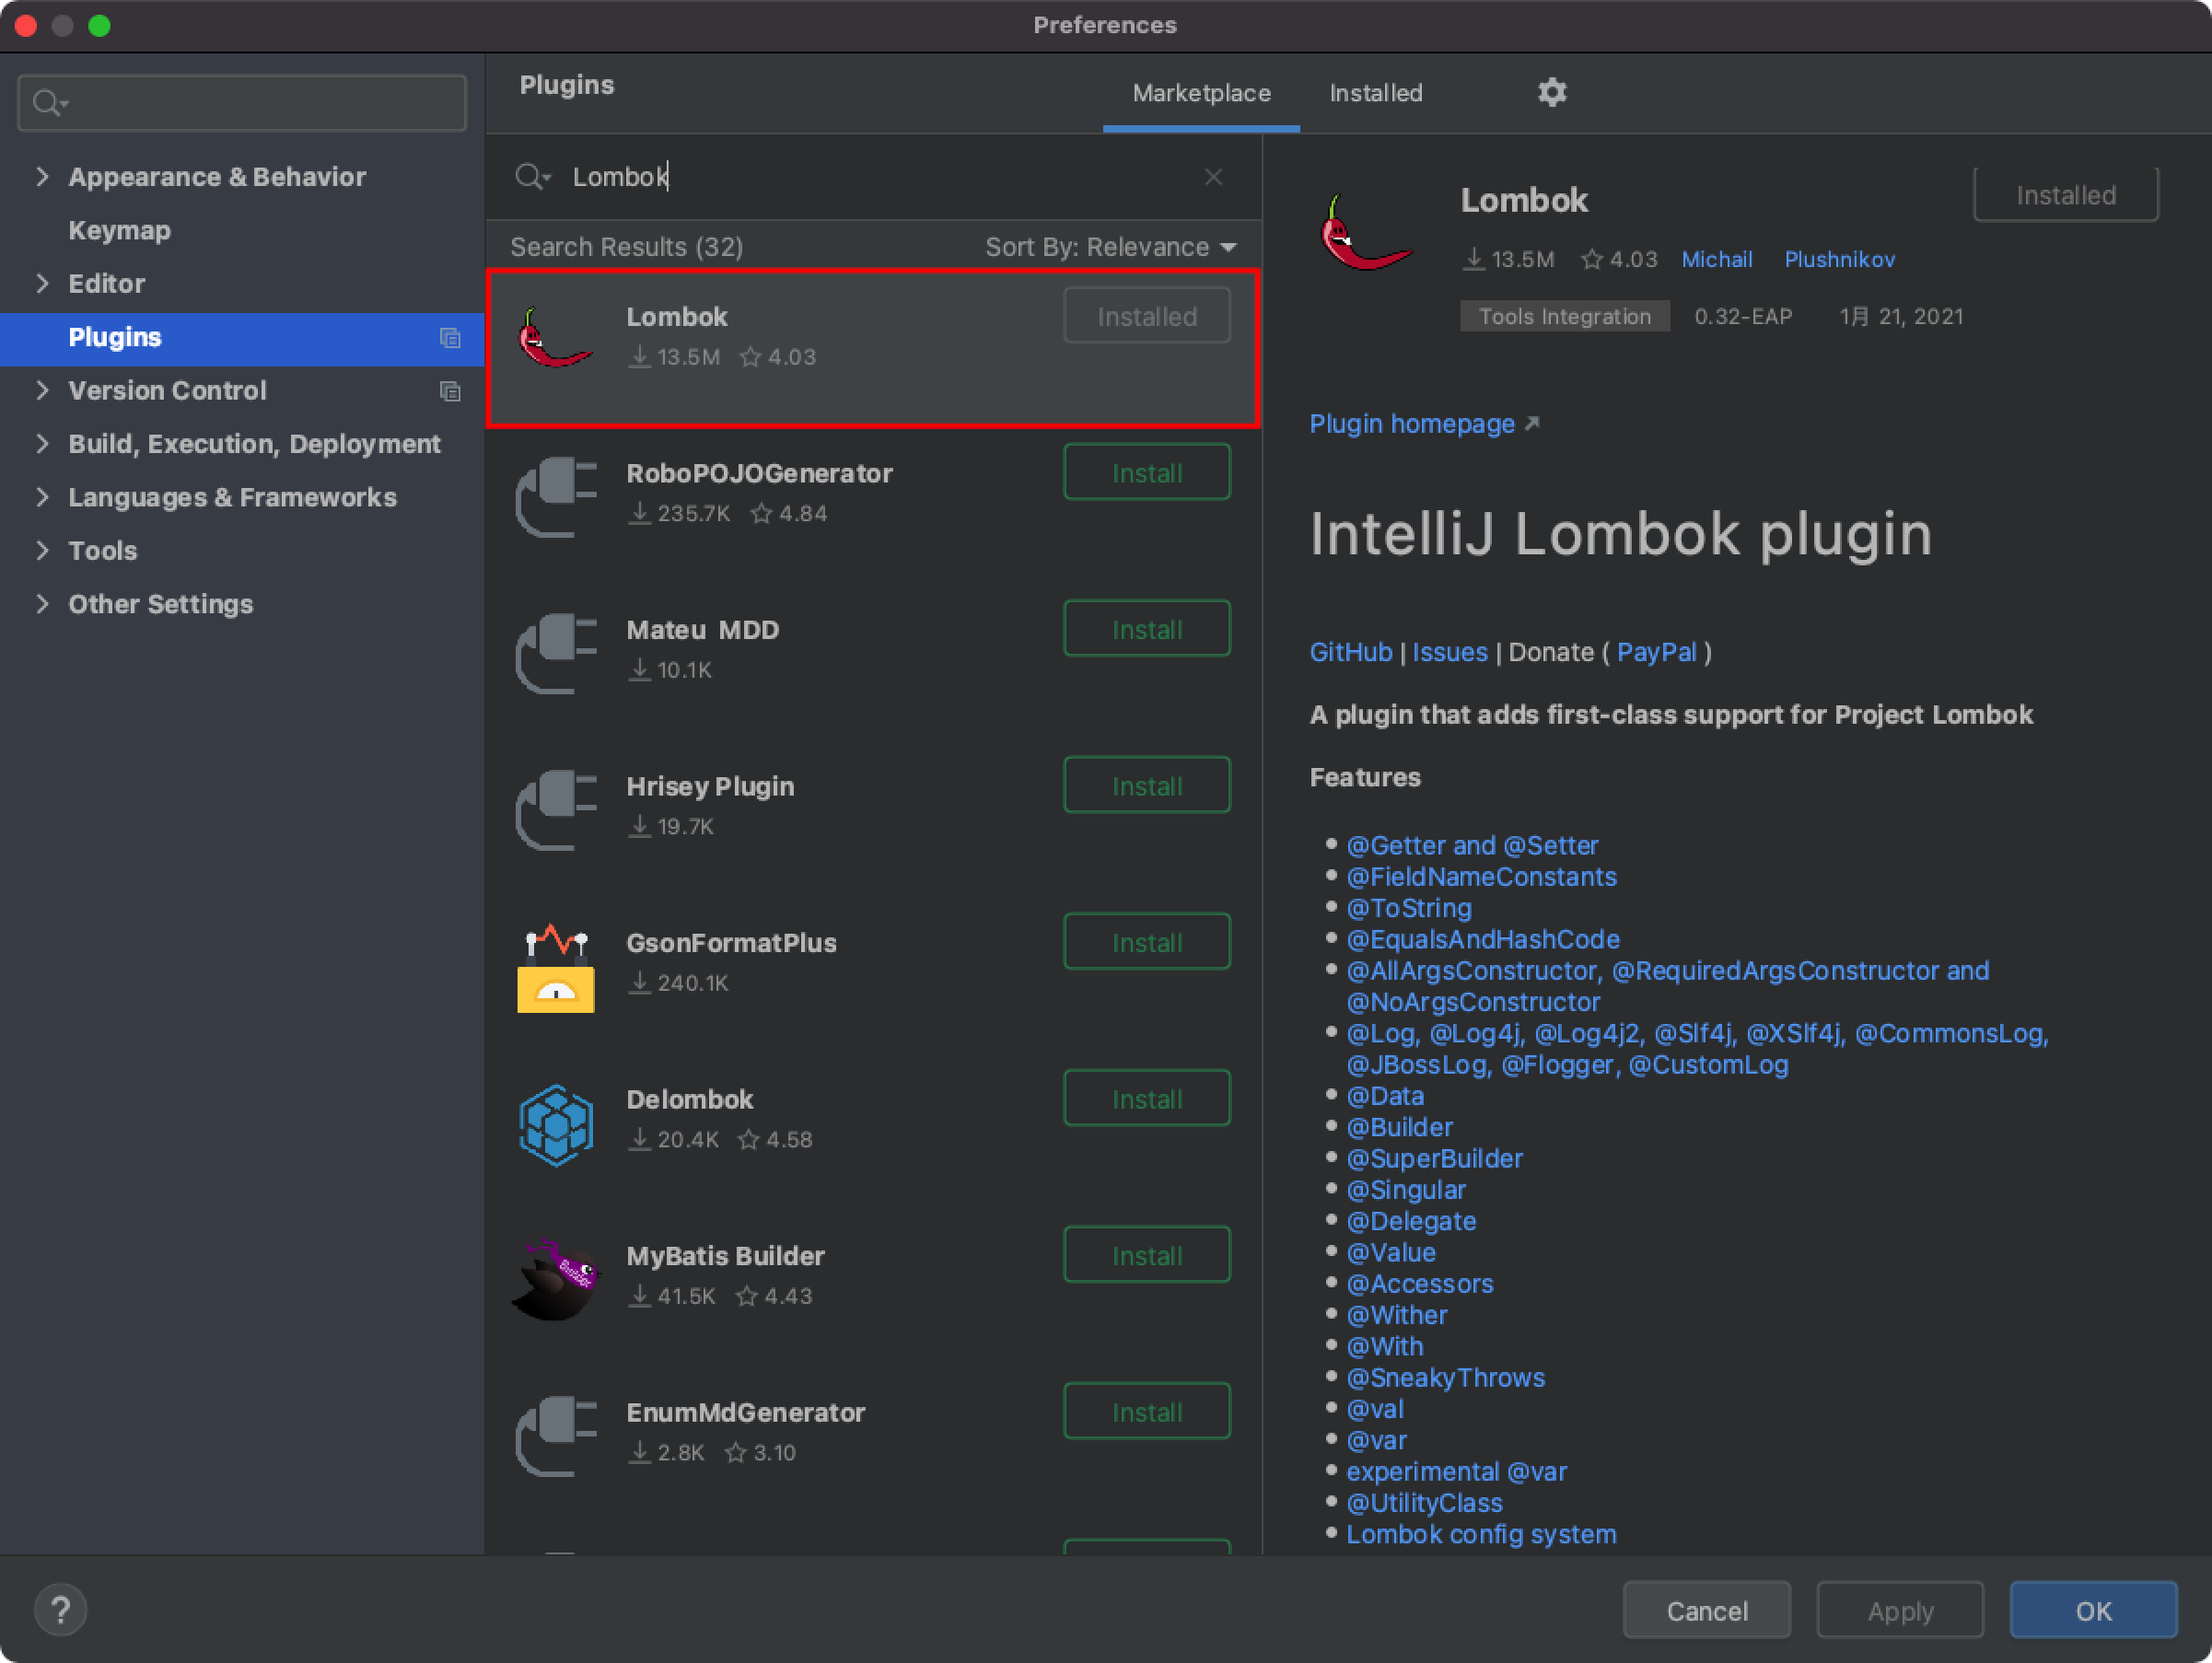
使用lombok需安装lombok插件,如果已安装此处可忽略。
4、添加代码生成器CodeGenerator
执行生成代码,
/**
 * @author zhanglei
 * 演示例子,执行 main 方法控制台输入模块表名回车自动生成对应项目目录中
 */
public class CodeGenerator {

    /**
     * <p>
     * 读取控制台内容
     * </p>
     */
    public static String scanner(String tip) {
        Scanner scanner = new Scanner(System.in);
        StringBuilder help = new StringBuilder();
        help.append(\"请输入\" + tip + \":\");
        System.out.println(help.toString());
        if (scanner.hasNext()) {
            String ipt = scanner.next();
            if (StringUtils.isNotBlank(ipt)) {
                return ipt;
            }
        }
        throw new MybatisPlusException(\"请输入正确的\" + tip + \"!\");
    }

    public static void main(String[] args) {
        // 代码生成器
        AutoGenerator mpg = new AutoGenerator();

        // 全局配置
        GlobalConfig gc = new GlobalConfig();
        String projectPath = System.getProperty(\"user.dir\");
        gc.setOutputDir(projectPath + \"/src/main/java\");
        gc.setAuthor(\"zhanglei\");
        gc.setOpen(false);
        // 实体属性 Swagger2 注解
        // gc.setSwagger2(true);
        mpg.setGlobalConfig(gc);

        // 数据源配置
        DataSourceConfig dsc = new DataSourceConfig();
        dsc.setUrl(\"jdbc:mysql://localhost:3306/shop_v1.0?useUnicode=true&useSSL=false&characterEncoding=utf8\");
        // dsc.setSchemaName(\"public\");
        dsc.setDriverName(\"com.mysql.jdbc.Driver\");
        dsc.setUsername(\"root\");
        dsc.setPassword(\"12345678\");
        mpg.setDataSource(dsc);

        // 包配置
        PackageConfig pc = new PackageConfig();
        pc.setModuleName(scanner(\"模块名\"));
        pc.setParent(\"com.zl\");
        mpg.setPackageInfo(pc);

        // 自定义配置
        InjectionConfig cfg = new InjectionConfig() {
            @Override
            public void initMap() {
                // to do nothing
            }
        };

        // 如果模板引擎是 freemarker
        String templatePath = \"/templates/mapper.xml.ftl\";
        // 如果模板引擎是 velocity
        // String templatePath = \"/templates/mapper.xml.vm\";

        // 自定义输出配置
        List<FileOutConfig> focList = new ArrayList<>();
        // 自定义配置会被优先输出
        focList.add(new FileOutConfig(templatePath) {
            @Override
            public String outputFile(TableInfo tableInfo) {
                // 自定义输出文件名 , 如果你 Entity 设置了前后缀、此处注意 xml 的名称会跟着发生变化!!
                return projectPath + \"/src/main/resources/mapper/\" + pc.getModuleName()
                        + \"/\" + tableInfo.getEntityName() + \"Mapper\" + StringPool.DOT_XML;
            }
        });

//        cfg.setFileCreate(new IFileCreate() {
//            @Override
//            public boolean isCreate(ConfigBuilder configBuilder, FileType fileType, String filePath) {
//                // 判断自定义文件夹是否需要创建
//                checkDir(\"调用默认方法创建的目录,自定义目录用\");
//                if (fileType == FileType.MAPPER) {
//                    // 已经生成 mapper 文件判断存在,不想重新生成返回 false
//                    return !new File(filePath).exists();
//                }
//                // 允许生成模板文件
//                return true;
//            }
//        });

        cfg.setFileOutConfigList(focList);
        mpg.setCfg(cfg);

        // 配置模板
        TemplateConfig templateConfig = new TemplateConfig();

        // 配置自定义输出模板
        // 指定自定义模板路径,注意不要带上.ftl/.vm, 会根据使用的模板引擎自动识别
        // templateConfig.setEntity(\"templates/entity2.java\");
        // templateConfig.setService();
        // templateConfig.setController();

        templateConfig.setXml(null);
        mpg.setTemplate(templateConfig);

        // 策略配置
        StrategyConfig strategy = new StrategyConfig();
        strategy.setNaming(NamingStrategy.underline_to_camel);
        strategy.setColumnNaming(NamingStrategy.underline_to_camel);
        // strategy.setSuperEntityClass(\"你自己的父类实体,没有就不用设置!\");
        strategy.setEntityLombokModel(true);
        strategy.setRestControllerStyle(true);
        // 公共父类
        // strategy.setSuperControllerClass(\"你自己的父类控制器,没有就不用设置!\");
        // 写于父类中的公共字段
        // strategy.setSuperEntityColumns(\"id\");
        strategy.setInclude(scanner(\"表名,多个英文逗号分割\").split(\",\"));
        strategy.setControllerMappingHyphenStyle(true);
        // strategy.setTablePrefix(pc.getModuleName() + \"_\");
        // 处理表前缀
        strategy.setTablePrefix(\"t_\");
        mpg.setStrategy(strategy);
        mpg.setTemplateEngine(new FreemarkerTemplateEngine());
        mpg.execute();
    }
}

将生成的代码复制到对应文件夹下。
5、添加配置文件
server.port=8089

spring.datasource.driver-class-name=com.mysql.jdbc.Driver
spring.datasource.url=jdbc:mysql://localhost:3306/shop_v1.0?characterEncoding=utf-8&useSSL=false
spring.datasource.username=root
spring.datasource.password=12345678
6、添加MybatisPlusConfig
/**
 * @author zhanglei
 */
@Configuration
@MapperScan(\"com.zl.mapper\")
public class MybatisPlusConfig {

    @Bean
    public MybatisPlusInterceptor mybatisPlusInterceptor() {
        MybatisPlusInterceptor interceptor = new MybatisPlusInterceptor();
        interceptor.addInnerInterceptor(new PaginationInnerInterceptor(DbType.MYSQL));
        return interceptor;
    }
}
7、添加Swagger2Config
/**
 * @author zhanglei
 */
@Configuration
@EnableSwagger2
@EnableSwaggerBootstrapUI
public class Swagger2Config {

    @Bean
    public Docket docket() {
        return new Docket(DocumentationType.SWAGGER_2)
                .apiInfo(new ApiInfoBuilder().title(\"springboot+vue前后端分离demo接口文档\").build());
    }

}
8、添加通用返回
package com.zl.entity;

import java.util.HashMap;

public class R extends HashMap<String, Object> {

    private static final int OK = 200;
    private static final int ERROR = 400;

    private int code;
    private String msg;
    private Object data;

    public R(int code, String msg, Object data) {
        this.put(\"code\", code);
        this.put(\"msg\", msg);
        this.put(\"data\", data);
    }

    public R(int code, String msg) {
        this.put(\"code\", code);
        this.put(\"msg\", msg);
    }

    public R() {

    }

    public int getCode() {
        return (Integer) this.get(\"code\");
    }

    public void setCode(int code) {
        this.put(\"code\", code);
    }

    public String getMsg() {
        return (String) this.get(\"msg\");
    }

    public void setMsg(String msg) {
        this.put(\"msg\", msg);
    }

    public Object getData() {
        return this.get(\"data\");
    }

    public void setData(Object data) {
        this.put(\"data\", data);
    }

    public static R ok() {
        return new R(OK, \"操作成功\");
    }

    public static R ok(String msg) {
        return new R(OK, msg);
    }

    public static R ok(Object data) {
        return new R(OK, \"操作成功\", data);
    }

    public static R ok(String msg, Object data) {
        return new R(OK, msg, data);
    }

    public static R ok(int code, String msg, Object data) {
        return new R(code, msg, data);
    }

    public static R error() {
        return new R(ERROR, \"操作失败\");
    }

    public static R error(String msg) {
        return new R(ERROR, msg);
    }

    public static R error(int code, String msg) {
        return new R(code, msg);
    }

}
9、修改UserController
@Api(tags = \"用户管理\")
@Slf4j
@CrossOrigin
@RestController
public class UserController {

    @Resource
    private IUserService userService;

    @GetMapping(\"/user\")
    public R queryUsers(@RequestParam(value = \"pageNum\", defaultValue = \"1\") int pageNum,
                        @RequestParam(value = \"pageSize\", defaultValue = \"5\") int pageSize,
                        HttpServletRequest request) {
        String username = request.getParameter(\"username\");
        String name = request.getParameter(\"name\");

        Page<User> page = new Page<>(pageNum, pageSize);
        QueryWrapper<User> queryWrapper = new QueryWrapper<>();
        queryWrapper.orderByDesc(\"create_time\");
        if (!StringUtils.isEmpty(username)) {
            queryWrapper.like(\"username\", username);
        }
        if (!StringUtils.isEmpty(name)) {
            queryWrapper.like(\"name\", name);
        }
        userService.page(page, queryWrapper);

        log.info(\"当前页数\" + page.getCurrent());
        log.info(\"总页数\" + page.getPages());
        log.info(\"每页条数\" + page.getSize());
        log.info(\"总条数\" + page.getTotal());
        log.info(\"是否有上一页\" + page.hasPrevious());
        log.info(\"是否有下一页\" + page.hasNext());

        return R.ok(page);
    }

    @GetMapping(\"/user/{id}\")
    public R queryUserById(@PathVariable(\"id\") Long id) {
        return R.ok(userService.getById(id));
    }

    @PostMapping(\"/user\")
    public R insertUser(@RequestBody User user) {
        userService.save(user);
        return R.ok();
    }

    @PutMapping(\"/user\")
    public R updateUser(@RequestBody User user) {
        userService.updateById(user);
        return R.ok();
    }

    @DeleteMapping(\"/user/{id}\")
    public R deleteUserById(@PathVariable(\"id\") Long id) {
        userService.removeById(id);
        return R.ok();
    }

    @DeleteMapping(\"/user\")
    public R deleteUsersByIds(@RequestBody List<Long> ids) {
        userService.removeByIds(ids);
        return R.ok();
    }
}
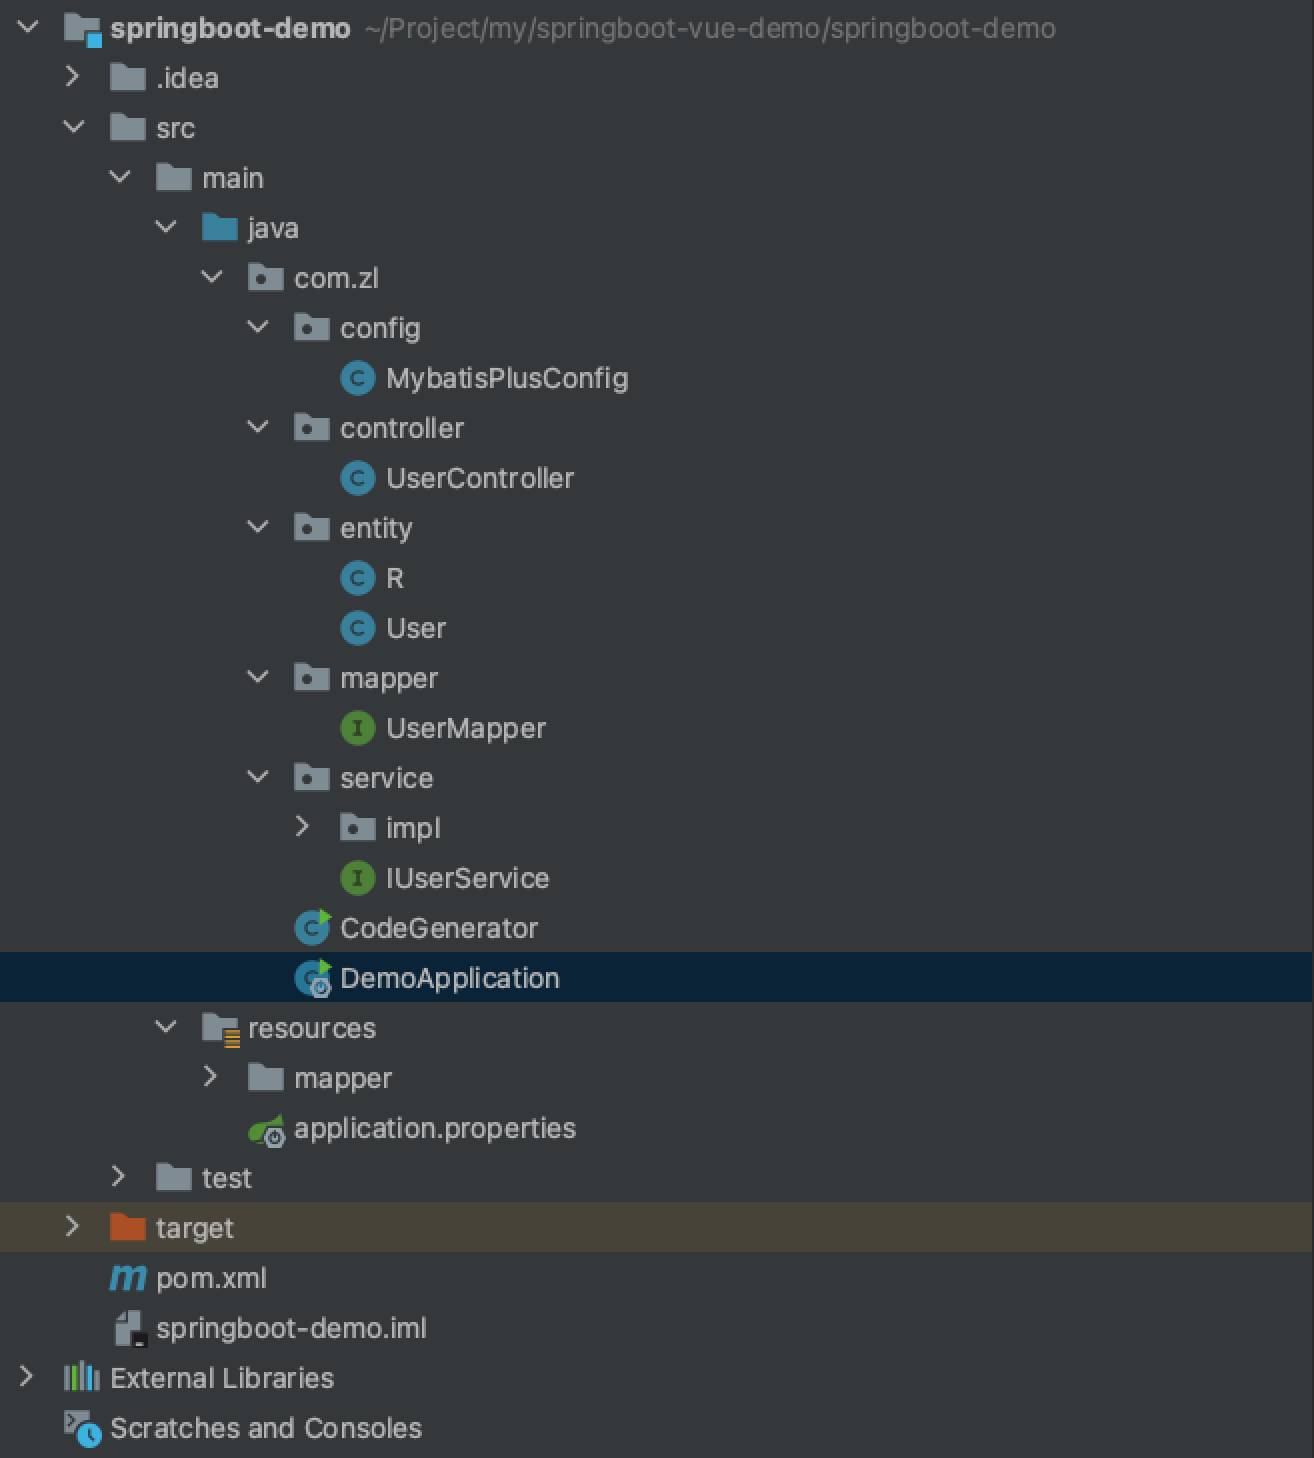
完整工程结构。
最后修改下User实体,解决日期字符串与LocalDate转化问题。
@JsonFormat(pattern = \"yyyy-MM-dd\")
private LocalDate birthday;
完成后启动。
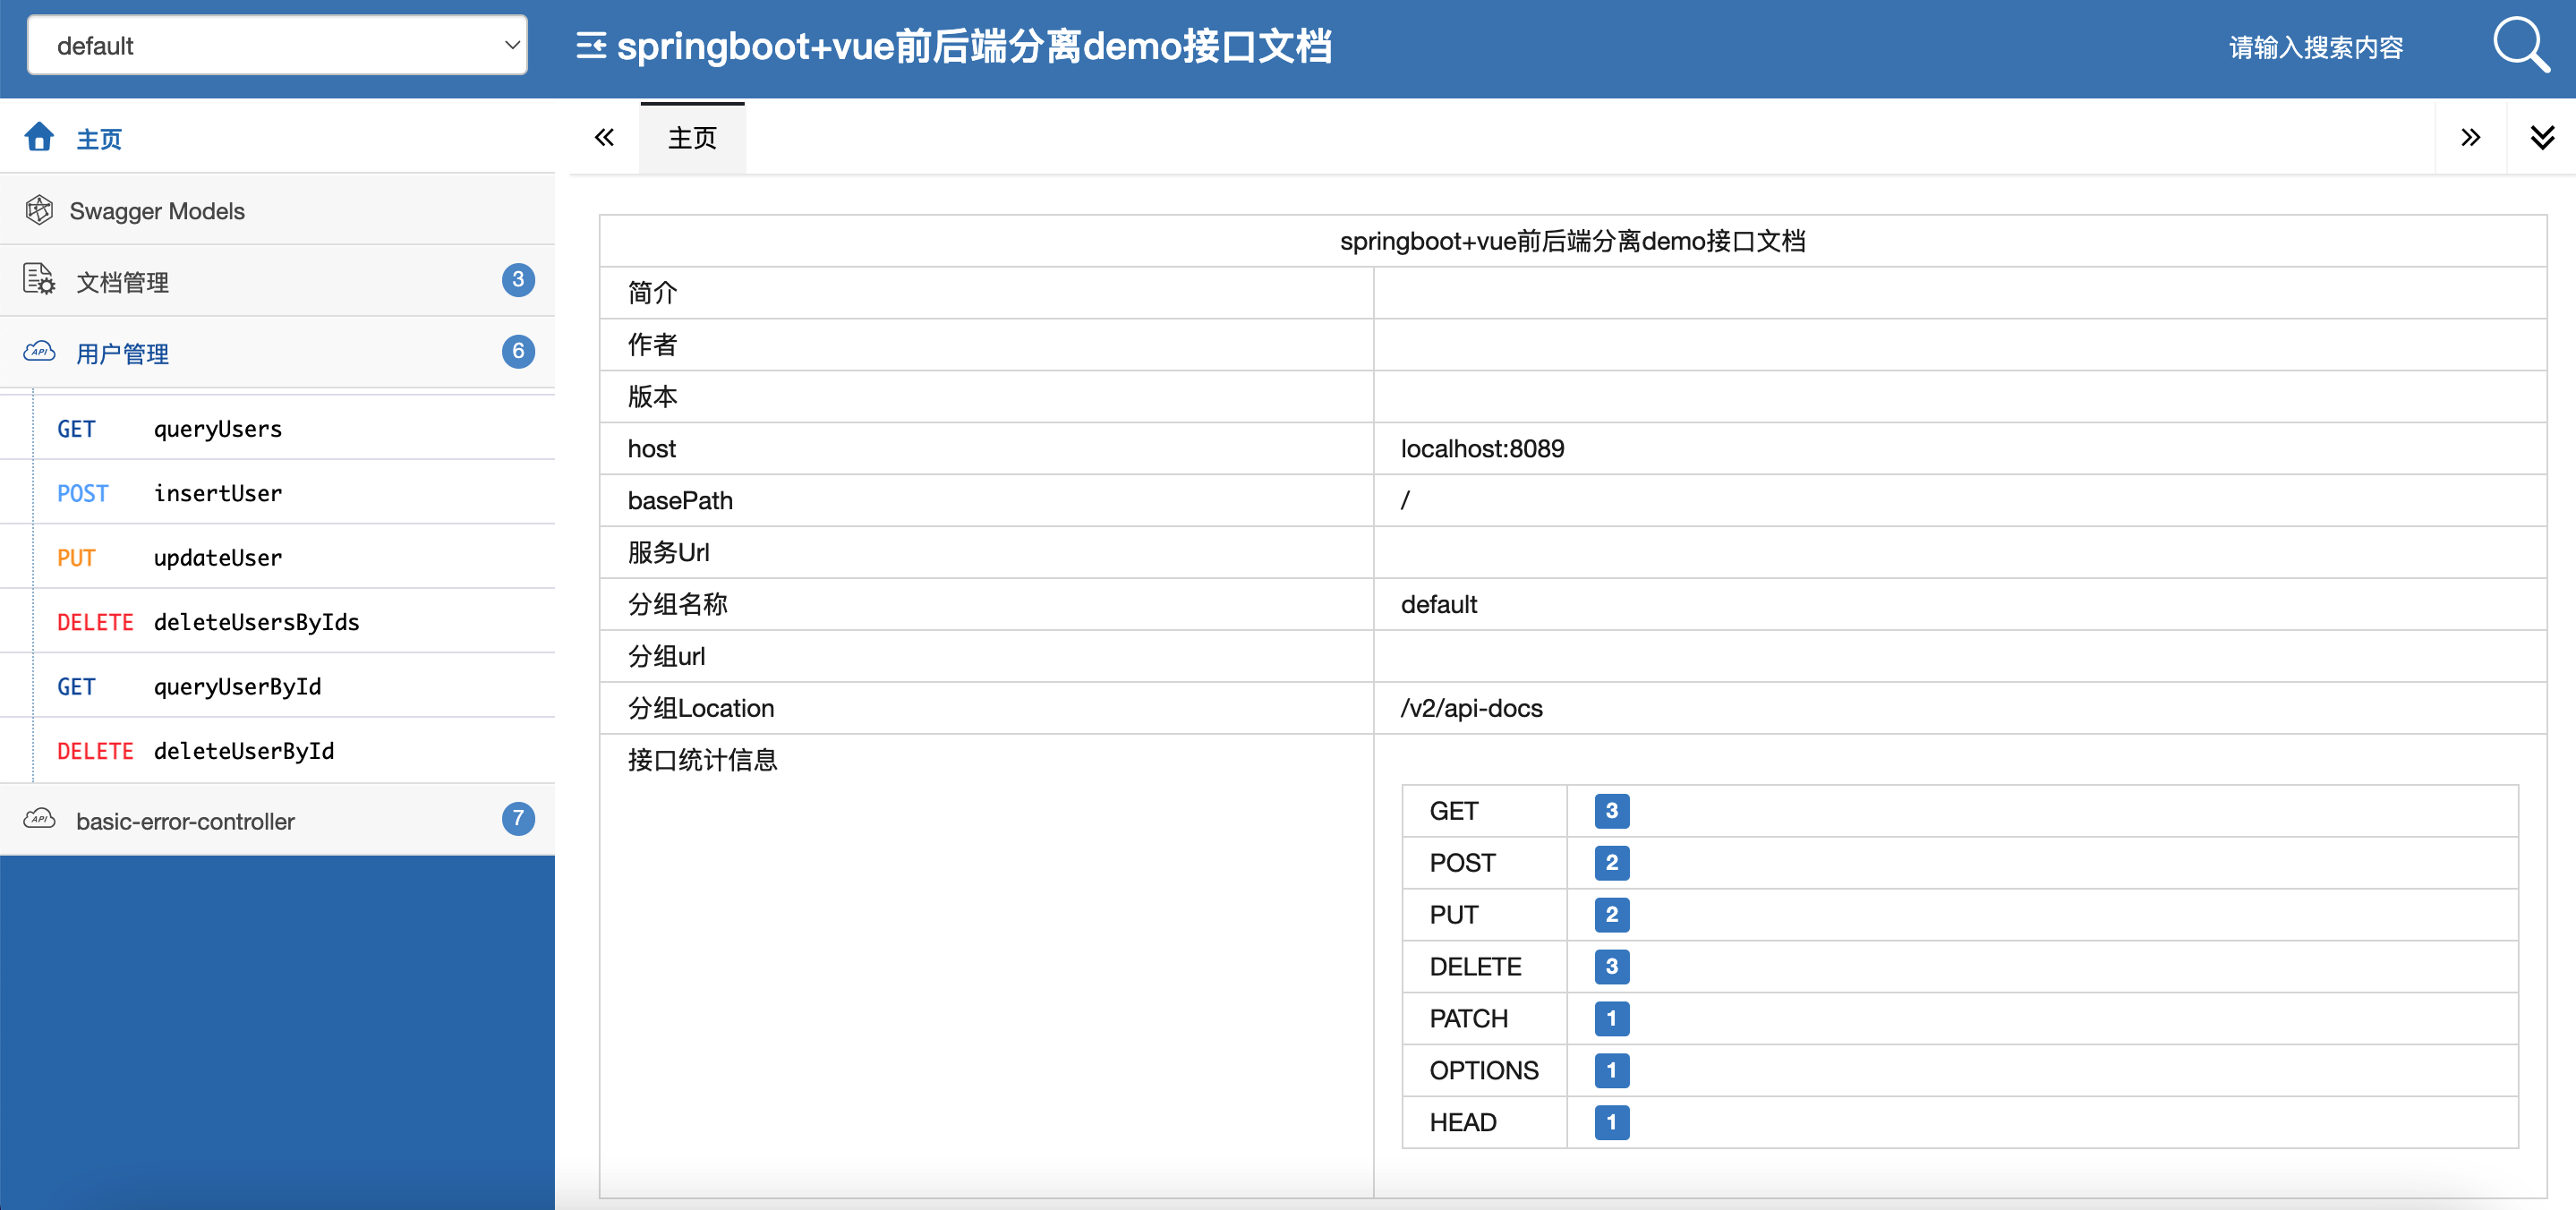
10、接口测试
访问 http://localhost:8089/swagger-ui.html 或者 http://localhost:8089/doc.html 测试一下接口。
二、前端工作
1、安装node.js
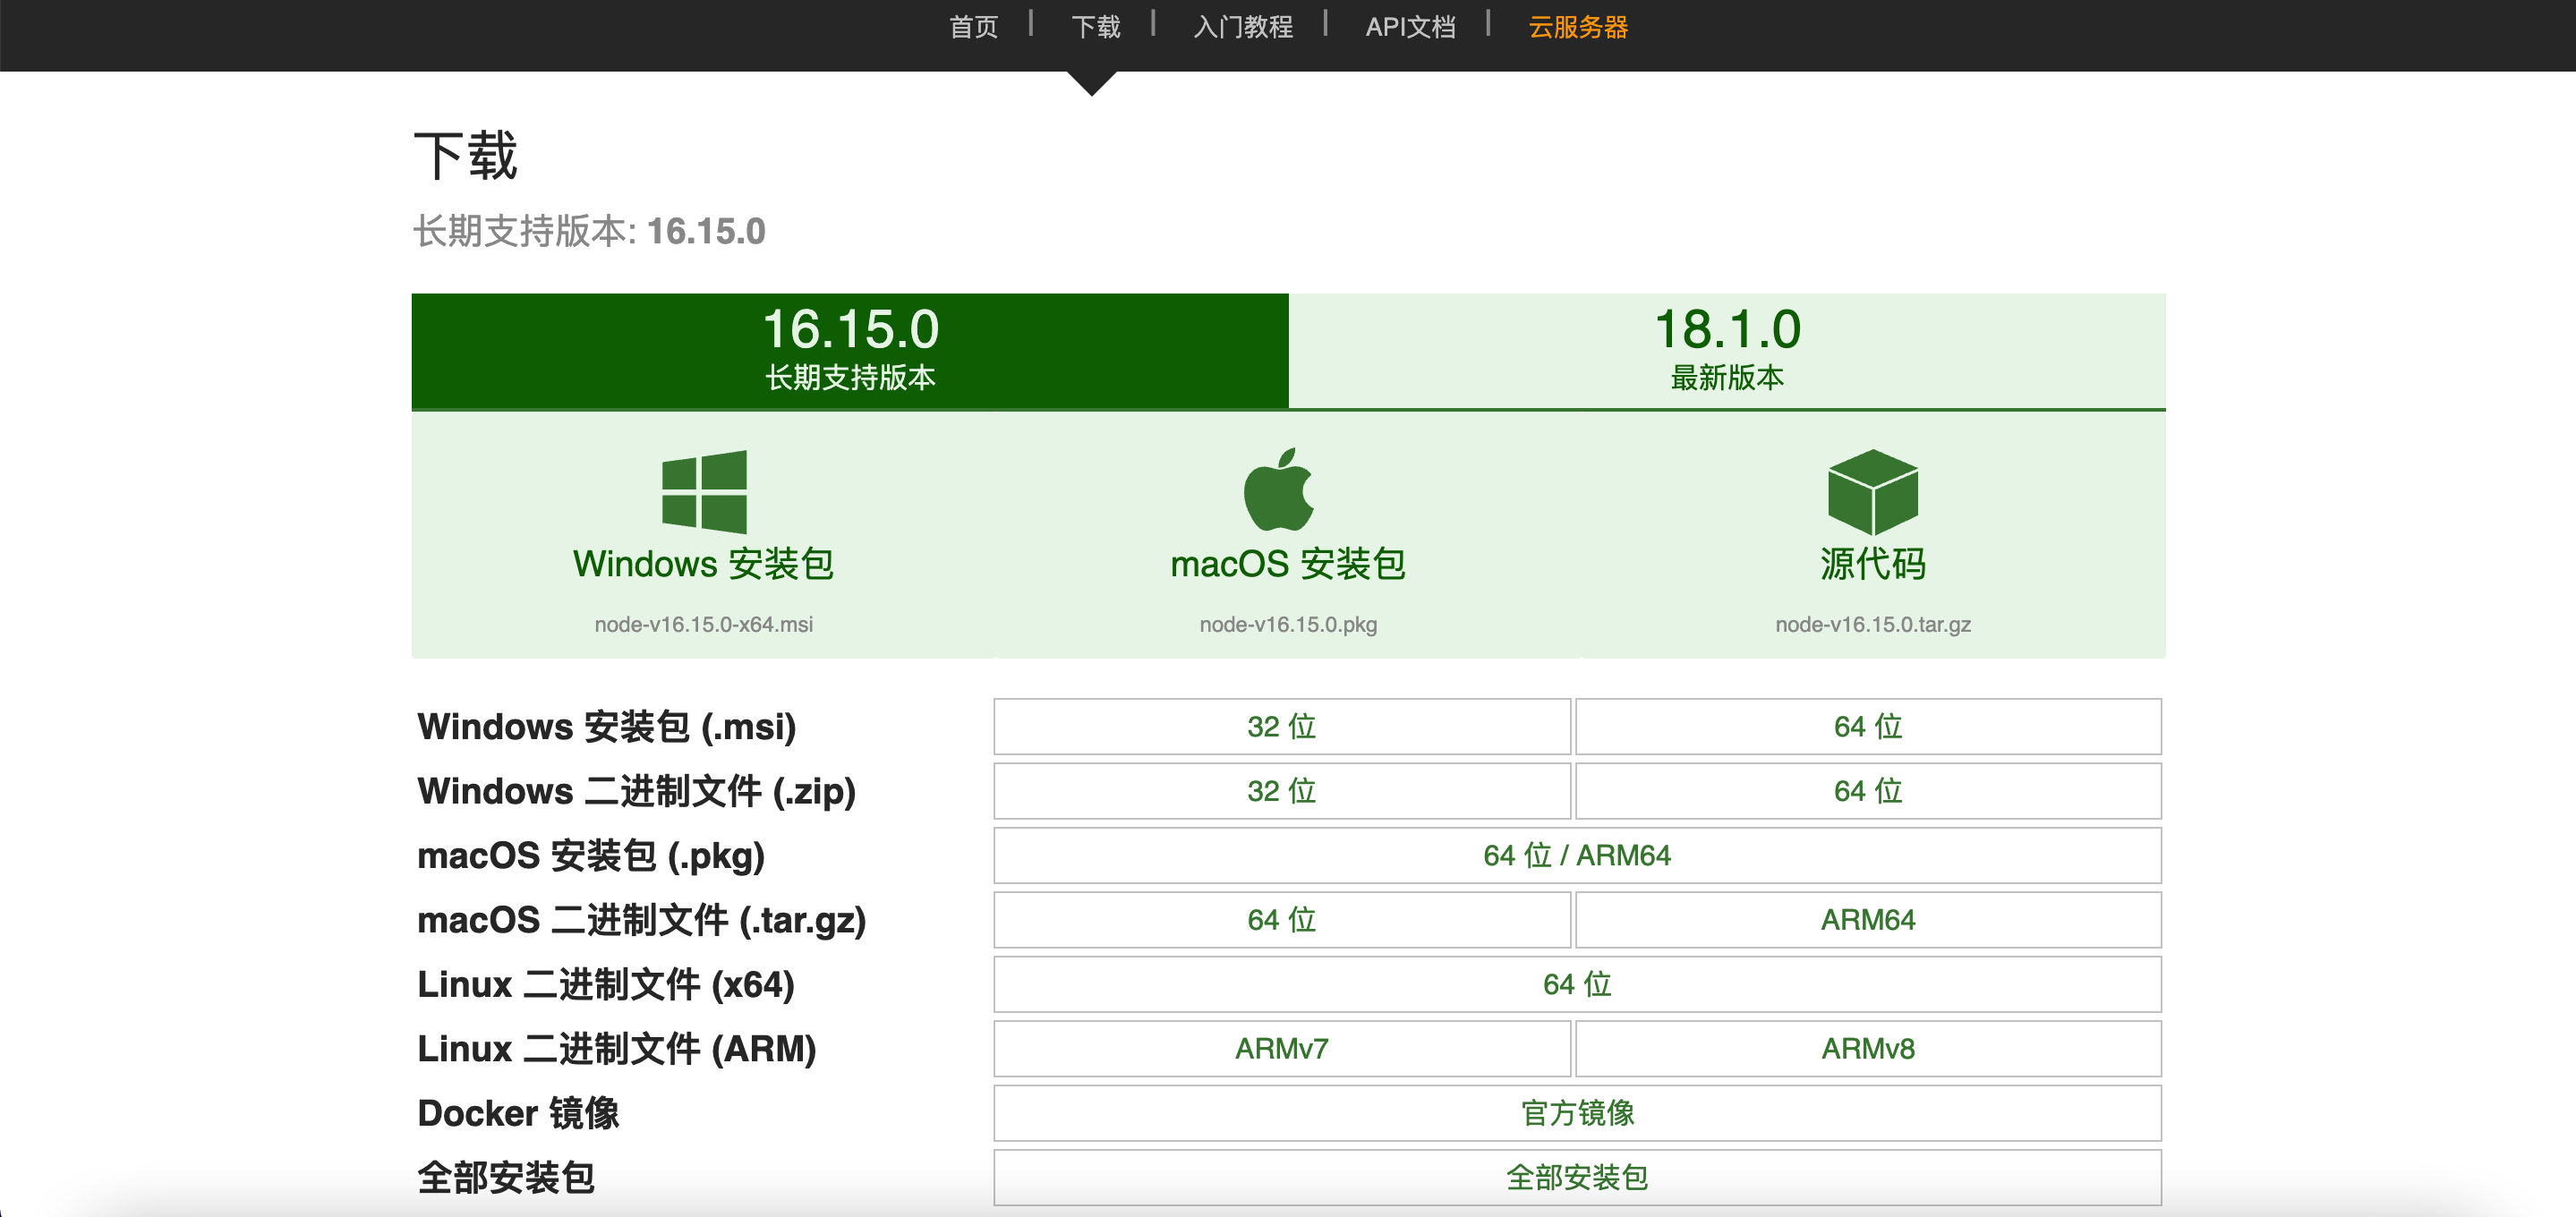
进入官网(http://nodejs.cn/),下载长期支持版并安装。
检查是否安装成功。
node -v
npm -v
2、安装vue脚手架vue-cli
npm install -g @vue/cli
3、vue可视化管理工具创建项目
vue ui
-
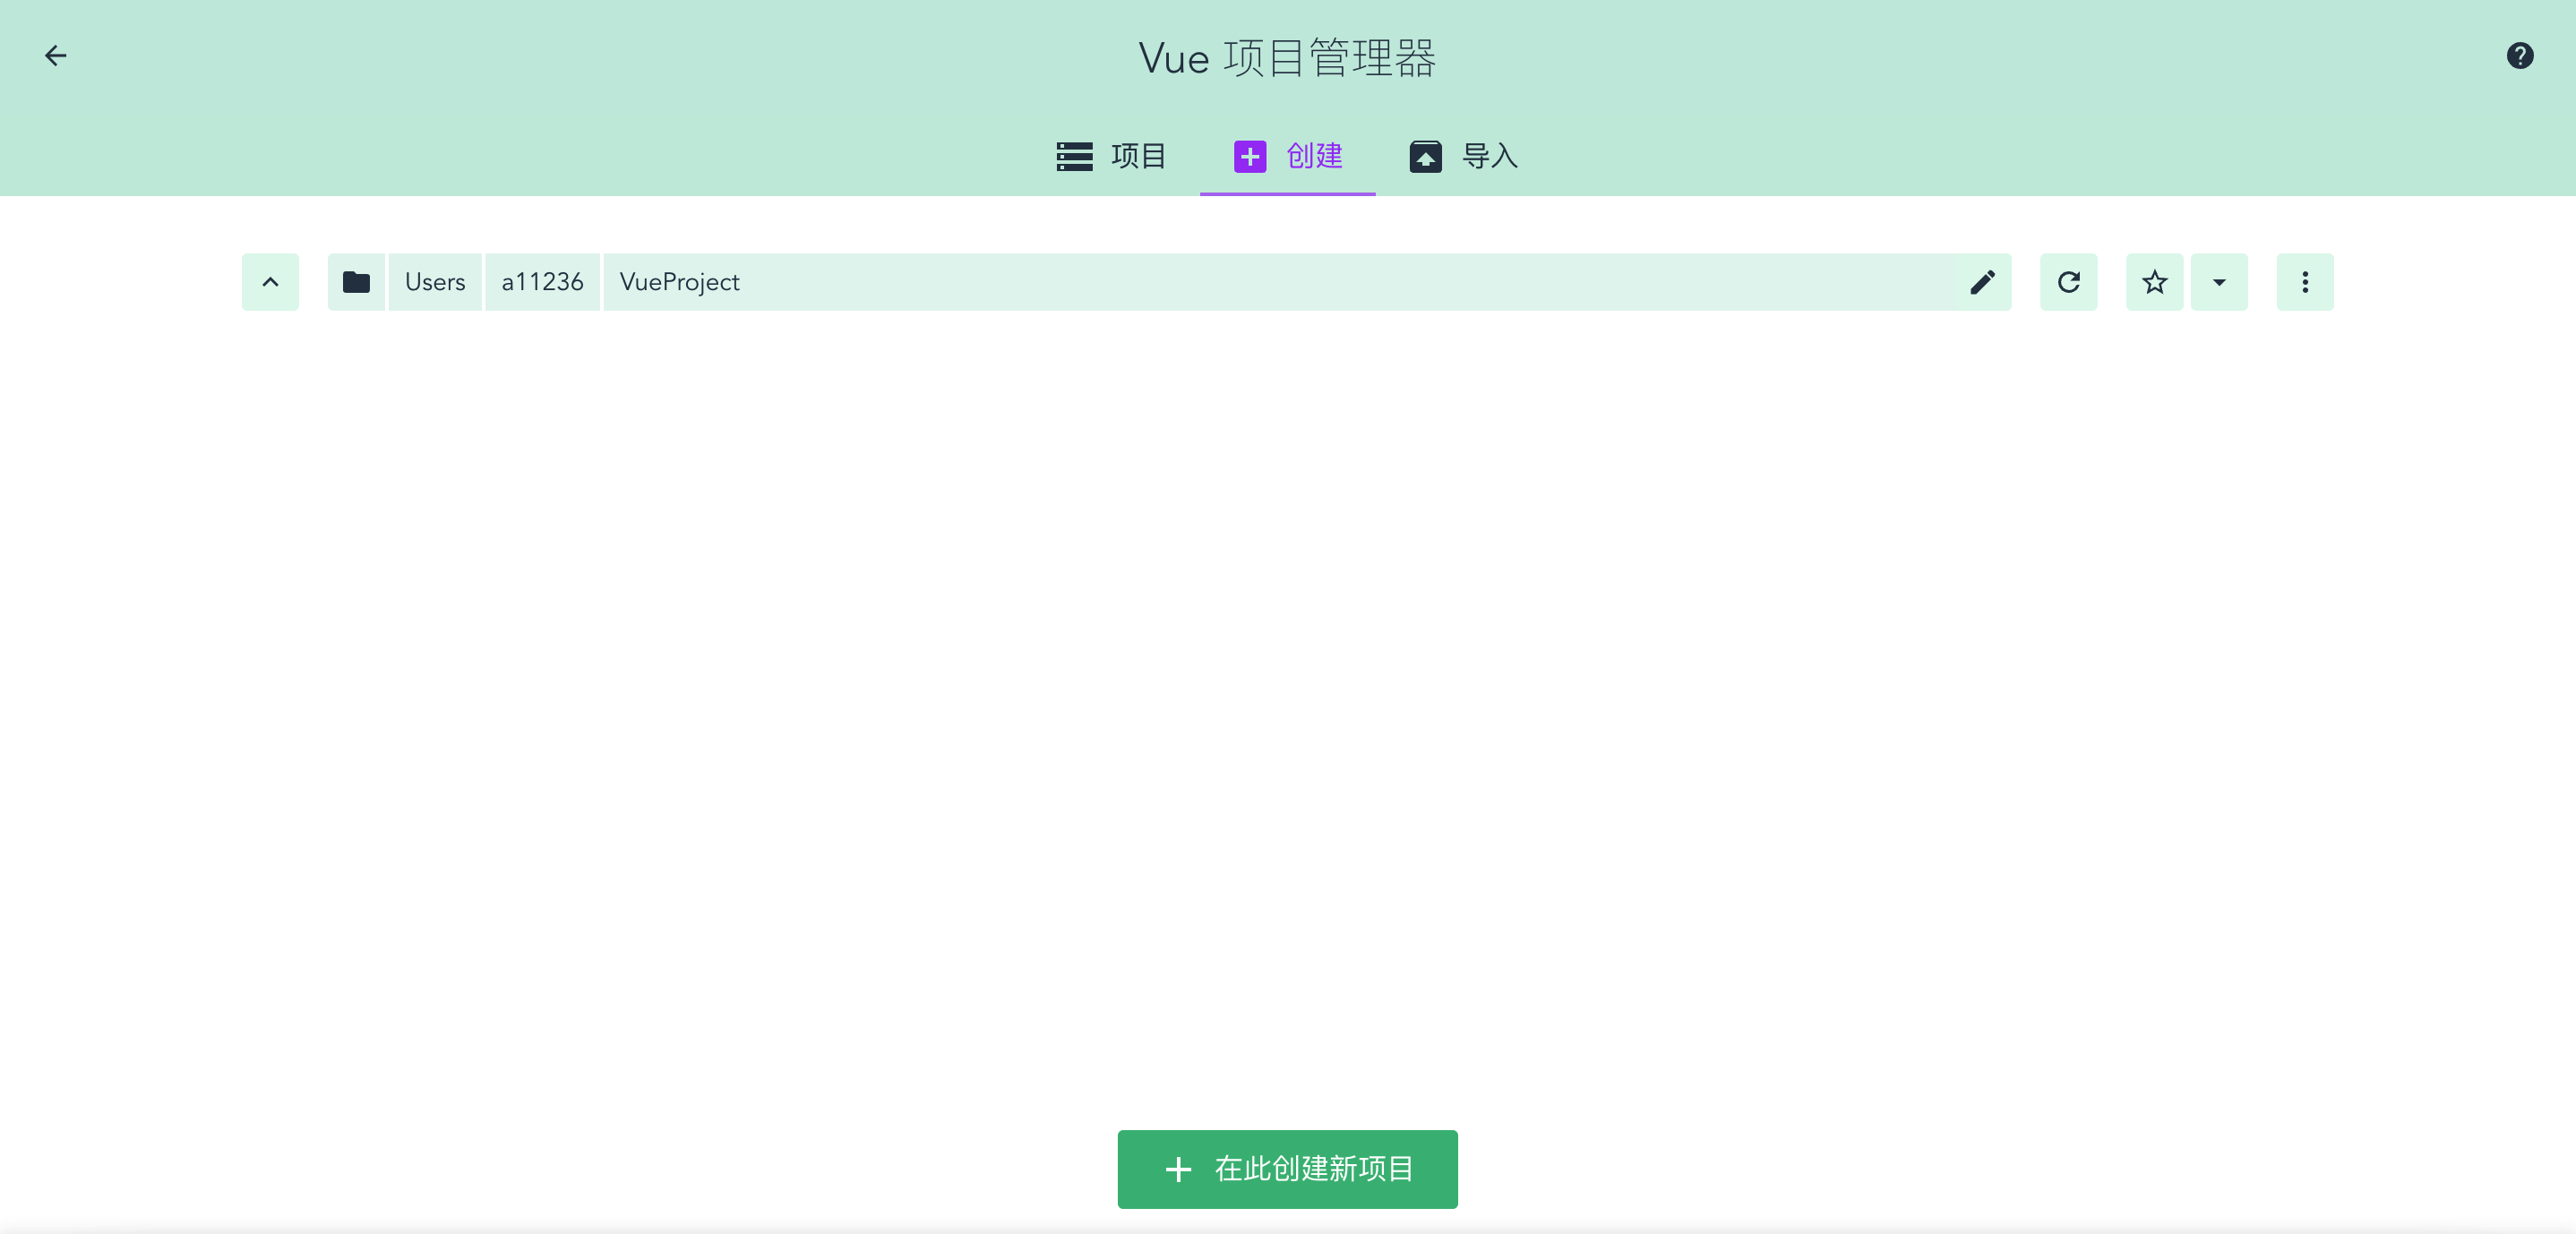
创建
-
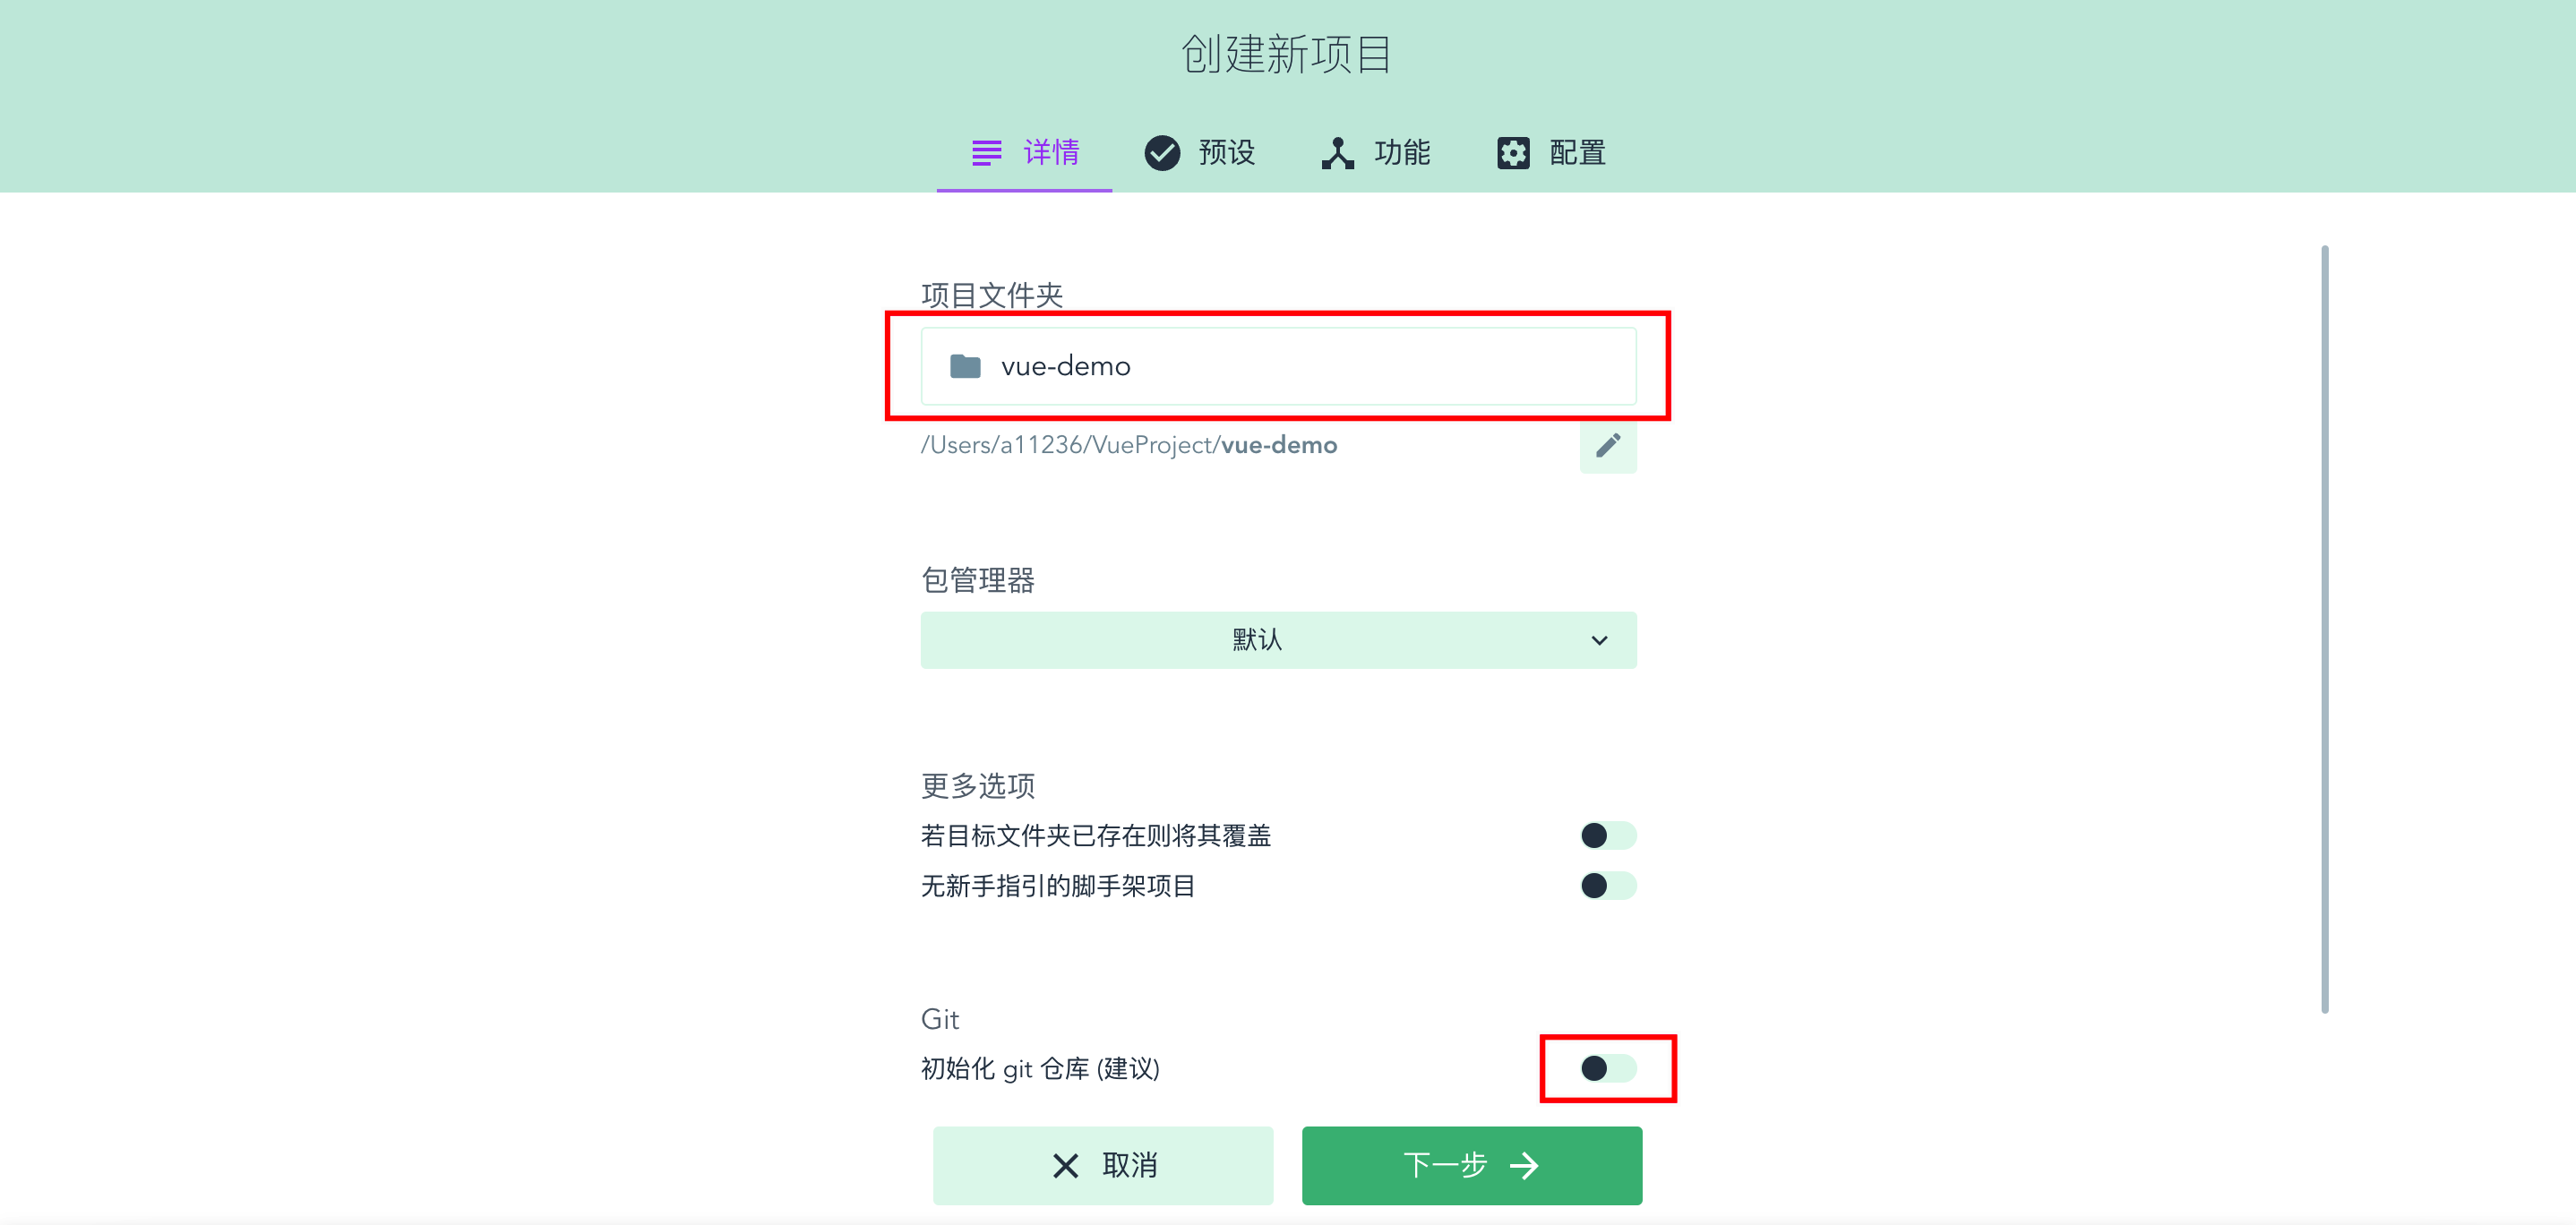
填写项目名称
-
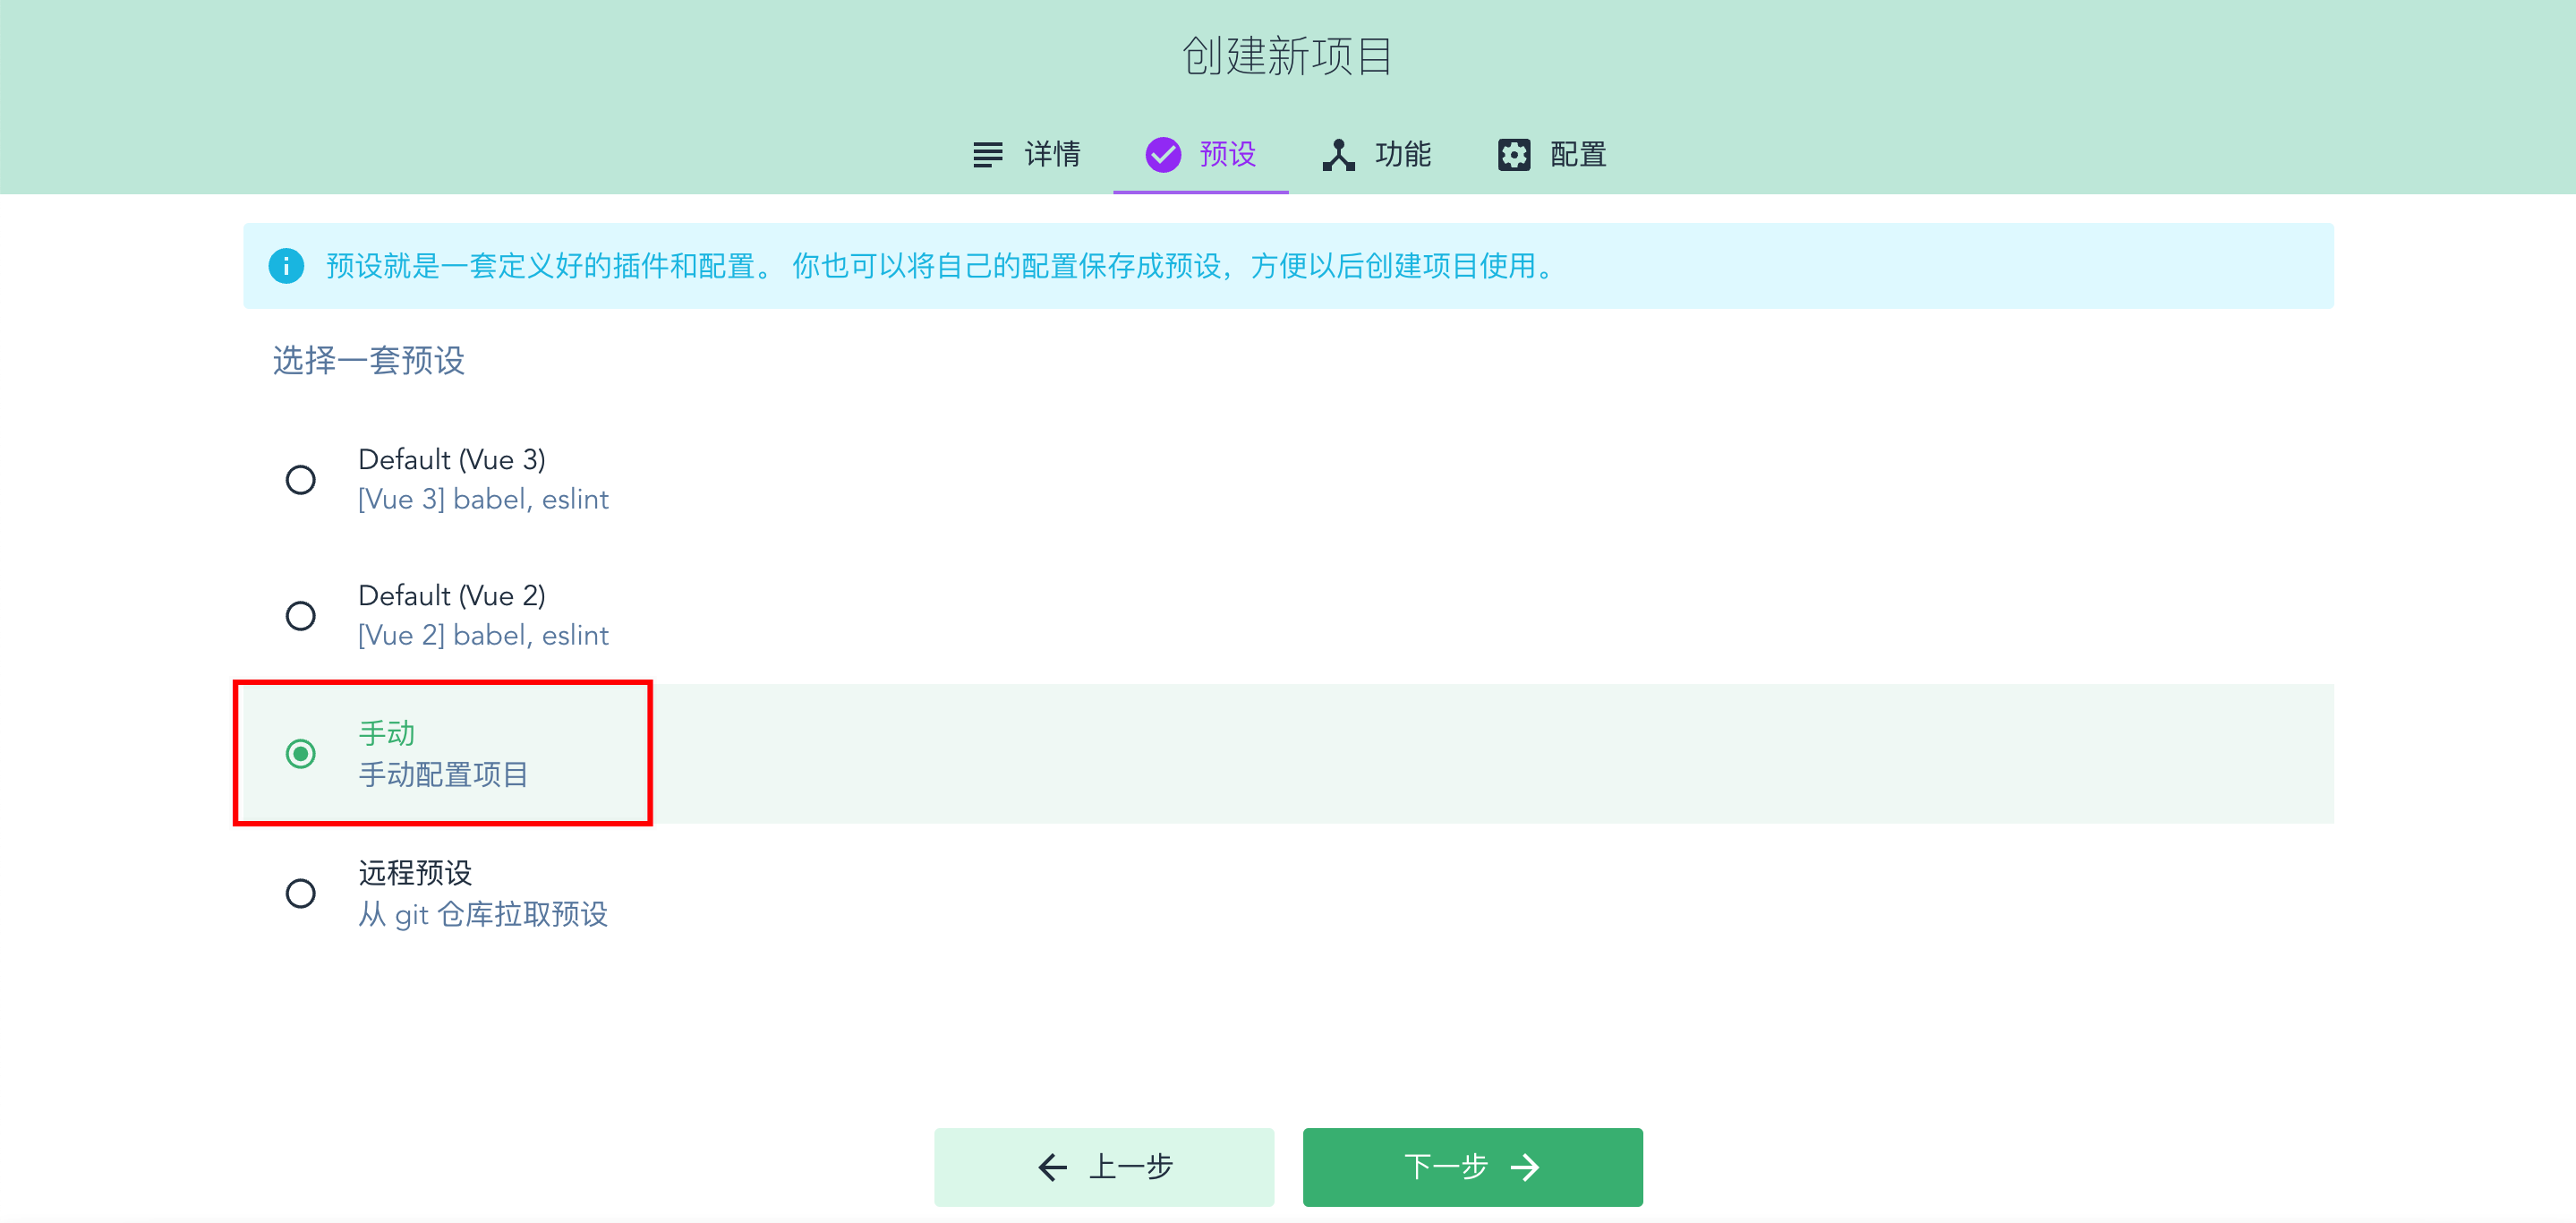
手动配置项目
-
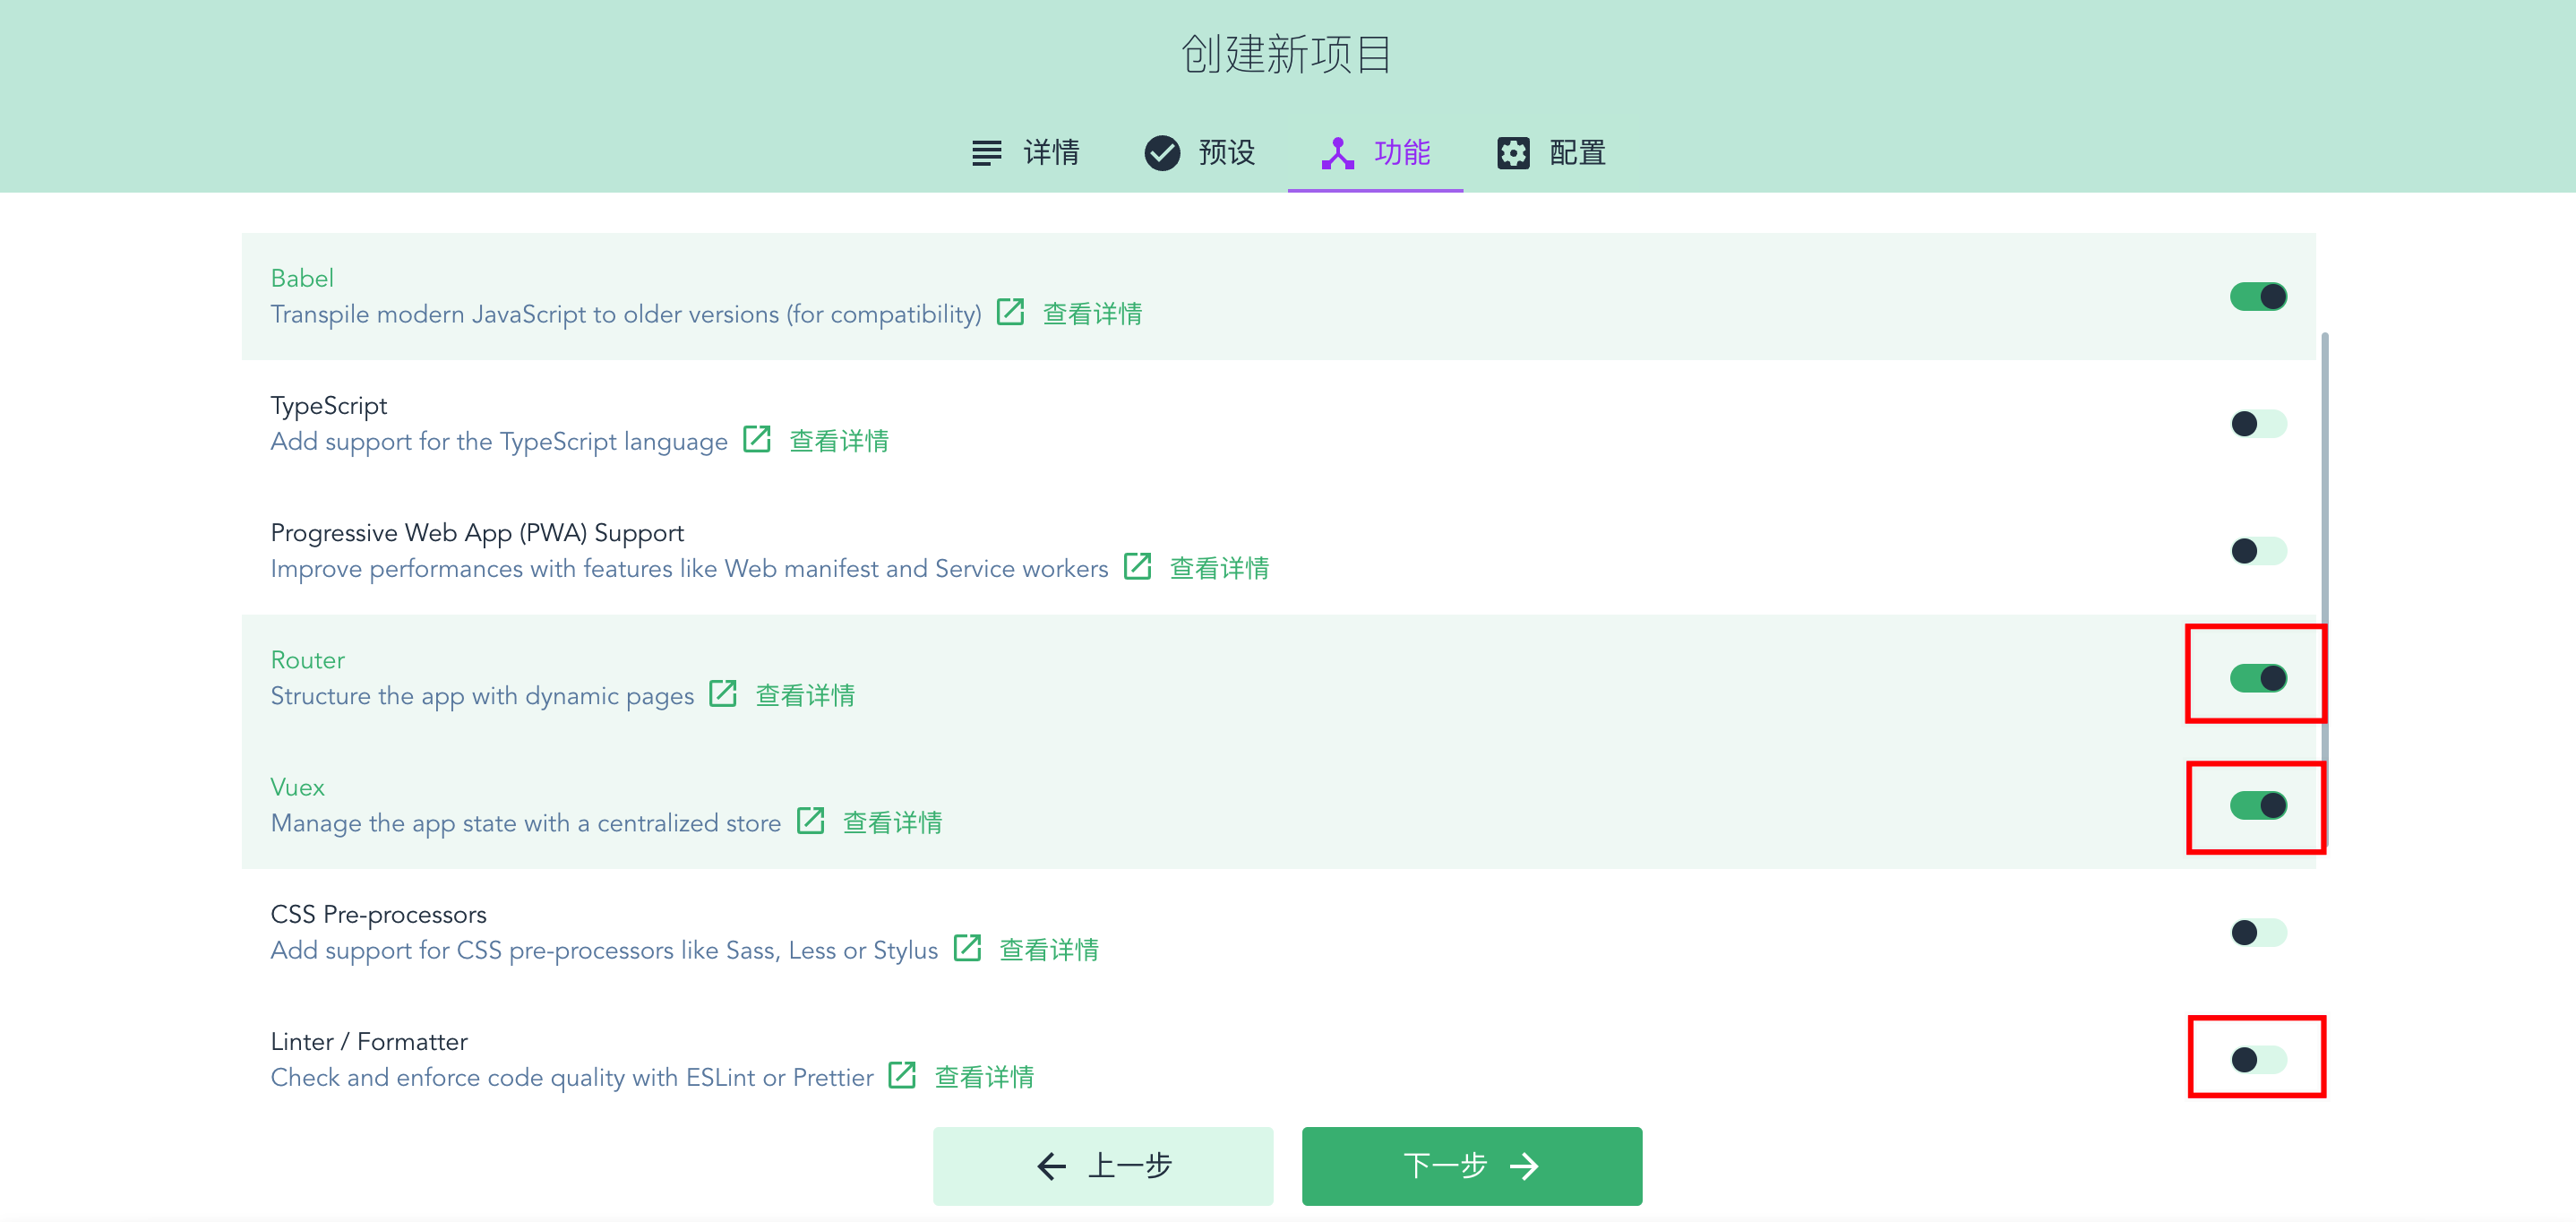
功能配置(注意红框位置,其余保持默认)
-
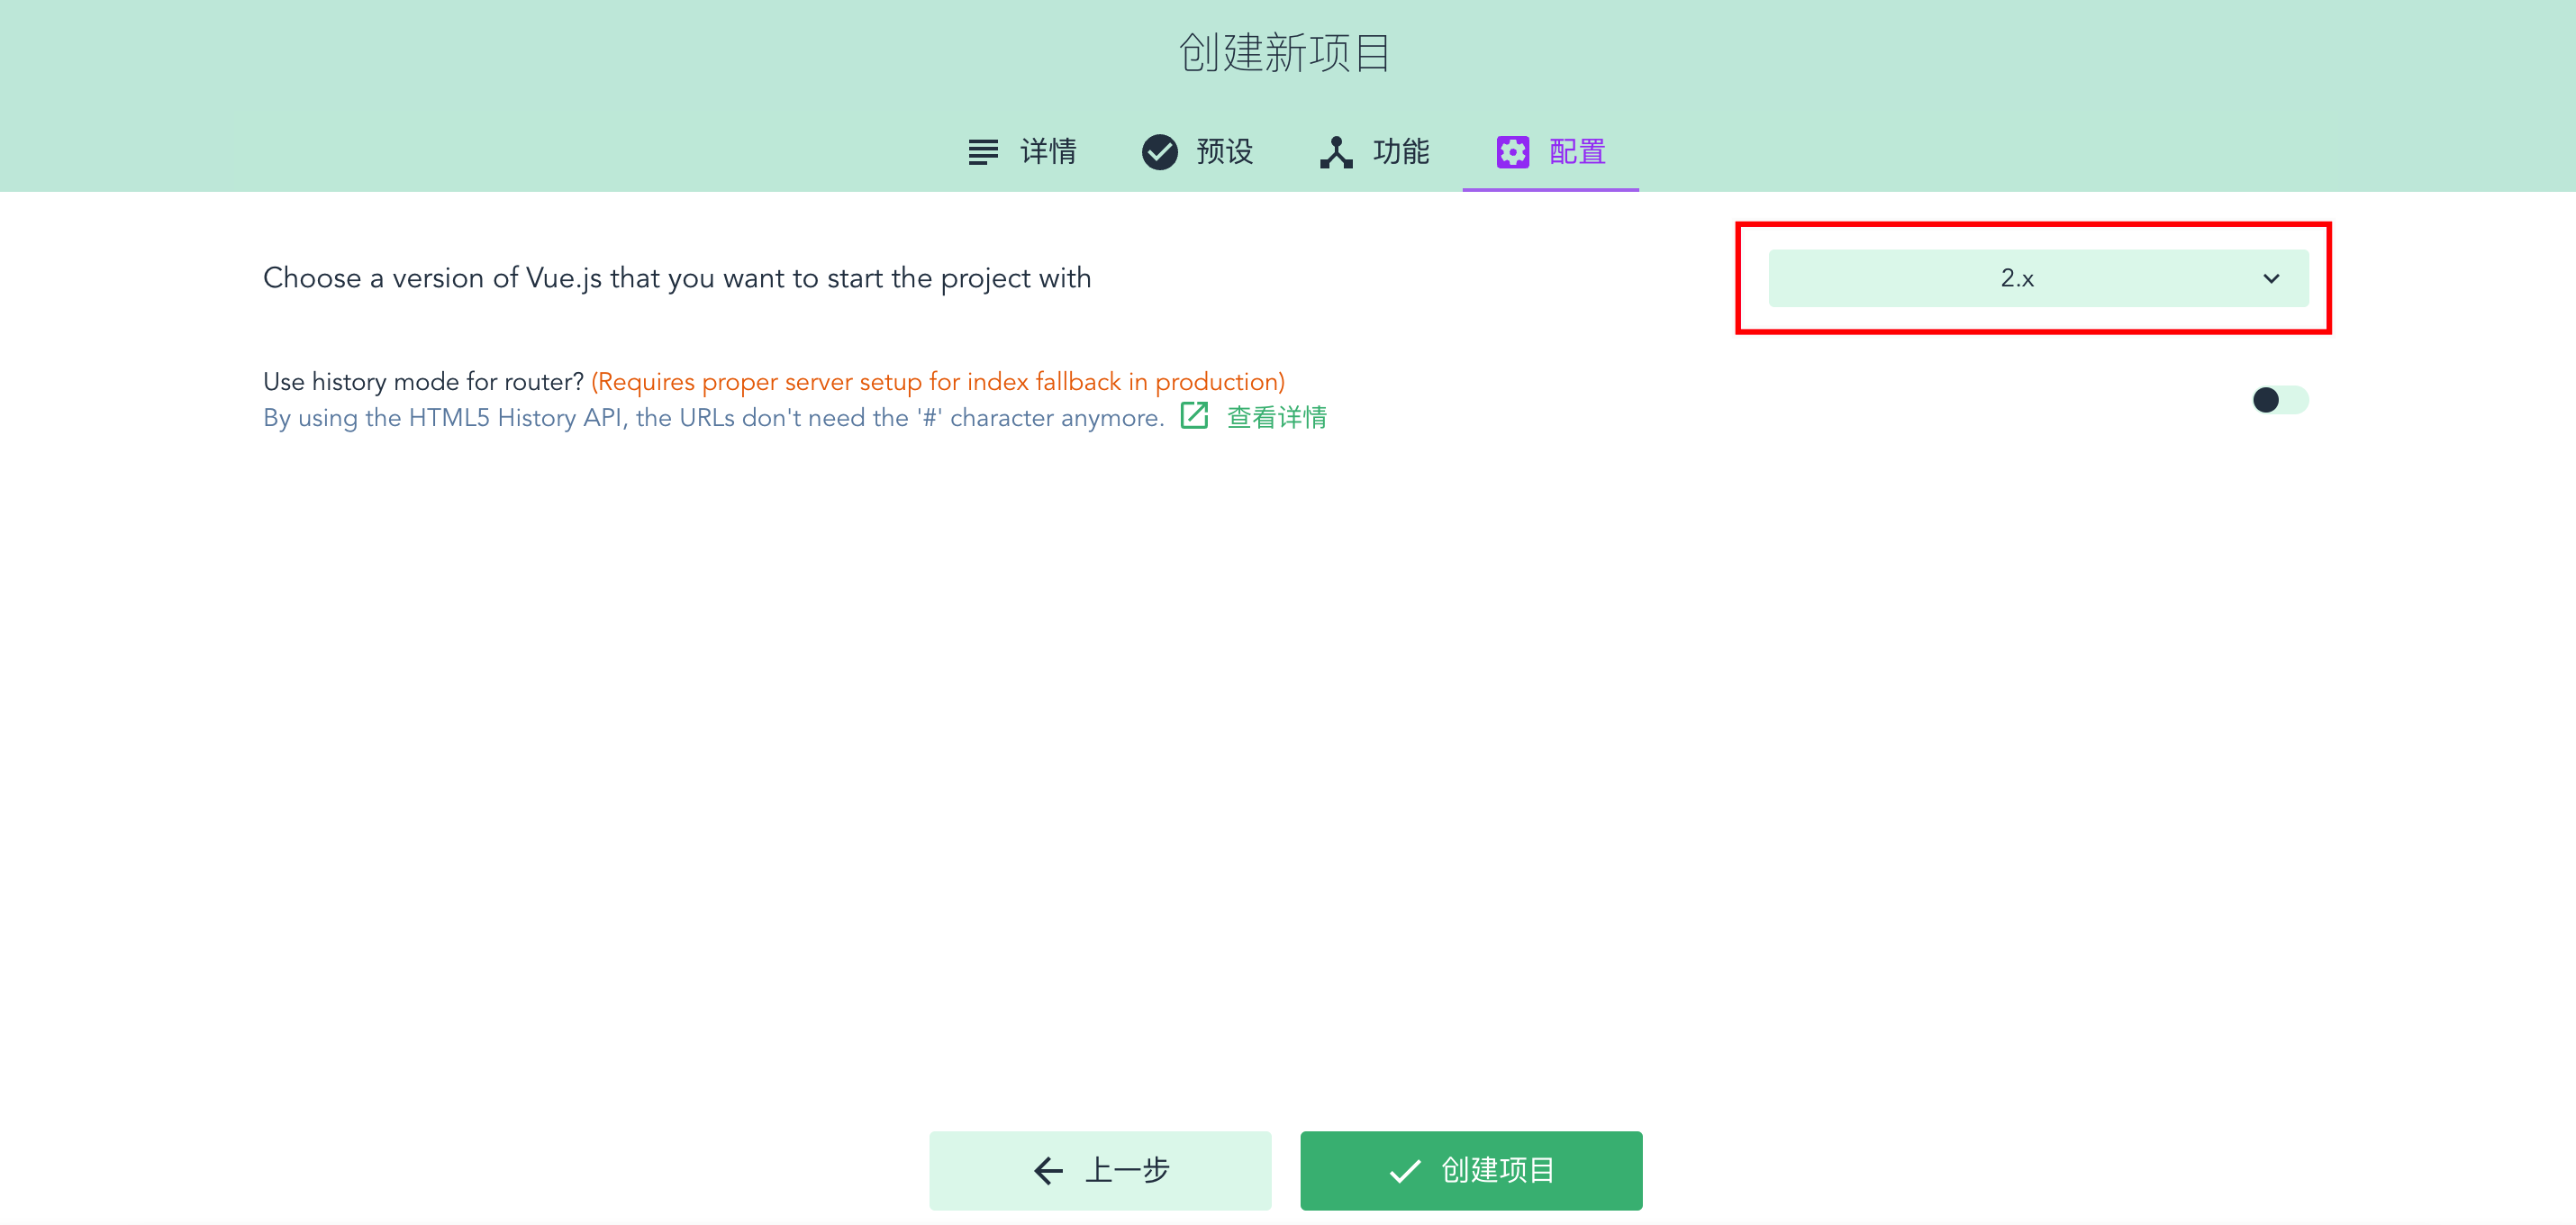
选择Vue2.x
-
创建项目,不保留预设

4、安装依赖
npm install
# 或者
npm install --registry=https://registry.npm.taobao.org
5、项目启动
npm run serve
6、安装element-ui、axios
element-ui
npm install element-ui --save

// 在main.js中引入
import Element from \'element-ui\'
import \"element-ui/lib/theme-chalk/index.css\"
Vue.use(Element)
axios
npm install axios --save

// 在main.js中引入
import axios from \'axios\'
Vue.prototype.$axios = axios
7、添加工具类
src下创建utils文件夹,在文件夹下新建request.js。
import axios from \'axios\'
import {Message} from \'element-ui\';

// create an axios instance
const service = axios.create({
    baseURL: \"http://localhost:8089\",
    // timeout: 5000 // request timeout
})

// response interceptor
service.interceptors.response.use(
    response => {
        const res = response.data
        // store.commit(\'SET_LOADING\',false);

        // if the custom code is not 20000, it is judged as an error.
        if (res.code !== 200) {
            Message.error({message: res.msg});
            return Promise.reject(new Error(res.message || \'Error\'))
        } else {
            return res
        }
    },
    error => {
        console.log(\'error\' + error)
        if (error.response.status) {
            switch (error.response.status) {
                case 401:
                    Message.error({message: \'登录状态已过期\'});
                    //跳至登录页
                    break;
                case 403:
                    Message.error({message: \'您的权限不足\'});
                    break;
                case 404:
                    Message.error({message: \'您访问的网页不存在\'});
                    break;
                case 504:
                    Message.error({message: \'服务器宕机了,( ╯□╰ )\'});
                    break;
                // 其他错误,直接抛出错误提示
                default:
                    if (error.response.data.msg) {
                        Message.error({message: error.response.data.msg})
                    } else {
                        Message.error({message: \'未知错误\'});
                    }
            }
        }
        return Promise.reject(error)
    }
)

export default service
8、添加接口API
src下创建api文件夹,在文件夹下新建user.js。
import request from \'@/utils/request\'

// 查询列表
export function queryUsers(params) {
    return request({
        url: \'/user\',
        method: \'get\',
        params: params
    })
}

// 查询单条
export function queryUserById(id) {
    return request({
        url: \'/user/\' + id,
        method: \'get\'
    })
}

// 新增
export function insertUser(data) {
    return request({
        url: \'/user\',
        method: \'post\',
        data: data
    })
}

// 修改
export function updateUser(data) {
    return request({
        url: \'/user\',
        method: \'put\',
        data: data
    })
}

// 单条删除
export function deleteUserById(id) {
    return request({
        url: \'/user\' + id,
        method: \'delete\'
    })
}

// 批量删除
export function deleteUsersByIds(ids) {
    return request({
        url: \'/user\',
        method: \'delete\',
        data: ids
    })
}
9、添加页面
在views文件夹下新建User.vue。
<template>
  <div>
    <el-form :inline=\"true\" size=\"small\" :model=\"searchForm\" ref=\"searchForm\">
      <el-form-item prop=\"username\">
        <el-input v-model=\"searchForm.username\" placeholder=\"用户名\" clearable/>
      </el-form-item>
      <el-form-item prop=\"name\">
        <el-input v-model=\"searchForm.name\" placeholder=\"姓名\" clearable/>
      </el-form-item>
      <el-form-item>
        <el-button type=\"primary\" icon=\"el-icon-search\" @click=\"search\">搜索</el-button>
      </el-form-item>
      <el-form-item>
        <el-button type=\"primary\" icon=\"el-icon-refresh\" @click=\"reset\">重置</el-button>
      </el-form-item>
    </el-form>

    <el-form :inline=\"true\" size=\"small\">
      <el-form-item>
        <el-button type=\"primary\" icon=\"el-icon-plus\" @click=\"dialogVisible=true\">新增</el-button>
      </el-form-item>
      <el-form-item>
        <el-popconfirm title=\"确认想要批量删除记录吗?\" @confirm=\"deleteHandle(null)\">
          <el-button type=\"danger\"
                     icon=\"el-icon-delete\"
                     slot=\"reference\"
                     :disabled=\"delDisabled\">批量删除
          </el-button>
        </el-popconfirm>
      </el-form-item>
    </el-form>

    <el-table
        size=\"medium\"
        v-loading=\"loading\"
        ref=\"multipleTable\"
        :data=\"tableData\"
        border
        @selection-change=\"selectionChange\">
      <el-table-column type=\"selection\"/>
      <el-table-column prop=\"username\" label=\"用户名\"/>
      <el-table-column prop=\"name\" label=\"姓名\"/>
      <el-table-column prop=\"email\" label=\"邮箱\"/>
      <el-table-column prop=\"telephone\" label=\"电话\"/>
      <el-table-column prop=\"birthday\" label=\"生日\"/>
      <el-table-column prop=\"gender\" label=\"性别\">
        <template slot-scope=\"scope\">
          <span v-if=\"scope.row.gender === \'1\'\">男</span>
          <span v-else-if=\"scope.row.gender === \'0\'\">女</span>
        </template>
      </el-table-column>
      <el-table-column prop=\"status\" label=\"状态\">
        <template slot-scope=\"scope\">
          <el-tag size=\"small\" v-if=\"scope.row.status === \'1\'\" type=\"success\">启用</el-tag>
          <el-tag size=\"small\" v-else-if=\"scope.row.status === \'0\'\" type=\"danger\">停用</el-tag>
        </template>
      </el-table-column>
      <el-table-column prop=\"icon\" label=\"操作\">
        <template slot-scope=\"scope\">
          <el-button type=\"text\" icon=\"el-icon-edit\" @click=\"updateHandle(scope.row.id)\">编辑</el-button>
          <el-popconfirm title=\"确认想要删除记录吗?\" @confirm=\"deleteHandle(scope.row.id)\">
            <el-button type=\"text\"
                       icon=\"el-icon-delete\"
                       slot=\"reference\"
                       style=\"margin-left:10px;\">删除
            </el-button>
          </el-popconfirm>
        </template>
      </el-table-column>
    </el-table>

    <el-pagination
        background
        @size-change=\"pageSizeChange\"
        @current-change=\"currentPageChange\"
        layout=\"total, sizes, prev, pager, next, jumper\"
        :page-sizes=\"[5, 20, 50, 100]\"
        :current-page=\"currentPage\"
        :page-size=\"pageSize\"
        :total=\"total\">
    </el-pagination>

    <!--新增对话框-->
    <el-dialog
        title=\"信息\"
        :visible.sync=\"dialogVisible\"
        width=\"600px\"
        @close=\"dialogClose(\'form\')\">

      <el-form :model=\"form\" :rules=\"rules\" ref=\"form\" size=\"small\" label-position=\"right\" label-width=\"100px\">
        <el-form-item label=\"用户名\" prop=\"username\">
          <el-input v-model=\"form.username\"/>
        </el-form-item>
        <el-form-item label=\"姓名\" prop=\"name\">
          <el-input v-model=\"form.name\"/>
        </el-form-item>
        <el-form-item label=\"邮箱\" prop=\"email\">
          <el-input v-model=\"form.email\"/>
        </el-form-item>
        <el-form-item label=\"手机号\" prop=\"telephone\">
          <el-input v-model=\"form.telephone\"/>
        </el-form-item>
        <el-form-item label=\"生日\" prop=\"birthday\">
          <el-date-picker
              type=\"date\" placeholder=\"选择日期\" v-model=\"form.birthday\"
              format=\"yyyy-MM-dd\"
              value-format=\"yyyy-MM-dd\" style=\"width: 260px;\">
          </el-date-picker>
        </el-form-item>
        <el-form-item label=\"性别\" prop=\"gender\">
          <el-radio-group v-model=\"form.gender\">
            <el-radio :label=\"\'1\'\">男</el-radio>
            <el-radio :label=\"\'0\'\">女</el-radio>
          </el-radio-group>
        </el-form-item>
        <el-form-item label=\"状态\" prop=\"status\">
          <el-select v-model=\"form.status\" placeholder=\"请选择\">
            <el-option
                v-for=\"item in options\"
                :key=\"item.value\"
                :label=\"item.label\"
                :value=\"item.value\">
            </el-option>
          </el-select>
        </el-form-item>
      </el-form>
      <div slot=\"footer\">
        <el-button size=\"small\" @click=\"dialogVisible = false\">取 消</el-button>
        <el-button size=\"small\" type=\"primary\" @click=\"submitForm(\'form\')\">确 定</el-button>
      </div>
    </el-dialog>
  </div>
</template>

<script>
import {queryUsers, queryUserById, insertUser, updateUser, deleteUserById, deleteUsersByIds} from \"@/api/user\";

export default {
  name: \"User\",
  data() {
    return {
      loading: false,

      searchForm: {
        username: \'\',
        name: \'\'
      },
      form: {
        id: null,
        username: \'\',
        name: \'\',
        email: \'\',
        telephone: \'\',
        birthday: \'\',
        gender: \'\',
        status: \'0\'
      },

      delDisabled: true,
      dialogVisible: false,

      total: 0,
      pageSize: 5,
      currentPage: 1,
      tableData: [],
      selections: [],

      options: [{
        value: \'1\',
        label: \'启用\'
      }, {
        value: \'0\',
        label: \'停用\'
      }],

      rules: {
        username: [
          {required: true, message: \'请输入用户名称\', trigger: \'blur\'}
        ],
        name: [
          {required: true, message: \'请输入姓名\', trigger: \'blur\'}
        ]
      }
    }
  },
  methods: {
    pageSizeChange(val) {
      this.pageSize = val
      this.search()
    },
    currentPageChange(val) {
      this.currentPage = val
      this.search()
    },
    selectionChange(val) {
      this.selections = val
      this.delDisabled = val.length === 0
    },
    resetForm(formName) {
      this.$refs[formName].resetFields()
    },
    dialogClose(formName) {
      this.resetForm(formName)
      this.form = {}
      this.dialogVisible = false
    },
    reset() {
      this.resetForm(\'searchForm\')
      this.search()
    },
    doSearch() {
      this.currentPage = 1
      this.pageSize = 5
      this.search()
    },
    search() {
      this.loading = true
      queryUsers({
        pageNum: this.currentPage,
        pageSize: this.pageSize,
        username: this.searchForm.username,
        name: this.searchForm.name
      }).then(res => {
        this.tableData = res.data.records
        this.total = res.data.total
        this.loading = false
      })
    },
    submitForm(formName) {
      this.$refs[formName].validate((valid) => {
        if (valid) {
          if (!this.form.id) {
            insertUser(this.form)
                .then(res => {
                  this.$message({message: \'保存成功\', type: \'success\'});
                  this.doSearch()
                  this.dialogVisible = false
                })
          } else {
            updateUser(this.form)
                .then(res => {
                  this.$message({message: \'更新成功\', type: \'success\'});
                  this.doSearch()
                  this.dialogVisible = false
                })
          }
        } else {
          return false;
        }
      });
    },
    updateHandle(id) {
      this.dialogVisible = true
      queryUserById(id).then(res => {
        this.form = res.data
      })
    },
    deleteHandle(id) {
      let ids = []
      if (id) {
        ids.push(id)
      } else {
        this.selections.forEach(row => {
          ids.push(row.id)
        })
      }
      deleteUsersByIds(ids).then(res => {
        this.$message({message: \'删除成功\', type: \'success\'});
        this.doSearch()
      })
    }
  },
  created() {
    this.search()
  }
}
</script>

<style>
.el-pagination {
  margin-top: 10px;
}

.el-input {
  width: 260px;
}
</style>
10、添加路由
src/router/index.js中添加路由。
{
  path: \'/user\',
  name: \'user\',
  component: () => import(\'../views/User.vue\')
}
11、修改App.vue
将样式和部分页面代码注释掉。
<template>
  <div id=\"app\">
<!--    <nav>-->
<!--      <router-link to=\"/\">Home</router-link> |-->
<!--      <router-link to=\"/about\">About</router-link>-->
<!--    </nav>-->
    <router-view/>
  </div>
</template>

<style>
/*#app {*/
/*  font-family: Avenir, Helvetica, Arial, sans-serif;*/
/*  -webkit-font-smoothing: antialiased;*/
/*  -moz-osx-font-smoothing: grayscale;*/
/*  text-align: center;*/
/*  color: #2c3e50;*/
/*}*/

/*nav {*/
/*  padding: 30px;*/
/*}*/

/*nav a {*/
/*  font-weight: bold;*/
/*  color: #2c3e50;*/
/*}*/

/*nav a.router-link-exact-active {*/
/*  color: #42b983;*/
/*}*/
</style>
完整工程结构。
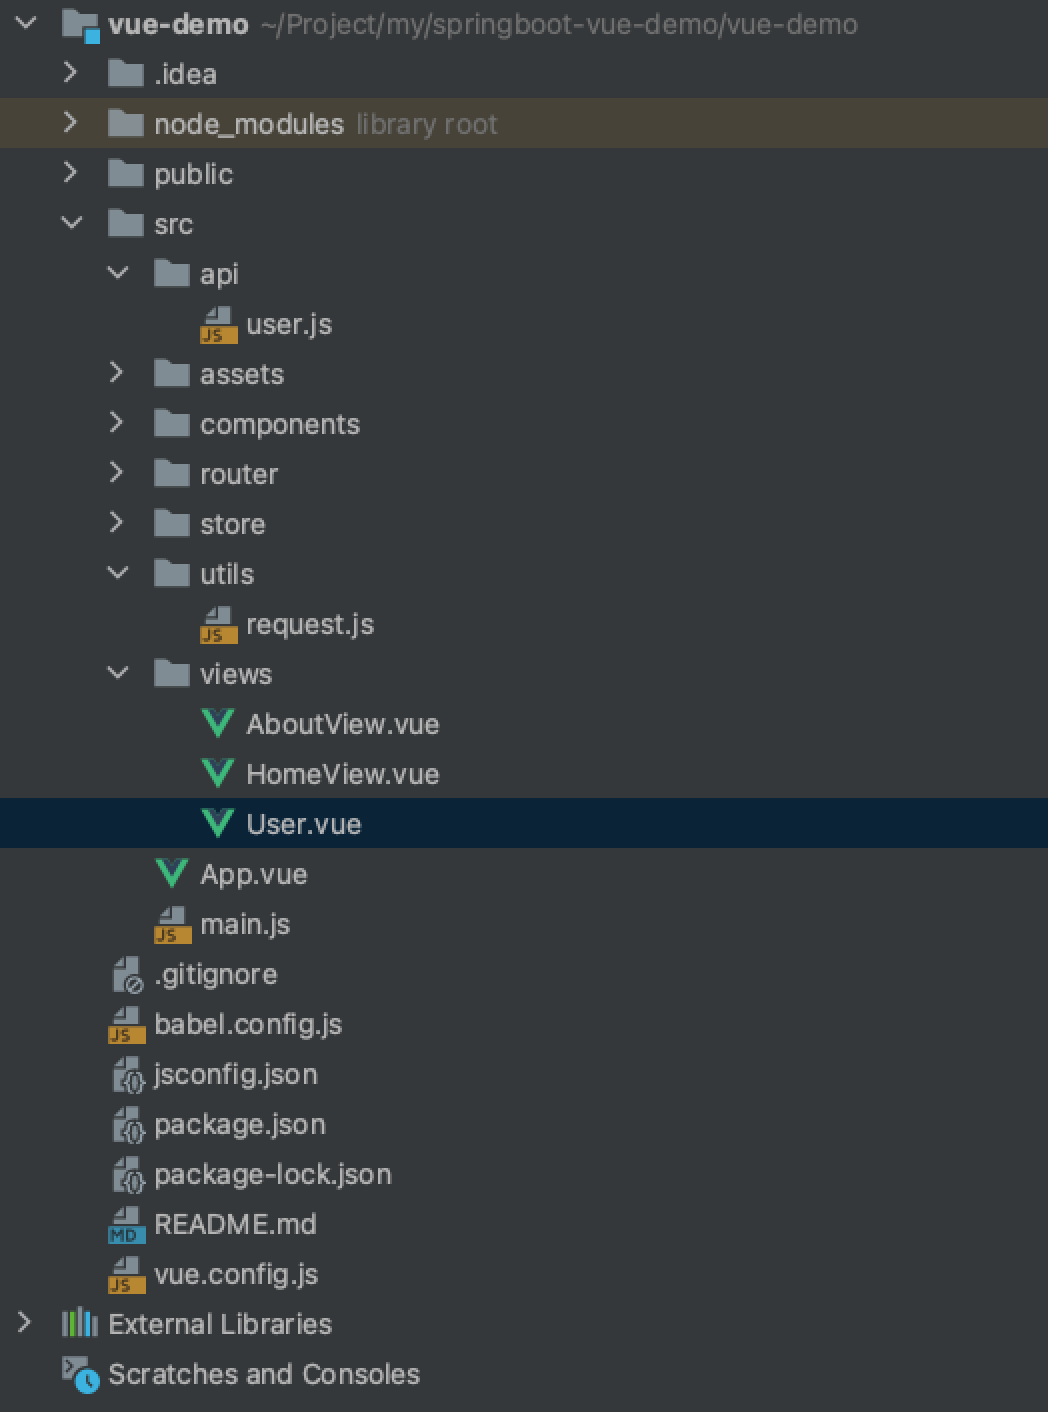
重新启动。
12、访问测试
浏览器输入:http://localhost:8080/#/user
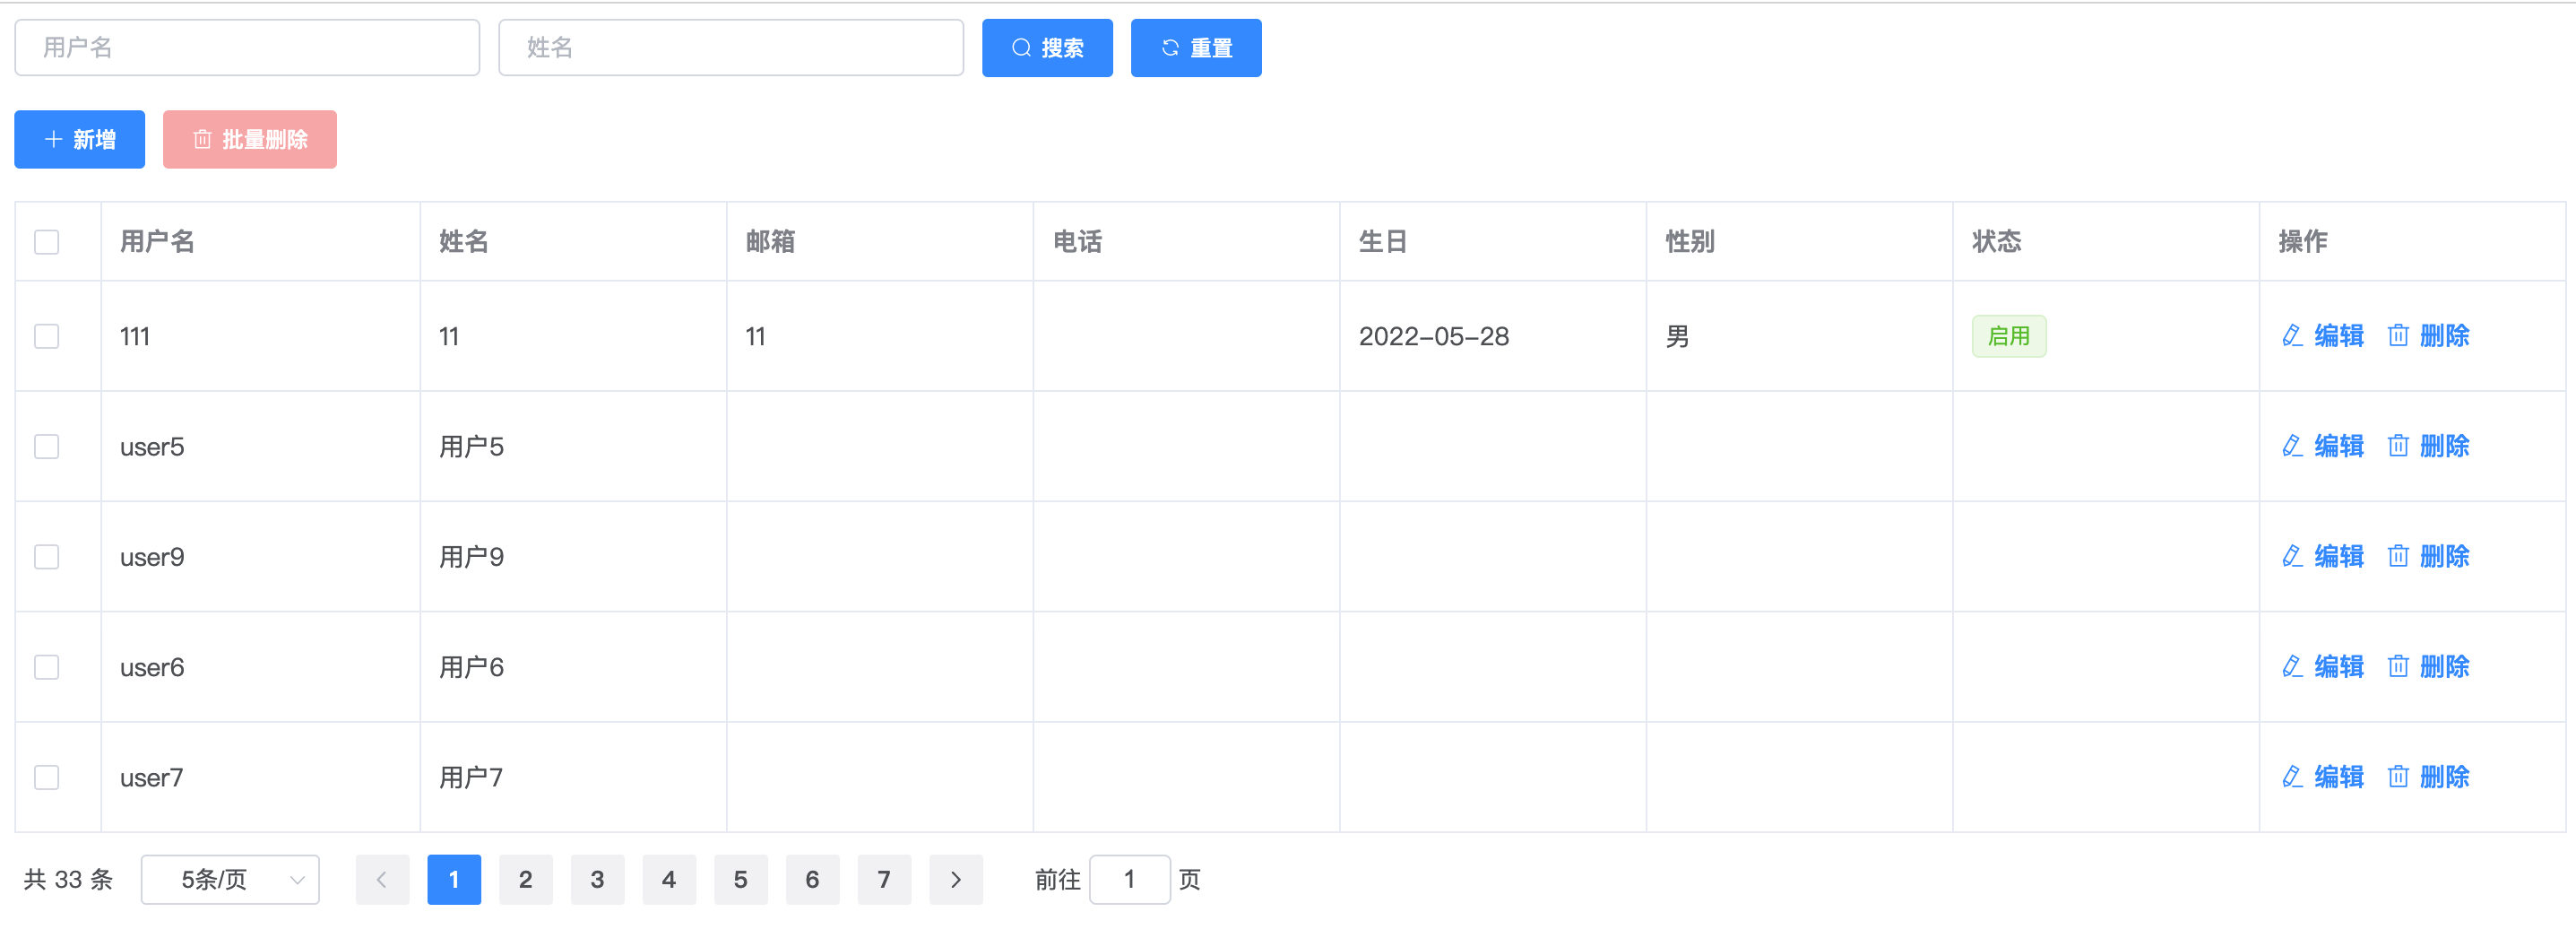
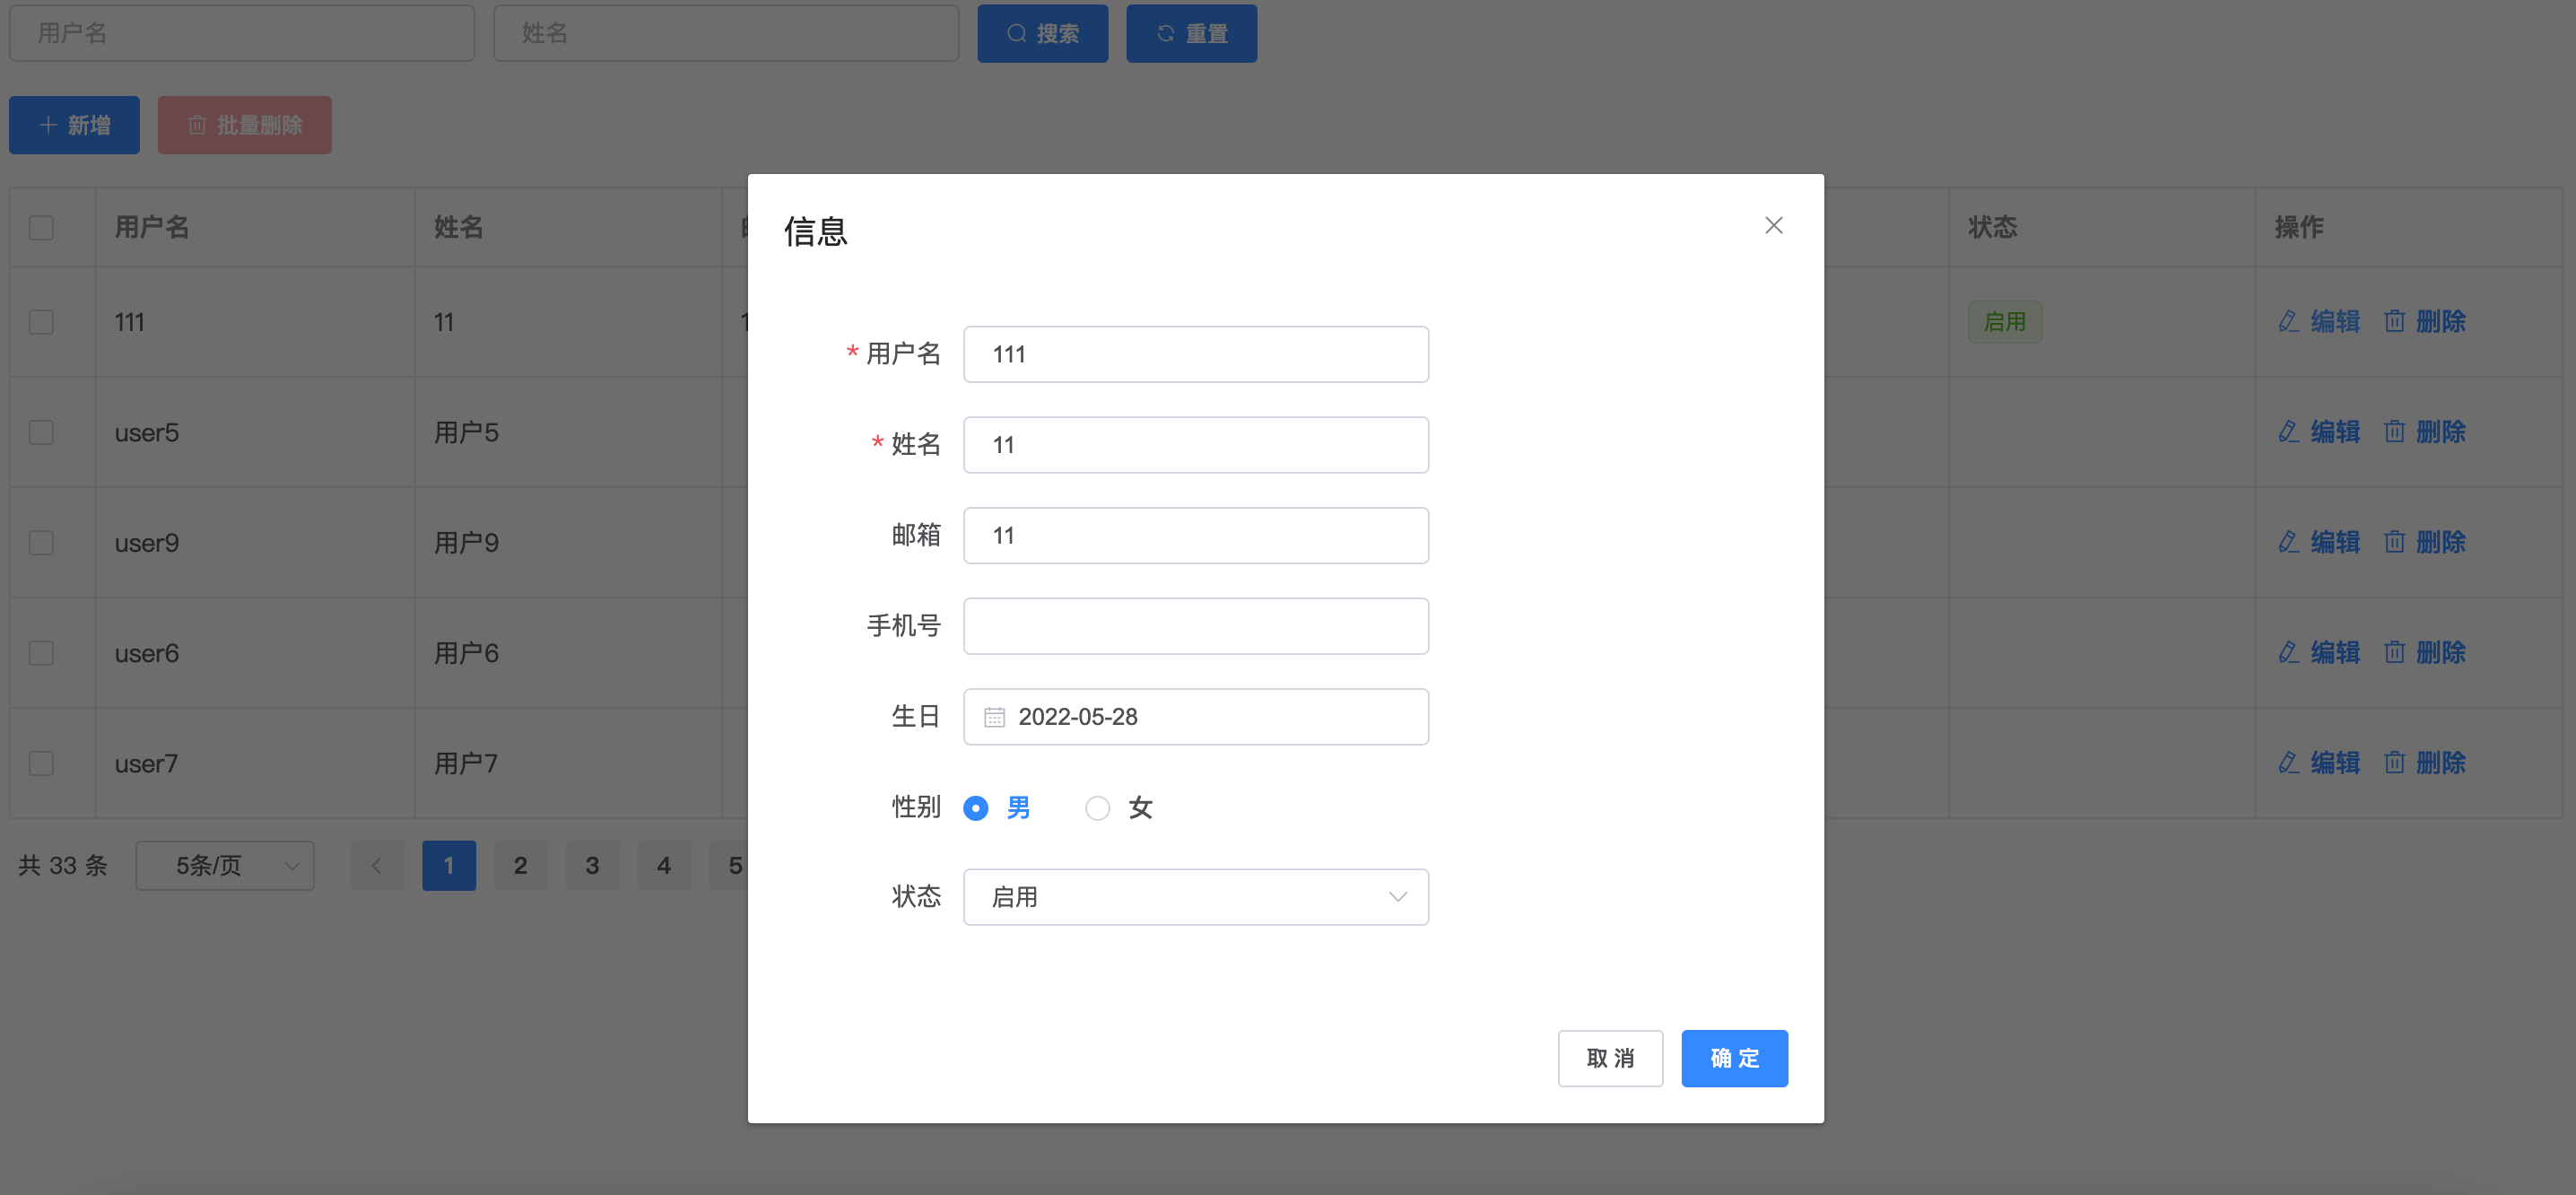
本文来自博客园,作者:zhanglei-code,转载请注明原文链接:https://www.cnblogs.com/zhanglei-code/p/16262104.html
来源:https://www.cnblogs.com/zhanglei-code/p/16262104.html
本站部分图文来源于网络,如有侵权请联系删除。
 百木园
百木园


