 百木园
百木园目录
- 一、基础概念
- 二、JDK源码
- 1、InetAddress
- 2、URL
- 3、HttpURLConnection
- 三、通信编程
- 1、Socket
- 2、SocketServer
- 3、SocketClient
- 4、字符流使用
- 5、文件传输
- 6、TCP协议
- 四、Http组件
- 1、基础接口
- 2、ApacheHttp
- 3、OkHttp
- 4、RestTemplate
- 五、参考源码
总感觉这个概念,和研发有点脱节;
一、基础概念
不同设备之间通过网络进行数据传输,并且基于通用的网络协议作为多种设备的兼容标准,称为网络通信;
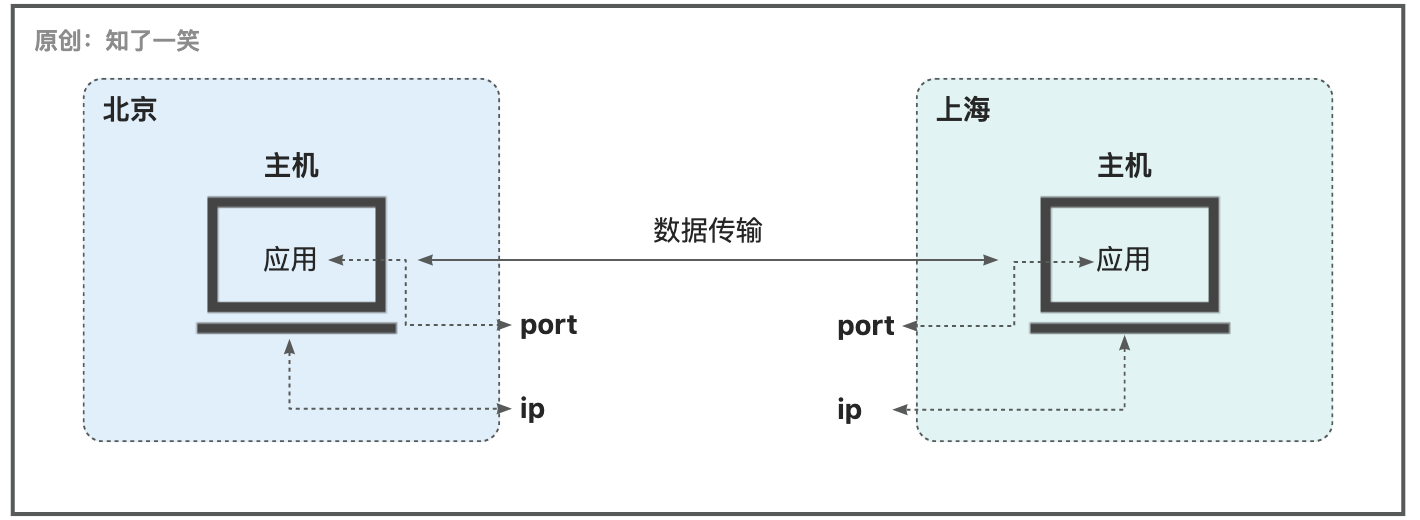
以C/S架构来看,在一次请求当中,客户端和服务端进行数据传输的交互时,在不同阶段和层次中需要遵守的网络通信协议也不一样;

应用层:HTTP超文本传输协议,基于TCP/IP通信协议来传递数据;
传输层:TCP传输控制协议,采用三次握手的方式建立连接,形成数据传输通道;
网络层:IP协议,作用是把各种传输的数据包发送给请求的接收方;
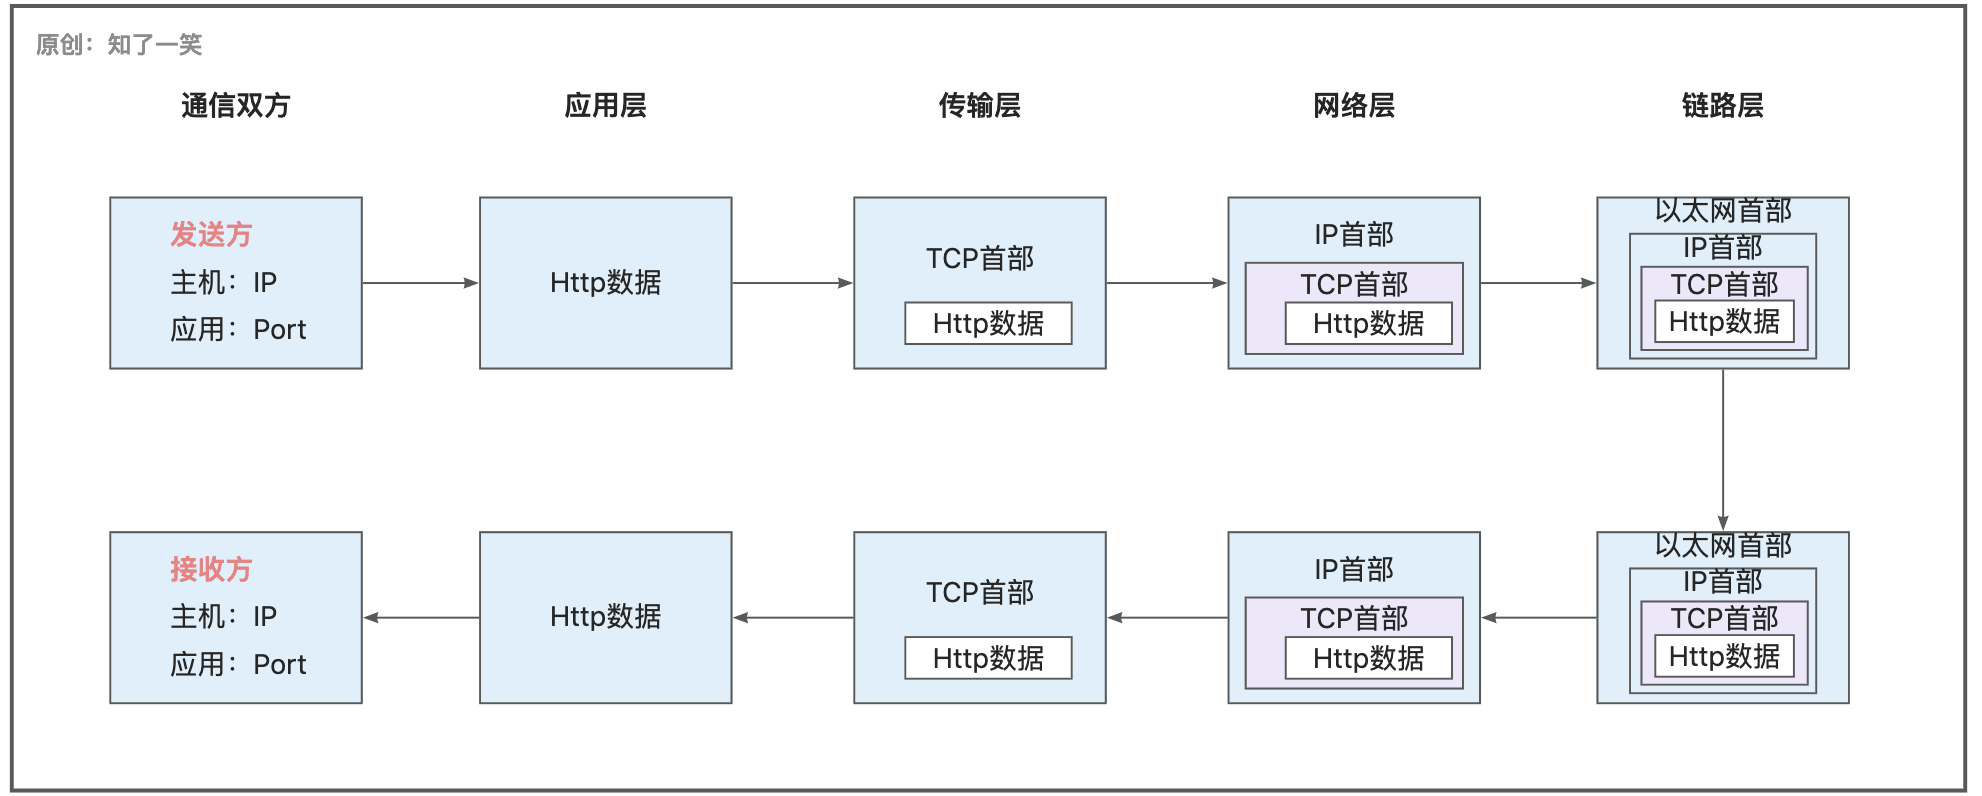
通信双方进行交互时,发送方数据在各层传输时,每通过一层就会添加该层的首部信息;接收方与之相反,每通过一次就会删除该层的首部信息;
二、JDK源码
在java.net源码包中,提供了与网络编程相关的基础API;
1、InetAddress
封装了对IP地址的相关操作,在使用该API之前可以先查看本机的hosts的映射,Linux系统中在/etc/hosts路径下;
import java.net.InetAddress;
public class TestInet {

    public static void main(String[] args) throws Exception {
        // 获取本机 InetAddress 对象
        InetAddress localHost = InetAddress.getLocalHost();
        printInetAddress(localHost);
        // 获取指定域名 InetAddress 对象
        InetAddress inetAddress = InetAddress.getByName(\"www.baidu.com\");
        printInetAddress(inetAddress);
        // 获取本机配置 InetAddress 对象
        InetAddress confAddress = InetAddress.getByName(\"nacos-service\");
        printInetAddress(confAddress);
    }

    public static void printInetAddress (InetAddress inetAddress){
        System.out.println(\"InetAddress:\"+inetAddress);
        System.out.println(\"主机名:\"+inetAddress.getHostName());
        System.out.println(\"IP地址:\"+inetAddress.getHostAddress());
    }
}
2、URL
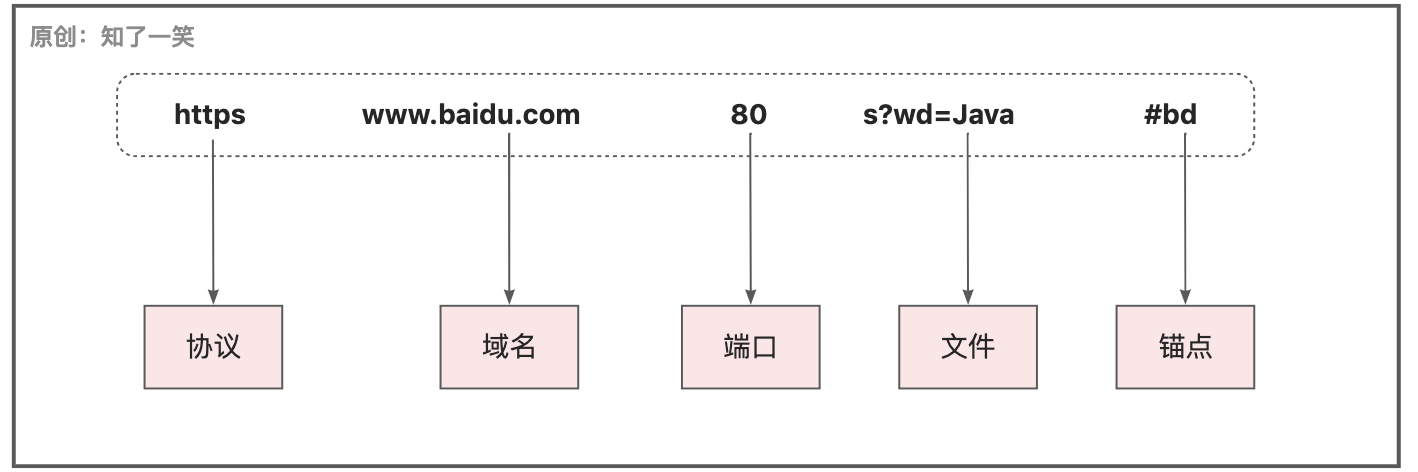
统一资源定位符,URL一般包括:协议、主机名、端口、路径、查询参数、锚点等,路径+查询参数,也被称为文件;
import java.net.URL;
public class TestURL {
    public static void main(String[] args) throws Exception {
        URL url = new URL(\"https://www.baidu.com:80/s?wd=Java#bd\") ;
        printURL(url);
    }
    private static void printURL (URL url){
        System.out.println(\"协议:\" + url.getProtocol());
        System.out.println(\"域名:\" + url.getHost());
        System.out.println(\"端口:\" + url.getPort());
        System.out.println(\"路径:\" + url.getPath());
        System.out.println(\"参数:\" + url.getQuery());
        System.out.println(\"文件:\" + url.getFile());
        System.out.println(\"锚点:\" + url.getRef());
    }
}
3、HttpURLConnection
作为URLConnection的抽象子类,用来处理针对Http协议的请求,可以设置连接超时、读取超时、以及请求的其他属性,是服务间通信的常用方式;
public class TestHttp {
    public static void main(String[] args) throws Exception {
        // 访问 网址 内容
        URL url = new URL(\"https://www.jd.com\");
        HttpURLConnection httpUrlConnection = (HttpURLConnection) url.openConnection();
        printHttp(httpUrlConnection);

        // 请求 服务 接口
        URL api = new URL(\"http://localhost:8082/info/99\");
        HttpURLConnection apiConnection = (HttpURLConnection) api.openConnection();
        apiConnection.setRequestMethod(\"GET\");
        apiConnection.setConnectTimeout(3000);
        printHttp(apiConnection);
    }

    private static void printHttp (HttpURLConnection httpUrlConnection) throws Exception{
        try (InputStream inputStream = httpUrlConnection.getInputStream()) {
            BufferedReader bufferedReader = new BufferedReader(new InputStreamReader(inputStream, StandardCharsets.UTF_8));
            String line ;
            while ((line = bufferedReader.readLine()) != null) {
                System.out.println(line);
            }
        }
    }
}
三、通信编程
1、Socket
Socket也被称为套接字,是两台设备之间通信的端点,会把网络连接当成流处理,则数据以IO形式传输,这种方式在当前被普遍采用;

从网络编程直接跳到Socket套接字,概念上确实有较大跨度,概念过度抽象时,可以看看源码的核心结构,在理解时会轻松很多,在JDK中重点看SocketImpl抽象类;
public abstract class SocketImpl implements SocketOptions {
    // Socket对象,客户端和服务端
    Socket socket = null;
    ServerSocket serverSocket = null;
    // 套接字的文件描述对象
    protected FileDescriptor fd;
    // 套接字的路由IP地址
    protected InetAddress address;
    // 套接字连接到的远程主机上的端口号
    protected int port;
    // 套接字连接到的本地端口号
    protected int localport;
}
套接字的抽象实现类,是实现套接字的所有类的公共超类,可以用于创建客户端和服务器套接字;
所以到底如何理解Socket概念?从抽象类中来看,套接字就是指代网络通讯中系统资源的核心标识,比如通讯方IP地址、端口、状态等;
2、SocketServer
创建Socket服务端,并且在8989端口监听,接收客户端的连接请求和相关信息,并且响应客户端,发送指定的数据;
public class SocketServer {
    public static void main(String[] args) throws Exception {
        // 1、创建Socket服务端
        ServerSocket serverSocket = new ServerSocket(8989);
        System.out.println(\"socket-server:8989,waiting connect...\");
        // 2、方法阻塞等待,直到有客户端连接
        Socket socket = serverSocket.accept();
        System.out.println(\"socket-server:8989,get connect:\"+socket.getPort());
        // 3、输入流,输出流
        InputStream inStream = socket.getInputStream();
        OutputStream outStream = socket.getOutputStream();
        // 4、数据接收和响应
        byte[] buf = new byte[1024];
        int readLen = 0;
        while ((readLen=inStream.read(buf)) != -1){
            // 接收数据
            String readVar = new String(buf, 0, readLen) ;
            if (\"exit\".equals(readVar)){
                break ;
            }
            System.out.println(\"recv:\"+readVar+\";time:\"+DateTime.now().toString(DatePattern.NORM_DATETIME_PATTERN));
            // 响应数据
            outStream.write((\"resp-time:\"+DateTime.now().toString(DatePattern.NORM_DATETIME_PATTERN)).getBytes());
        }
        // 5、资源关闭
        outStream.close();
        inStream.close();
        socket.close();
        serverSocket.close();
        System.out.println(\"socket-server:8989,exit...\");
    }
}
需要注意的是步骤2输出的端口号是随机不确定的,结合jps和lsof -i tcp:port命令查看进程和端口号的占用情况;
3、SocketClient
创建Socket客户端,并且连接到服务端,读取命令行输入的内容并发送到服务端,并且输出服务端的响应数据;
public class SocketClient {
    public static void main(String[] args) throws Exception {
        // 1、创建Socket客户端
        Socket socket = new Socket(InetAddress.getLocalHost(), 8989);
        System.out.println(\"server-client,connect to:8989\");
        // 2、输入流,输出流
        OutputStream outStream = socket.getOutputStream();
        InputStream inStream = socket.getInputStream();
        // 3、数据发送和响应接收
        int readLen = 0;
        byte[] buf = new byte[1024];
        while (true){
            // 读取命令行输入
            BufferedReader bufReader = new BufferedReader(new InputStreamReader(System.in));
            String iptLine = bufReader.readLine();
            if (\"exit\".equals(iptLine)){
                break;
            }
            // 发送数据
            outStream.write(iptLine.getBytes());
            // 接收数据
            if ((readLen = inStream.read(buf)) != -1) {
                System.out.println(new String(buf, 0, readLen));
            }
        }
        // 4、资源关闭
        inStream.close();
        outStream.close();
        socket.close();
        System.out.println(\"socket-client,get exit command\");
    }
}
测试结果:整个流程在没有收到客户端的exit退出指令前,会保持连接的状态,并且可以基于字节流模式,进行持续的数据传输;

4、字符流使用
基于上述的基础案例,采用字符流的方式进行数据传输,客户端和服务端只进行一次简单的交互;
-- 1、客户端
BufferedReader bufReader = new BufferedReader(new InputStreamReader(inStream));
BufferedWriter bufWriter = new BufferedWriter(new OutputStreamWriter(outStream));
// 客户端发送数据
bufWriter.write(\"hello,server\");
bufWriter.newLine();
bufWriter.flush();
// 客户端接收数据
System.out.println(\"client-read:\"+bufReader.readLine());

-- 2、服务端
BufferedReader bufReader = new BufferedReader(new InputStreamReader(inStream));
BufferedWriter bufWriter = new BufferedWriter(new OutputStreamWriter(outStream));
// 服务端接收数据
System.out.println(\"server-read:\"+bufReader.readLine());
// 服务端响应数据
bufWriter.write(\"hello,client\");
bufWriter.newLine();
bufWriter.flush();
5、文件传输
基于上述的基础案例,客户端向服务端发送图片文件,服务端完成文件的读取和保存,在处理完成后给客户端发送结果描述;
-- 1、客户端
// 客户端发送图片
FileInputStream fileStream = new FileInputStream(\"Local_File_Path/jvm.png\");
byte[] bytes = new byte[1024];
int i = 0;
while ((i = fileStream.read(bytes)) != -1) {
    outStream.write(bytes);
}
// 写入结束标记,禁用此套接字的输出流,之后再使用输出流会抛异常
socket.shutdownOutput();
// 接收服务端响应结果
System.out.println(\"server-resp:\"+new String(bytes,0,readLen));

-- 2、服务端
// 接收客户端图片
FileOutputStream fileOutputStream = new FileOutputStream(\"Local_File_Path/new_jvm.png\");
byte[] bytes = new byte[1024];
int i = 0;
while ((i = inStream.read(bytes)) != -1) {
    fileOutputStream.write(bytes, 0, i);
}
// 响应客户端文件处理结果
outStream.write(\"file-save-success\".getBytes());
6、TCP协议
Socket网络编程是基于TCP协议的,TCP传输控制协议是一种面向连接的、可靠的、基于字节流的传输层通信协议,在上述案例中侧重基于流的数据传输,其中关于连接还涉及两个核心概念:
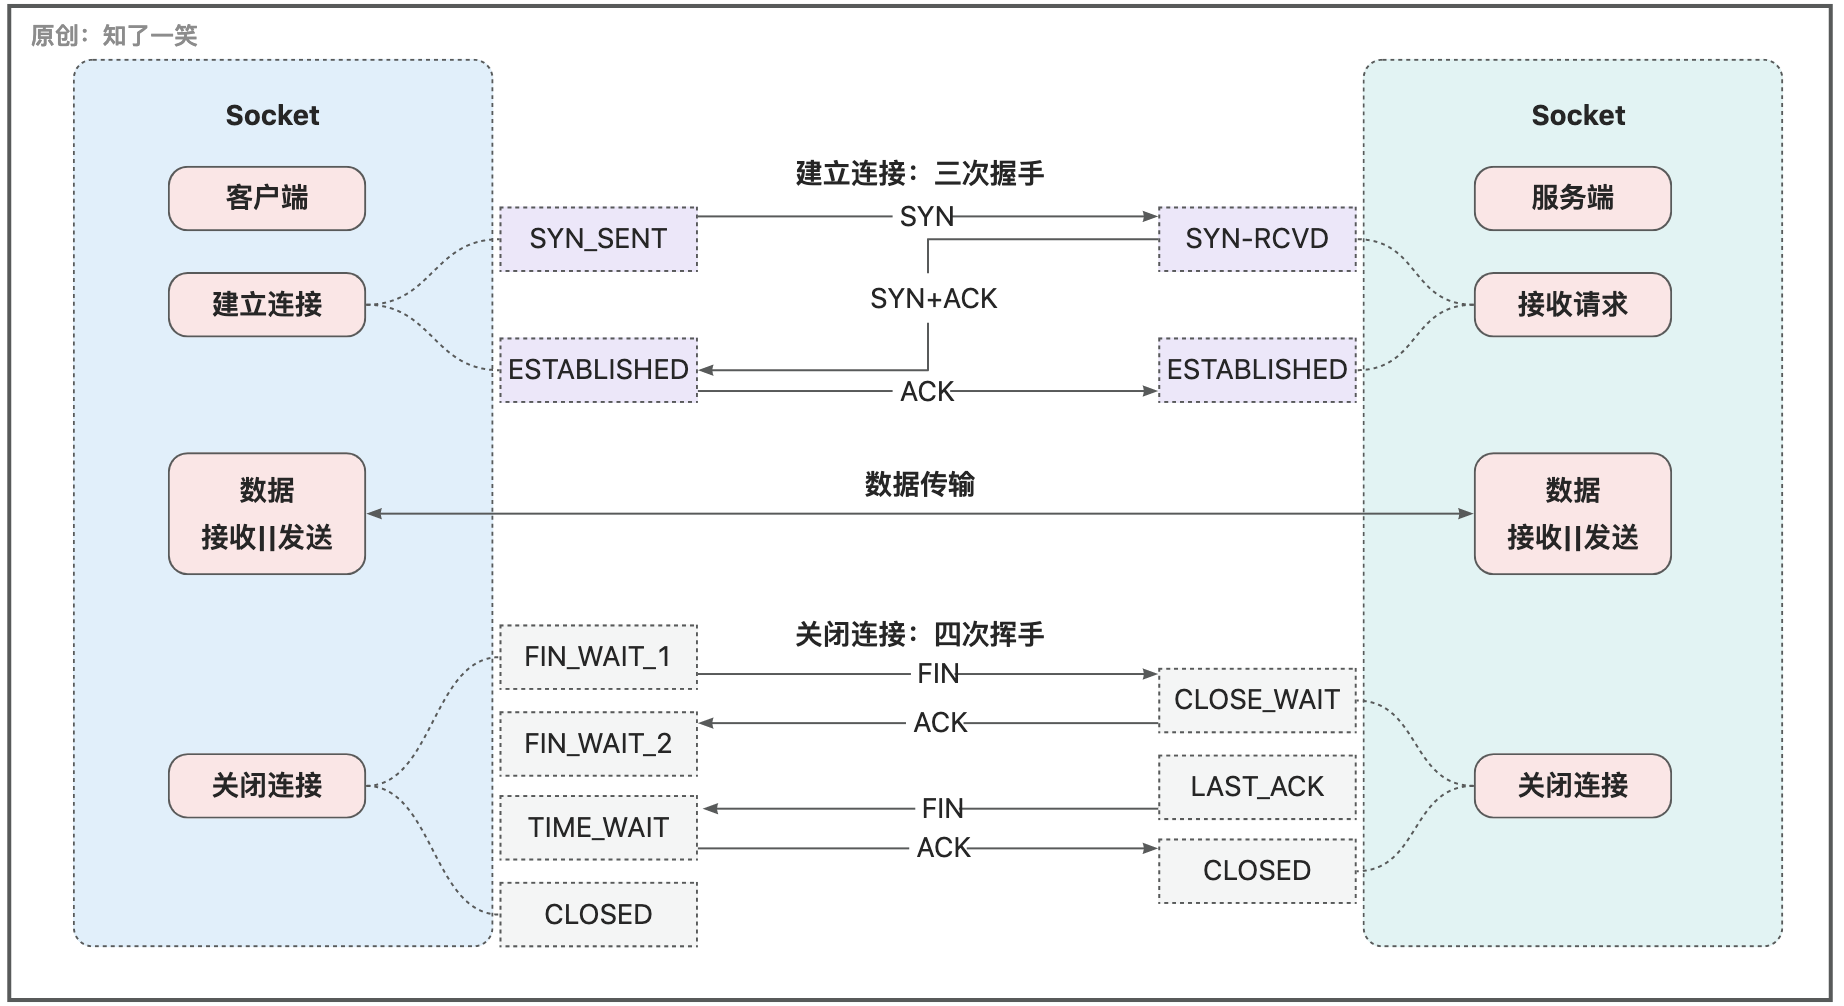
三次握手:建立连接的过程,在这个过程中进行了三次网络通信,当连接处于建立的状态,就可以进行正常的通信,即数据传输;四次挥手:关闭连接的过程,调用close方法,即连接使用结束,在这个过程中进行了四次网络通信;
四、Http组件
在服务通信时依赖网络,而对于编程来说,更常见的是的Http的组件,在微服务架构中,涉及到Http组件工具有很多,例如Spring框架中的RestTemplate,Feign框架支持ApacheHttp和OkHttp;下面围绕几个常用的组件编写测试案例;
1、基础接口
@RestController
public class BizWeb {

    @GetMapping(\"/getApi/{id}\")
    public Rep<Integer> getApi(@PathVariable Integer id){
        log.info(\"id={}\",id);
        return Rep.ok(id) ;
    }

    @GetMapping(\"/getApi_v2/{id}\")
    public Rep<Integer> getApiV2(HttpServletRequest request,
                                 @PathVariable Integer id,
                                 @RequestParam(\"name\") String name){
        String token = request.getHeader(\"Token\");
        log.info(\"token={},id={},name={}\",token,id,name);
        return Rep.ok(id) ;
    }

    @PostMapping(\"/postApi\")
    public Rep<IdKey> postApi(HttpServletRequest request,@RequestBody IdKey idKey){
        String token = request.getHeader(\"Token\");
        log.info(\"token={},idKey={}\", token,JSONUtil.toJsonStr(idKey));
        return Rep.ok(idKey) ;
    }

    @PutMapping(\"/putApi\")
    public Rep<IdKey> putApi(@RequestBody IdKey idKey){
        log.info(\"idKey={}\", JSONUtil.toJsonStr(idKey));
        return Rep.ok(idKey) ;
    }

    @DeleteMapping(\"/delApi/{id}\")
    public Rep<Integer> delApi(@PathVariable Integer id){
        log.info(\"id={}\",id);
        return Rep.ok(id) ;
    }
}
2、ApacheHttp
public class TestApacheHttp {

    private static final String BASE_URL = \"http://localhost:8083\" ;
    public static void main(String[] args) {
        BasicHeader header = new BasicHeader(\"Token\",\"ApacheSup\") ;

        // 1、发送Get请求
        Map<String,String> param = new HashMap<>() ;
        param.put(\"name\",\"cicada\") ;
        Rep getRep = doGet(BASE_URL+\"/getApi_v2/3\",header,param, Rep.class);
        System.out.println(\"get:\"+getRep);

        // 2、发送Post请求
        IdKey postBody = new IdKey(1,\"id-key-我\") ;
        Rep postRep = doPost (BASE_URL+\"/postApi\", header, postBody, Rep.class);
        System.out.println(\"post:\"+postRep);
    }
    /**
     * 构建HttpClient对象
     */
    private static CloseableHttpClient buildHttpClient (){
        // 请求配置
        RequestConfig reqConfig = RequestConfig.custom().setConnectTimeout(6000).build();
        return HttpClients.custom()
                .setDefaultRequestConfig(reqConfig).build();
    }
    /**
     * 执行Get请求
     */
    public static <T> T doGet (String url, Header header, Map<String,String> param,
                               Class<T> repClass) {
        // 创建Get请求
        CloseableHttpClient httpClient = buildHttpClient();
        HttpGet httpGet = new HttpGet();
        httpGet.addHeader(header);
        try {
            URIBuilder builder = new URIBuilder(url);
            if (param != null) {
                for (String key : param.keySet()) {
                    builder.addParameter(key, param.get(key));
                }
            }
            httpGet.setURI(builder.build());
            // 请求执行
            HttpResponse httpResponse = httpClient.execute(httpGet);
            if (httpResponse.getStatusLine().getStatusCode() == 200) {
                // 结果转换
                String resp = EntityUtils.toString(httpResponse.getEntity());
                return JSONUtil.toBean(resp, repClass);
            }
        } catch (Exception e) {
            e.printStackTrace();
        } finally {
            IoUtil.close(httpClient);
        }
        return null;
    }
    /**
     * 执行Post请求
     */
    public static <T> T doPost (String url, Header header, Object body,Class<T> repClass) {
        // 创建Post请求
        CloseableHttpClient httpClient = buildHttpClient();
        HttpPost httpPost = new HttpPost(url);
        httpPost.addHeader(header);
        StringEntity conBody = new StringEntity(JSONUtil.toJsonStr(body),ContentType.APPLICATION_JSON);
        httpPost.setEntity(conBody);
        try {
            // 请求执行
            HttpResponse httpResponse = httpClient.execute(httpPost);
            if (httpResponse.getStatusLine().getStatusCode() == 200) {
                // 结果转换
                String resp = EntityUtils.toString(httpResponse.getEntity());
                return JSONUtil.toBean(resp, repClass);
            }
        } catch (Exception e) {
            e.printStackTrace();
        }finally {
            IoUtil.close(httpClient);
        }
        return null;
    }
}
3、OkHttp
public class TestOkHttp {

    private static final String BASE_URL = \"http://localhost:8083\" ;
    public static void main(String[] args) {
        Headers headers = new Headers.Builder().add(\"Token\",\"OkHttpSup\").build() ;

        // 1、发送Get请求
        Rep getRep = execute(BASE_URL+\"/getApi/1\", Method.GET.name(), headers, null, Rep.class);
        System.out.println(\"get:\"+getRep);

        // 2、发送Post请求
        IdKey postBody = new IdKey(1,\"id-key\") ;
        Rep postRep = execute(BASE_URL+\"/postApi\", Method.POST.name(), headers, buildBody(postBody), Rep.class);
        System.out.println(\"post:\"+postRep);

        // 3、发送Put请求
        IdKey putBody = new IdKey(2,\"key-id\") ;
        Rep putRep = execute(BASE_URL+\"/putApi\", Method.PUT.name(), headers, buildBody(putBody), Rep.class);
        System.out.println(\"put:\"+putRep);

        // 4、发送Delete请求
        Rep delRep = execute(BASE_URL+\"/delApi/2\", Method.DELETE.name(), headers, null, Rep.class);
        System.out.println(\"del:\"+delRep);
    }
    /**
     * 构建JSON请求体
     */
    public static RequestBody buildBody (Object body){
        MediaType mediaType = MediaType.parse(\"application/json; charset=utf-8\");
        return RequestBody.create(mediaType, JSONUtil.toJsonStr(body)) ;
    }
    /**
     * 构建OkHttpClient对象
     */
    public static OkHttpClient buildOkHttp () {
        return new OkHttpClient.Builder()
                .readTimeout(10, TimeUnit.SECONDS).connectTimeout(6, TimeUnit.SECONDS)
                .connectionPool(new ConnectionPool(15, 5, TimeUnit.SECONDS))
                .build();
    }
    /**
     * 执行请求
     */
    public static <T> T execute (String url, String method,
                                 Headers headers, RequestBody body,
                                 Class<T> repClass) {
        // 请求创建
        OkHttpClient httpClient = buildOkHttp() ;
        Request.Builder requestBuild = new Request.Builder()
                .url(url).method(method, body);
        if (headers != null) {
            requestBuild.headers(headers);
        }
        try  {
            // 请求执行
            Response response = httpClient.newCall(requestBuild.build()).execute();
            // 结果转换
            InputStream inStream = null;
            if (response.isSuccessful()) {
                ResponseBody responseBody = response.body();
                if (responseBody != null) {
                    inStream = responseBody.byteStream();
                }
            }
            if (inStream != null) {
                try {
                    byte[] respByte = IoUtil.readBytes(inStream);
                    if (respByte != null) {
                        return JSONUtil.toBean(new String(respByte, Charset.defaultCharset()), repClass);
                    }
                } catch (Exception e) {
                    e.printStackTrace();
                } finally {
                    IoUtil.close(inStream);
                }
            }
        } catch (Exception e) {
            e.printStackTrace();
        }
        return null;
    }
}
4、RestTemplate
public class TestRestTemplate {

    private static final String BASE_URL = \"http://localhost:8083\" ;
    public static void main(String[] args) {

        RestTemplate restTemplate = buildRestTemplate() ;
        // 1、发送Get请求
        Map<String,String> paramMap = new HashMap<>() ;
        Rep getRep = restTemplate.getForObject(BASE_URL+\"/getApi/1\",Rep.class,paramMap);
        System.out.println(\"get:\"+getRep);

        // 2、发送Post请求
        IdKey idKey = new IdKey(1,\"id-key\") ;
        Rep postRep = restTemplate.postForObject(BASE_URL+\"/postApi\",idKey,Rep.class);
        System.out.println(\"post:\"+postRep);

        // 3、发送Put请求
        IdKey idKey2 = new IdKey(2,\"key-id\") ;
        restTemplate.put(BASE_URL+\"/putApi\",idKey2,paramMap);

        // 4、发送Delete请求
        restTemplate.delete(BASE_URL+\"/delApi/2\",paramMap);

        // 5、自定义Header请求
        HttpHeaders headers = new HttpHeaders();
        headers.add(\"Token\",\"AdminSup\");
        HttpEntity<IdKey> requestEntity = new HttpEntity<>(idKey, headers);
        ResponseEntity<Rep> respEntity = restTemplate.exchange(BASE_URL+\"/postApi\",
                                            HttpMethod.POST, requestEntity, Rep.class);
        System.out.println(\"post-header:\"+respEntity.getBody());
    }

    private static RestTemplate buildRestTemplate (){
        // 1、参数配置
        SimpleClientHttpRequestFactory factory = new SimpleClientHttpRequestFactory();
        factory.setReadTimeout(3000);
        factory.setConnectTimeout(6000);
        // 2、创建对象
        return new RestTemplate(factory) ;
    }
}
五、参考源码
编程文档:
https://gitee.com/cicadasmile/butte-java-note

应用仓库:
https://gitee.com/cicadasmile/butte-flyer-parent
Gitee主页: https://gitee.com/cicadasmile/butte-java-note
来源:https://www.cnblogs.com/cicada-smile/p/16974205.html
本站部分图文来源于网络,如有侵权请联系删除。