 百木园
百木园关于ELK是什么、做什么用,我们不在此讨论。本文重点在如何实现快速方便地安装logstash和filebeat组件,特别是在近千台DB Server的环境下(为了安全保守,公司DB Server 目前尚未部署saltstack一类的管控软件)。在尽可能标准化的条件下,希望可以实现一键化安装。下面是我们功能实现的一些尝试,我们把手动一步步操作打包提炼到一个sh文档中,安装部署时只要执行sh文件即可。部署安装logstash和filebeat组件由原来的10分钟缩减到目前的1分钟左右,并且减少了因手动部署带来的误操作。
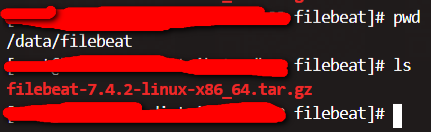
1.logstash和filebeat安装包所在指定路径下
logstash的安装包logstash-7.6.0.zip所在路径
/data/logstash/logstash-7.6.0.zip

filebeat的安装包filebeat-7.4.2-linux-x86_64.tar.gz所在路径
2.上传经过标准化的程序配置文件
上传程序的配置文件filebeat.service、filebeat.yml、logstash.conf、startup.options到指定位置,这些文件是格式化后的,不是解压的默认文件,目的是方便替换安装。
如何想直接使用disposelogcollectot.sh文件,上传的路径一定要是/tmp/
3.编写一键安装的可执行文件disposelogcollectot.sh
#!/bin/bash
# The version is defined V.001
# Version ModifyTime ModifyBy Desc
# Ver001 2018-03-25 Carson.Xu Create the Scripts File
# Desc: This file is used to despose filebeat \\ logstash in order to collect slow log and error log from mysqld.
#### step 1 判断 需要上传的文件是否已上传
cd /tmp/
if [ -f \"filebeat.service\" -a -f \"filebeat.yml\" -a -f \"logstash.conf\" -a -f \"startup.options\" ]
then
echo \'step 1 安装过程需要的文件已到位,上传文件项检查通过....\'
else
echo \"step 1 安装过程中需要的filebeat.service、 filebeat.yml、 logstash.conf、 startup.options,没有到位,不能继续安装,安装进程退出!!!\"
exit
fi
#### step 2 解压指定文件
cd /data/logstash/
unzip logstash-7.6.0.zip
echo \'step 2 解压logstash项工作完成....\'
sleep 3
#### step 3 删除解压后的指定文件
cd logstash-7.6.0/config/
rm -rf startup.options
echo \'step 3 删除解压后的指定文件startup.options工作完成....\'
sleep 3
#### step 4 转移上传的文件
mv /tmp/logstash.conf /tmp/startup.options -t /data/logstash/logstash-7.6.0/config/
echo \'step 4 转移文件logstash.conf的工作完成....\'
sleep 2
#### step 5 修改log上传的ES 索引[必做 建议用业务名称替换,例如qq/weixin/rewu]
read -p \"请输入业务名称:\" product
echo -e \"\\n\"
echo \"用户名为:$product\"
sed -i \"s/qqweixinface/$product/\" /data/logstash/logstash-7.6.0/config/logstash.conf
echo \'step 5 删除解压后的指定文件startup.options工作完成....\'
sleep 2
##### step 6 安装logstash 服务
/data/logstash/logstash-7.6.0/bin/system-install
echo \'step 6 安装logstash 服务工作完成....\'
sleep 3
##### step 7 解压缩filebeat文件
cd /data/filebeat/
tar -zxvf filebeat-7.4.2-linux-x86_64.tar.gz
echo \'step 7 解压缩filebeat文件工作完成....\'
sleep 3
#### step 8 转移上传的filebeat.yml,允许覆盖掉生成默认配置文件
rm -rf /data/filebeat/filebeat-7.4.2-linux-x86_64/filebeat.yml
mv /tmp/filebeat.yml /data/filebeat/filebeat-7.4.2-linux-x86_64/
echo \'step 8 转移上传的filebeat.yml,允许覆盖掉生成默认配置文件工作完成....\'
sleep 2
#### step 9 权限调整
cd /data/filebeat/filebeat-7.4.2-linux-x86_64
chown -R root:root filebeat.yml
chmod 600 filebeat.yml
echo \'step 9 调整filebeat文件权限的工作完成....\'
sleep 2
##### step 10 获取 Server IP
ip=$(ip a|awk -F \"inet|/\" \'/inet.*brd/ {print $2}\'|head -n 1)
serverid=$(echo $ip) #去除左右空格
echo $serverid
echo \'step 10 获取Server IP的工作完成....\'
echo \'获取Server IP的为:\' $serverid
sleep 1
###### step 11 调整host配置[必做 IP替换]
sed -i \"s/119.119.119.119/$serverid/\" /data/filebeat/filebeat-7.4.2-linux-x86_64/filebeat.yml
echo \'step 11 替换配置文件中的Server IP工作完成....\'
sleep 1
###### step 12 转移服务文件
mv /tmp/filebeat.service /etc/systemd/system/
echo \'step 12 将filebeat服务的文件移动到指定位置的工作完成....\'
sleep 1
###### step 13 服务设置及启动
systemctl enable logstash.service
systemctl enable filebeat.service
echo \'step 13 将服务设置为自启动的工作完成....\'
systemctl start logstash.service
sleep 20
systemctl start filebeat.service
sleep 10
##### step 14 检查服务是否已正常启动
logstashservice_check_result=`systemctl status logstash.service | grep \"active (running)\"| wc -l`
if [ \"$logstashservice_check_result\" == \"1\" ]
then
echo \'step 14 检查logstash.service已启动....\'
else
echo \"step 14 检查logstash.service未正常启动....,安装进程退出!!!\"
exit
fi
sleep 3
filebeatservice_check_result=`systemctl status filebeat.service | grep \"active (running)\"| wc -l`
if [ \"$filebeatservice_check_result\" == \"1\" ]
then
echo \'step 14 检查filebeat.service已启动....\'
else
echo \"step 14 检查filebeat.service未正常启动....,安装进程退出!!!\"
exit
fi
###### step 15 安装过程结束
echo \'step 15 安装过程结束\'
来源:https://www.cnblogs.com/xuliuzai/p/14486122.html
图文来源于网络,如有侵权请联系删除。