 百木园
百木园mysql主从
目录
- mysql主从
- 1.主从原理
- 1.1 主从介绍
- 1.2 主从作用
- 1.3 主从形式
- 1.4 主从复制原理
- 2.主从复制配置
- 2.1 mysql安装
- 2.2 mysql主从配置
- 2.2.1 确保从数据库于主数据库的数据一样
- 2.2.2 在主数据库里创建一个同步账号授权给从数据库使用
- 2.2.3 配置主数据库
- 2.2.4 配置从数据库
- 2.2.5 测试验证
- 3.GTID主从
- 3.1 GTID概念介绍
- 3.2 GTID工作原理
- 3.3 GTID主从配置
- 3.3.1 主库配置,并重启mysql
- 3.3.2 从库配置,并重启mysql
- 3.3.3 主库授权复制用户
- 3.3.4 从库设置要同步的主库信息,并开启同步
- 3.3.5 测试验证
- 1.主从原理
1.主从原理
1.1 主从介绍
所谓mysql主从就是建立两个完全一样的数据库,其中一个为主要使用的数据库,另一个为次要的数据库,一般在企业中,存放比较重要的数据的数据库服务器需要配置主从,这样可以防止因数据库服务器宕机导致数据丢失,还能保证业务量太多、数据太多和访问人数太多时服务的质量(服务器响应速度),还能提供故障切换、读写分离、和备份等等功能
1.2 主从作用
- 实时灾备,用于故障切换
- 读写分离,提供查询服务
- 备份,避免影响业务
1.3 主从形式
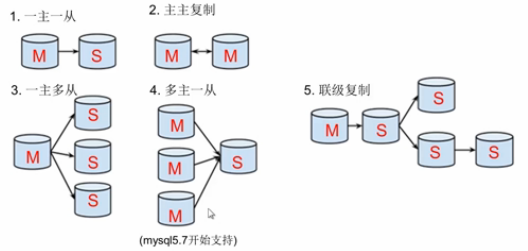
一主一从
主主复制:当作备份使用,当主服务器出现故障时,另一个主服务器会自动顶上。
一主多从:用来实现读写分离,当写操作较少时,读操作较多时使用,主服务器用来实现写操作,从服务器用来实现读操作。
多主一从:用来实现读写分离,当写操作较多时,读操作较少时使用,主服务器用来实现写操作,从服务器用来实现读操作。5.7开始支持
联级复制:是指从主场地复制过来的又从该场地再次复制到其他场地,即A场地把数据复制到B场地,B场地又把这些数据或其中部分数据再复制到其他场地。
1.4 主从复制原理
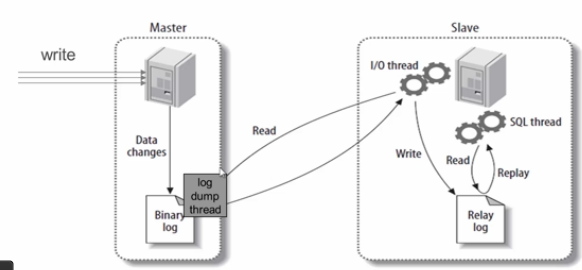
主从复制步骤:
- 主库将所有的写操作记录到binlog日志中并生成一个log dump线程,将binlog日志传给从库的I/O线程
- 从库生成两个线程,一个I/O线程,一个SQL线程
- I/O线程去请求主库的binlog,并将得到的binlog日志写到relay log(中继日志) 文件中
- SQL线程,会读取relay log文件中的日志,并解析成具体操作,来实现主从的操作一致,达到最终数据一致的目的
2.主从复制配置
主从复制配置步骤:
- 确保从数据库与主数据库里的数据一样
- 在主数据库里创建一个同步账号授权给从数据库使用
- 配置主数据库(修改配置文件)
- 配置从数据库(修改配置文件)
需求:
搭建两台MySQL服务器,一台作为主服务器,一台作为从服务器,主服务器进行写操作,从服务器进行读操作
环境说明:
| 数据库角色 | IP | 应用与系统版本 | 有无数据 |
|---|---|---|---|
| 主数据库 | 192.168.111.135 | centos8/redhat8 mysql-5.7 | 有数据 |
| 从数据库 | 192.168.111.137 | centos8/redhat8 mysql-5.7 | 无数据 |
2.1 mysql安装
分别在主从两台服务器上安装mysql-5.7版本
[root@localhost ~]# wget http://dev.mysql.com/get/mysql57-community-release-el7-11.noarch.rpm
[root@localhost ~]# rpm -Uvh  mysql57-community-release-el7-11.noarch.rpm
[root@localhost ~]# yum module disable mysql  //禁用mysql
[root@localhost ~]# yum -y install mysql-community-server mysql-community-client  mysql-community-common mysql-community-devel  --nogpgcheck

//安装完后设置开机自启动
[root@localhost ~]# systemctl enable --now mysqld

//在日志中找出密码
[root@localhost ~]# grep \"password\"  /var/log/mysqld.log
2022-07-25T06:34:28.883599Z 1 [Note] A temporary password is generated for root@localhost: OFU+amdhV3Wr			//临时密码

//关闭防火墙和selinux
[root@localhost ~]# systemctl disable --now firewalld
[root@localhost ~]# setenforce 0
[root@localhost ~]# vim /etc/selinux/config
SELINUX=disabled

//使用临时密码登录mysql
[root@localhost ~]# mysql -uroot -pOFU+amdhV3Wr		//-p后可以跟密码
mysql: [Warning] Using a password on the command line interface can be insecure.
Welcome to the MySQL monitor.  Commands end with ; or \\g.
Your MySQL connection id is 3
Server version: 5.7.38

Copyright (c) 2000, 2022, Oracle and/or its affiliates.

Oracle is a registered trademark of Oracle Corporation and/or its
affiliates. Other names may be trademarks of their respective
owners.

Type \'help;\' or \'\\h\' for help. Type \'\\c\' to clear the current input statement.

mysql> 				//看到这样的标识表示登录进去了

//修改mysql登录密码
mysql> set global validate_password_policy=0;
Query OK, 0 rows affected (0.00 sec)

mysql> set global validate_password_length=1;
Query OK, 0 rows affected (0.00 sec)

mysql> ALTER USER \'root\'@\'localhost\' IDENTIFIED BY \'123456\';
Query OK, 0 rows affected (0.00 sec)

//为避免mysql自动升级,需要卸载最开始安装的yum源
[root@localhost ~]# rpm -e mysql57-community-release
2.2 mysql主从配置
2.2.1 确保从数据库于主数据库的数据一样
为确保从数据库与主数据库里的数据一样,先全备主数据库并还原到从数据库中
//主库为master
[root@localhost ~]# hostnamectl set-hostname master
[root@localhost ~]# bash
[root@master ~]#

//从库为slave
[root@localhost ~]# hostnamectl set-hostname slave
[root@localhost ~]# bash
[root@slave ~]#
//先查看主库有哪些库
[root@master ~]# mysql -uroot -p123456 -e\'show databases;\'
mysql: [Warning] Using a password on the command line interface can be insecure.
+--------------------+
| Database           |
+--------------------+
| information_schema |
| mysql              |
| performance_schema |
| runtime            |
| sys                |
+--------------------+

//在查看从库
[root@slave ~]# mysql -uroot -p123456 -e\'show databases;\'
mysql: [Warning] Using a password on the command line interface can be insecure.
+--------------------+
| Database           |
+--------------------+
| information_schema |
| mysql              |
| performance_schema |
| sys                |
+--------------------+

//全备主库
//全备主库时需要另开一个终端,给数据库加上读锁,避免在备份期间有其他人在写入导致数据不一致
mysql> FLUSH TABLES WITH READ LOCK;
Query OK, 0 rows affected (0.00 sec)
//此锁表的终端必须在备份完成以后才能退出

//备份主库并将备份文件传送到从库
[root@master ~]# mysqldump -uroot -p123456 --all-databases > /opt/all-2022.sql
mysqldump: [Warning] Using a password on the command line interface can be insecure.
[root@master ~]# ls /opt/
all-2022.sql
[root@master ~]# scp /opt/all-2022.sql root@192.168.111.137:/opt/
The authenticity of host \'192.168.111.137 (192.168.111.137)\' can\'t be established.
ECDSA key fingerprint is SHA256:AneDLcALQuLH7WhrvDCtu+7mdCXjrXa87i7CQ+01ntk.
Are you sure you want to continue connecting (yes/no/[fingerprint])? yes
Warning: Permanently added \'192.168.111.137\' (ECDSA) to the list of known hosts.
root@192.168.111.137\'s password:
all-2022.sql           100%  860KB 110.1MB/s   00:00

//解除主库的锁表状态,直接退出交互式界面即可
mysql> quit
Bye
[root@master ~]#

//在从库上恢复主库的备份并查看从库有哪些库,确保与主库一致
[root@slave ~]# mysql -uroot -p123456 < /opt/all-2022.sql
mysql: [Warning] Using a password on the command line interface can be insecure.
[root@slave ~]# mysql -uroot -p123456 -e\'show databases;\'
mysql: [Warning] Using a password on the command line interface can be insecure.
+--------------------+
| Database           |
+--------------------+
| information_schema |
| mysql              |
| performance_schema |
| runtime            |
| sys                |
+--------------------+
2.2.2 在主数据库里创建一个同步账号授权给从数据库使用
mysql> create user \'repl\'@\'192.168.111.137\' identified by \'123456\';
Query OK, 0 rows affected (0.00 sec)

mysql> grant replication slave on *.* to \'repl\'@\'192.168.111.137\';
Query OK, 0 rows affected (0.00 sec)

mysql> flush privileges;
Query OK, 0 rows affected (0.01 sec)
2.2.3 配置主数据库
[root@master ~]# vim /etc/my.cnf
//在[mysql]这段后面添加
datadir=/var/lib/mysql
socket=/var/lib/mysql/mysql.sock
log-bin=mysql-bin		//添加	启用binlog日志
server-id=1				//添加	数据库服务器唯一标识符,主库的server-id值必须比从库的小
# Disabling symbolic-links is recommended to prevent assorted security risks
symbolic-links=0

log-error=/var/log/mysqld.log
pid-file=/var/run/mysqld/mysqld.pid

//重启数主库的mysql服务
[root@master ~]# systemctl restart mysqld
[root@master ~]# ss -anlt
State         Recv-Q        Send-Q               Local Address:Port               Peer Address:Port       Process
LISTEN        0             128                        0.0.0.0:22                      0.0.0.0:*
LISTEN        0             80                               *:3306                          *:*
LISTEN        0             128                           [::]:22                         [::]:*

//查看主库的状态
mysql> show master status;
+------------------+----------+--------------+------------------+-------------------+
| File             | Position | Binlog_Do_DB | Binlog_Ignore_DB | Executed_Gtid_Set |
+------------------+----------+--------------+------------------+-------------------+
| mysql-bin.000001 |      154 |              |                  |                   |
+------------------+----------+--------------+------------------+-------------------+
1 row in set (0.00 sec)
2.2.4 配置从数据库
[root@slave ~]# vim /etc/my.cnf
//在[mysql]这段后面添加
datadir=/var/lib/mysql
socket=/var/lib/mysql/mysql.sock
server-id=2				//添加 从库的server-id比主库的大
relay-log=mysql-relay-bin		//添加
# Disabling symbolic-links is recommended to prevent assorted security risks
symbolic-links=0

log-error=/var/log/mysqld.log
pid-file=/var/run/mysqld/mysqld.pid

//重启mysql服务
[root@slave ~]# systemctl restart mysqld
[root@slave ~]# ss -anlt
State         Recv-Q        Send-Q               Local Address:Port               Peer Address:Port       Process
LISTEN        0             128                        0.0.0.0:22                      0.0.0.0:*
LISTEN        0             80                               *:3306                          *:*
LISTEN        0             128                           [::]:22                         [::]:*

//配置并启动主从复制
mysql> change master to
    -> master_host=\'192.168.111.135\',
    -> master_user=\'repl\',
    -> master_password=\'123456\',
    -> master_log_file=\'mysql-bin.000001\',
    -> master_log_pos=154;
Query OK, 0 rows affected, 2 warnings (0.01 sec)

mysql> start slave;
Query OK, 0 rows affected (0.00 sec)

//查看服务器状态
mysql> show slave status \\G
*************************** 1. row ***************************
               Slave_IO_State: Waiting for master to send event
                  Master_Host: 192.168.111.135
                  Master_User: repl
                  Master_Port: 3306
                Connect_Retry: 60
              Master_Log_File: mysql-bin.000001
          Read_Master_Log_Pos: 154
               Relay_Log_File: mysql-relay-bin.000002
                Relay_Log_Pos: 320
        Relay_Master_Log_File: mysql-bin.000001
             Slave_IO_Running: Yes		//此处只许为yes
            Slave_SQL_Running: Yes		//此处只许为yes
              Replicate_Do_DB:
          Replicate_Ignore_DB:
2.2.5 测试验证
在主服务器的runtime库的zxr表中插入数据
mysql> use runtime;
Reading table information for completion of table and column names
You can turn off this feature to get a quicker startup with -A

Database changed
mysql> select * from zxr;
Empty set (0.00 sec)

mysql> insert into zxr values (1,\'sean\',20),(2,\'tom\',23),(3,\'jerry\',30);
Query OK, 3 rows affected (0.01 sec)
Records: 3  Duplicates: 0  Warnings: 0

mysql> select * from zxr;
+----+-------+------+
| id | name  | age  |
+----+-------+------+
|  1 | sean  |   20 |
|  2 | tom   |   23 |
|  3 | jerry |   30 |
+----+-------+------+
3 rows in set (0.00 sec)
在从数据库中查看数据是否同步
mysql> use runtime;
Reading table information for completion of table and column names
You can turn off this feature to get a quicker startup with -A

Database changed
mysql> select * from zxr;
+----+-------+------+
| id | name  | age  |
+----+-------+------+
|  1 | sean  |   20 |
|  2 | tom   |   23 |
|  3 | jerry |   30 |
+----+-------+------+
3 rows in set (0.00 sec)
3.GTID主从
3.1 GTID概念介绍
GTID即全局事务ID (global transaction identifier), 其保证为每一个在主上提交的事务在复制集群中可以生成一个唯一的ID。GTID最初由google实现,官方MySQL在5.6才加入该功能。mysql主从结构在一主一从情况下对于GTID来说就没有优势了,而对于2台主以上的结构优势异常明显,可以在数据不丢失的情况下切换新主。使用GTID需要注意: 在构建主从复制之前,在一台将成为主的实例上进行一些操作(如数据清理等),通过GTID复制,这些在主从成立之前的操作也会被复制到从服务器上,引起复制失败。也就是说通过GTID复制都是从最先开始的事务日志开始,即使这些操作在复制之前执行。比如在server1上执行一些drop、delete的清理操作,接着在server2上执行change的操作,会使得server2也进行server1的清理操作。
GTID实际上是由UUID+TID (即transactionId)组成的。其中UUID(即server_uuid) 产生于auto.conf文件(cat /data/mysql/data/auto.cnf),是一个MySQL实例的唯一标识。TID代表了该实例上已经提交的事务数量,并且随着事务提交单调递增,所以GTID能够保证每个MySQL实例事务的执行(不会重复执行同一个事务,并且会补全没有执行的事务)。GTID在一组复制中,全局唯一。 下面是一个GTID的具体形式 :
mysql> show master status;
+------------------+----------+--------------+------------------+------------------------------------------+
| File             | Position | Binlog_Do_DB | Binlog_Ignore_DB | Executed_Gtid_Set                        |
+------------------+----------+--------------+------------------+------------------------------------------+
| mysql_bin.000001 |     1114 |              |                  | a190ac61-117c-11ed-abda-000c296d5362:1-4 |
+------------------+----------+--------------+------------------+------------------------------------------+
1 row in set (0.00 sec)


GTID=a190ac61-117c-11ed-abda-000c296d5362:1-4
UUID=a190ac61-117c-11ed-abda-000c296d5362
transactionId:1-4
了解了GTID的格式,通过UUID可以知道这个事务在哪个实例上提交的。通过GTID可以极方便的进行复制结构上的故障转移,新主设置,这就很好地解决了下面这个图所展现出来的问题。
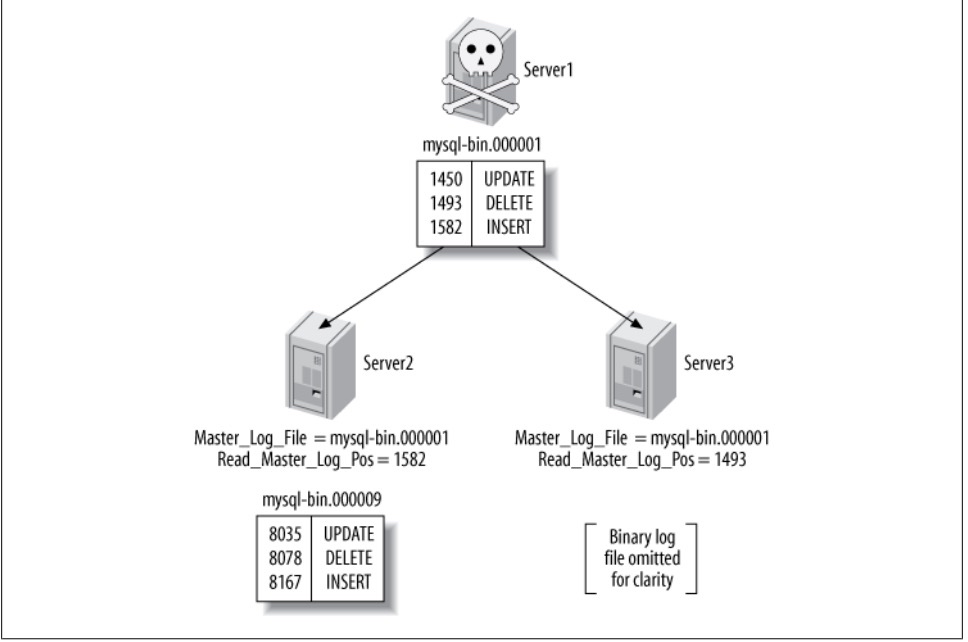
如图, Server1(Master)崩溃,根据从上show slave status获得Master_log_File/Read_Master_Log_Pos的值,Server2(Slave)已经跟上了主,Server3(Slave)没有跟上主。这时要是把Server2提升为主,Server3变成Server2的从。这时在Server3上执行change的时候需要做一些计算。
这个问题在5.6的GTID出现后,就显得非常的简单。由于同一事务的GTID在所有节点上的值一致,那么根据Server3当前停止点的GTID就能定位到Server2上的GTID。甚至由于MASTER_AUTO_POSITION功能的出现,我们都不需要知道GTID的具体值,直接使用CHANGE MASTER TO MASTER_HOST=\'xxx\', MASTER_AUTO_POSITION命令就可以直接完成failover的工作。
====== GTID和Binlog的关系 ======
- GTID在binlog中的结构
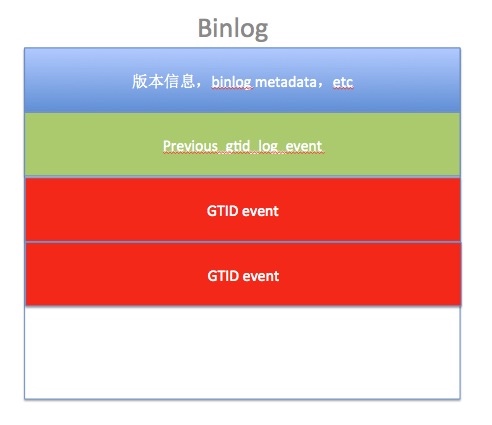
- GTID event 结构

- Previous_gtid_log_event
Previous_gtid_log_event 在每个binlog 头部都会有每次binlog rotate的时候存储在binlog头部Previous-GTIDs在binlog中只会存储在这台机器上执行过的所有binlog,不包括手动设置gtid_purged值。换句话说,如果你手动set global gtid_purged=xx; 那么xx是不会记录在Previous_gtid_log_event中的。 - GTID和Binlog之间的关系是怎么对应的呢? 如何才能找到GTID=? 对应的binlog文件呢?
假设有4个binlog: bin.001,bin.002,bin.003,bin.004
bin.001 : Previous-GTIDs=empty; binlog_event有: 1-40
bin.002 : Previous-GTIDs=1-40; binlog_event有: 41-80
bin.003 : Previous-GTIDs=1-80; binlog_event有: 81-120
bin.004 : Previous-GTIDs=1-120; binlog_event有: 121-160
假设现在我们要找GTID=$A,那么MySQL的扫描顺序为: - 从最后一个binlog开始扫描(即: bin.004)
- bin.004的Previous-GTIDs=1-120,如果$A=140 > Previous-GTIDs,那么肯定在bin.004中
- bin.004的Previous-GTIDs=1-120,如果$A=88 包含在Previous-GTIDs中,那么继续对比上一个binlog文件 bin.003,然后再循环前面2个步骤,直到找到为止.
====== GTID 重要参数的持久化 =======
- GTID相关参数
| 参数 | comment |
|---|---|
| gtid_executed | 执行过的所有GTID |
| gtid_purged | 丢弃掉的GTID |
| gtid_mode | GTID模式 |
| gtid_next | session级别的变量,下一个gtid |
| gtid_owned | 正在运行的GTID |
| enforce_gtid_consistency | 保证GTID安全的参数 |
开启GTID的必备条件
gtid_mode=on    (必选)
enforce-gtid-consistency=1  (必选)
log_bin=mysql-bin           (可选)    #高可用切换,最好开启该功能
log-slave-updates=1     (可选)       #高可用切换,最好打开该功能
3.2 GTID工作原理
从服务器连接到主服务器之后,把自己执行过的GTID (Executed_Gtid_Set: 即已经执行的事务编码) 、获取到的GTID (Retrieved_Gtid_Set: 即从库已经接收到主库的事务编号) 发给主服务器,主服务器把从服务器缺少的GTID及对应的transactions发过去补全即可。当主服务器挂掉的时候,找出同步最成功的那台从服务器,直接把它提升为主即可。如果硬要指定某一台不是最新的从服务器提升为主, 先change到同步最成功的那台从服务器, 等把GTID全部补全了,就可以把它提升为主了。
GTID是MySQL 5.6的新特性,可简化MySQL的主从切换以及Failover。GTID用于在binlog中唯一标识一个事务。当事务提交时,MySQL Server在写binlog的时候,会先写一个特殊的Binlog Event,类型为GTID_Event,指定下一个事务的GTID,然后再写事务的Binlog。主从同步时GTID_Event和事务的Binlog都会传递到从库,从库在执行的时候也是用同样的GTID写binlog,这样主从同步以后,就可通过GTID确定从库同步到的位置了。也就是说,无论是级联情况,还是一主多从情况,都可以通过GTID自动找点儿,而无需像之前那样通过File_name和File_position找点儿了。
简而言之,GTID的工作流程为:
- master更新数据时,会在事务前产生GTID,一同记录到binlog日志中。
- slave端的i/o 线程将变更的binlog,写入到本地的relay log中。
- sql线程从relay log中获取GTID,然后对比slave端的binlog是否有记录。
- 如果有记录,说明该GTID的事务已经执行,slave会忽略。
- 如果没有记录,slave就会从relay log中执行该GTID的事务,并记录到binlog。
- 在解析过程中会判断是否有主键,如果没有就用二级索引,如果没有就用全部扫描。
3.3 GTID主从配置
环境说明:
| 数据库角色 | IP | 应用与系统版本 |
|---|---|---|
| 主数据库 | 192.168.111.135 | centos8/redhat8 mysql-5.7 |
| 从数据库 | 192.168.111.137 | centos8/redhat8 mysql-5.7 |
3.3.1 主库配置,并重启mysql
//主库
[root@localhost ~]# hostnamectl set-hostname master
[root@localhost ~]# bash
[root@master ~]#
//从库
[root@localhost ~]# hostnamectl set-hostname slave
[root@localhost ~]# bash
[root@slave ~]#
//修改配置文件
[root@master ~]#  vim /etc/my.cnf
datadir=/var/lib/mysql
socket=/var/lib/mysql/mysql.sock
log-bin=mysql_bin		//添加
server-id=10			//添加
gtid_mode=on			//添加
enforce-gtid-consistency=true		//添加
log-slave-updates=on				//添加
# Disabling symbolic-links is recommended to prevent assorted security risks
symbolic-links=0

log-error=/var/log/mysqld.log
pid-file=/var/run/mysqld/mysqld.pid

//重启mysql服务
[root@master ~]#  systemctl restart mysqld
[root@master ~]#  ss -anlt
State         Recv-Q        Send-Q               Local Address:Port               Peer Address:Port       Process
LISTEN        0             128                        0.0.0.0:22                      0.0.0.0:*
LISTEN        0             80                               *:3306                          *:*
LISTEN        0             128                           [::]:22                         [::]:*
3.3.2 从库配置,并重启mysql
//修改配置文件
[root@slave ~]# vim /etc/my.cnf
datadir=/var/lib/mysql
socket=/var/lib/mysql/mysql.sock
server-id=20		//添加
relay-log=myrelay	//添加
gtid_mode=on		//添加
enforce-gtid-consistency=true		//添加
log-slave-updates=on				//添加
read_only=on		//添加
master-info-repository=TABLE		//添加
relay-log-info-repository=TABLE		//添加
# Disabling symbolic-links is recommended to prevent assorted security risks
symbolic-links=0

log-error=/var/log/mysqld.log
pid-file=/var/run/mysqld/mysqld.pid

//重启mysql服务
[root@slave ~]# systemctl restart mysqld
[root@slave ~]# ss -anlt
State         Recv-Q        Send-Q               Local Address:Port               Peer Address:Port       Process
LISTEN        0             128                        0.0.0.0:22                      0.0.0.0:*
LISTEN        0             80                               *:3306                          *:*
LISTEN        0             128                           [::]:22                         [::]:*
3.3.3 主库授权复制用户
mysql> set global validate_password_policy=0;
Query OK, 0 rows affected (0.00 sec)

mysql> set global validate_password_length=1;
Query OK, 0 rows affected (0.00 sec)

mysql> grant replication slave on *.* to \'repl\'@\'%\' identified by \'123456\';
Query OK, 0 rows affected, 1 warning (0.00 sec)
3.3.4 从库设置要同步的主库信息,并开启同步
mysql> change master to master_host=\'192.168.111.135\',
    -> master_port=3306,master_user=\'repl\',master_password=\'123456\',
    -> master_auto_position=1;
Query OK, 0 rows affected, 2 warnings (0.02 sec)

mysql> start slave;
Query OK, 0 rows affected (0.01 sec)

mysql> show slave status \\G
*************************** 1. row ***************************
               Slave_IO_State: Waiting for master to send event
                  Master_Host: 192.168.111.135
                  Master_User: repl
                  Master_Port: 3306
                Connect_Retry: 60
              Master_Log_File: mysql_bin.000001
          Read_Master_Log_Pos: 437
               Relay_Log_File: myrelay.000002
                Relay_Log_Pos: 650
        Relay_Master_Log_File: mysql_bin.000001
             Slave_IO_Running: Yes				//此行为yes
            Slave_SQL_Running: Yes				//此行为yes
              Replicate_Do_DB:
          Replicate_Ignore_DB:
3.3.5 测试验证
//查看主库
[root@master ~]# mysql -uroot -p123456 -e\'show databases;\'
mysql: [Warning] Using a password on the command line interface can be insecure.
+--------------------+
| Database           |
+--------------------+
| information_schema |
| mysql              |
| performance_schema |
| sys                |
+--------------------+

//查看从库
[root@slave ~]# mysql -uroot -p123456 -e\'show databases;\'
mysql: [Warning] Using a password on the command line interface can be insecure.
+--------------------+
| Database           |
+--------------------+
| information_schema |
| mysql              |
| performance_schema |
| sys                |
+--------------------+

//主库创建数据库和表
mysql> create database runtime;
Query OK, 1 row affected (0.00 sec)

mysql> use runtime;
Database changed
mysql> create table zxr (id int not null,name varchar(50) not null,age tinyint);
Query OK, 0 rows affected (0.02 sec)

mysql> insert into zxr values (1,\'sean\',20),(2,\'tom\',23),(3,\'jerry\',30);
Query OK, 3 rows affected (0.02 sec)
Records: 3  Duplicates: 0  Warnings: 0

mysql>
mysql>
mysql> select * from zxr;
+----+-------+------+
| id | name  | age  |
+----+-------+------+
|  1 | sean  |   20 |
|  2 | tom   |   23 |
|  3 | jerry |   30 |
+----+-------+------+
3 rows in set (0.00 sec)

//从库查看是否同步
mysql> show databases;
+--------------------+
| Database           |
+--------------------+
| information_schema |
| mysql              |
| performance_schema |
| runtime            |
| sys                |
+--------------------+
5 rows in set (0.00 sec)

mysql> use runtime;
Reading table information for completion of table and column names
You can turn off this feature to get a quicker startup with -A

Database changed
mysql> show tables;
+-------------------+
| Tables_in_runtime |
+-------------------+
| zxr               |
+-------------------+
1 row in set (0.00 sec)

mysql> select * from zxr;
+----+-------+------+
| id | name  | age  |
+----+-------+------+
|  1 | sean  |   20 |
|  2 | tom   |   23 |
|  3 | jerry |   30 |
+----+-------+------+
3 rows in set (0.00 sec)
来源:https://www.cnblogs.com/Their-own/p/16542053.html
本站部分图文来源于网络,如有侵权请联系删除。