 百木园
百木园在 StoneDB 1.0 版本中,InnoDB 引擎处理 OLTP 的事务型业务,Tianmu 引擎处理 OLAP 的分析型业务。因此,需要在主从复制环境的基础上做读写分离,所有的写操作和部分读操作走 InnoDB 引擎,所有的分析类查询走 Tianmu 引擎。读写分离方案既可以使用第三方中间件,也可以在业务前端实现。本文介绍的是较为常用的中间件 ProxySQL。
服务器配置说明
| IP | Memory | CPU | OS version |
|---|---|---|---|
| 192.168.30.40 | 8G | 8C | CentOS Linux release 7.9 |
| 192.168.30.41 | 8G | 8C | CentOS Linux release 7.9 |
| 192.168.30.42 | 8G | 8C | CentOS Linux release 7.9 |
| 192.168.30.46 | 16G | 16C | CentOS Linux release 7.9 |
注:主从环境中的各个服务器的配置一般情况下建议是一致的,但由于 StoneDB 不管重放 binlog,还是用于 OLAP 场景的查询,都是较消耗系统资源的,建议 StoneDB 配置略高于 MySQL。
主从环境说明
| IP | DATABASE | ROLE | DB version |
|---|---|---|---|
| 192.168.30.40 | MySQL | master | MySQL 5.7 |
| 192.168.30.41 | / | ProxySQL | / |
| 192.168.30.42 | MySQL | slave | MySQL 5.7 |
| 192.168.30.46 | StoneDB | slave | StoneDB 5.7 |
注:MySQL 与 StoneDB 的版本建议保持一致。
架构图说明
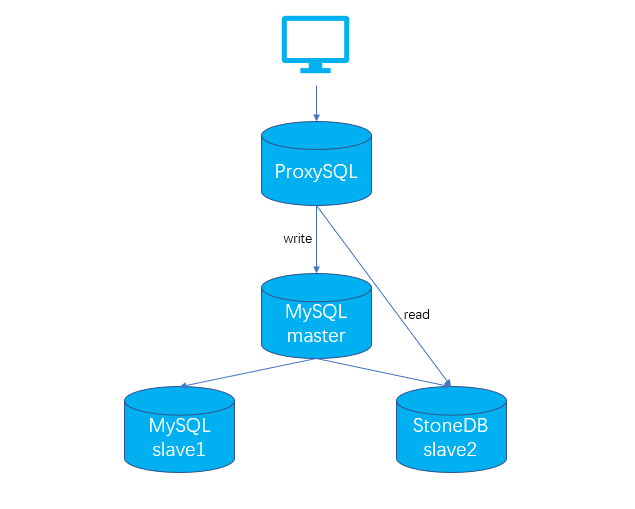
推荐采用一主两从的架构,上层的 ProxySQL 用于读写分离:
1)master(192.168.30.40)使用 InnoDB 引擎,可读写,提供 OLTP 场景的读写业务;
2)slave1(192.168.30.42)使用 InnoDB 引擎,只读,同时作为 standby,当 master 发生宕机时,可切换至 slave1,保证业务正常运行;
3)slave2(192.168.30.46)使用 Tianmu 引擎,只读,提供 OLAP 场景的读业务。
1、操作系统环境检查
操作系统环境检查的步骤在四个节点均需要执行。
1.1 关闭防火墙
# systemctl stop firewalld
# systemctl disable firewalld
1.2 关闭SELINUX
# vim /etc/selinux/config
SELINUX = disabled
1.3 设置Swap分区
修改vm.swappiness的值为1,表示尽量不使用Swap。
# vi /etc/sysctl.conf
vm.swappiness = 1
1.4 修改操作系统的限制
# ulimit -a
core file size          (blocks, -c) 0
data seg size           (kbytes, -d) unlimited
scheduling priority             (-e) 0
file size               (blocks, -f) unlimited
pending signals                 (-i) 1031433
max locked memory       (kbytes, -l) 64
max memory size         (kbytes, -m) unlimited
open files                      (-n) 65535
pipe size            (512 bytes, -p) 8
POSIX message queues     (bytes, -q) 819200
real-time priority              (-r) 0
stack size              (kbytes, -s) 10240
cpu time               (seconds, -t) unlimited
max user processes              (-u) 1024
virtual memory          (kbytes, -v) unlimited
file locks                      (-x) unlimited

修改操作系统的软硬限制
# vim /etc/security/limits.conf
* soft nofile 65535
* hard nofile 65535
mysql soft nproc 1028056
mysql hard nproc 1028056
1.5 创建用户
# groupadd mysql
# useradd -g mysql mysql
# passwd mysql
ProxySQL 节点无需创建,以上步骤执行完之后,重启操作系统。
2、部署MySQL
在 master 节点和 slave1 节点安装 MySQL。
2.1 下载安装包
https://downloads.mysql.com/archives/community/
从官网下载 MySQL 5.7 的安装包。
2.2 卸载mariadb
# rpm -qa|grep mariadb
mariadb-5.5.56-2.el7.x86_64
mariadb-server-5.5.56-2.el7.x86_64
mariadb-libs-5.5.56-2.el7.x86_64
# yum remove mariadb*
# rpm -qa|grep mariadb
2.3 上传tar包并解压
# tar -zxvf mysql-5.7.36-linux-glibc2.12-x86_64.tar.gz -C /usr/local/
# cd /usr/local/
# mv mysql-5.7.36-linux-glibc2.12-x86_64 mysql
2.4 创建目录
# mkdir -p /mysql/data/
# mkdir -p /mysql/log
# chown -R mysql:mysql /mysql/
2.5 配置参数文件 my.cnf
master
# vim /etc/my.cnf
[client]
port    = 3306
socket  = /mysql/data/mysql.sock

[mysqld]
port      = 3306
basedir   = /usr/local/mysql
datadir   = /mysql/data
socket    = /mysql/data/mysql.sock
pid_file  = /mysql/data/mysqld.pid
log_error = /mysql/log/mysqld.log
log_bin   = /mysql/log/mybinlog
server_id = 40
character_set_server = utf8mb4
collation_server = utf8mb4_general_ci
max_connections = 1000
binlog_format = row
default_storage_engine = innodb
read_only=0

innodb_buffer_pool_size = 4096000000
innodb_log_file_size = 1024000000
innodb_log_files_in_group = 3
innodb_io_capacity = 4000
innodb_io_capacity_max = 8000

#开启GTID模式
gtid_mode = on
enforce_gtid_consistency = 1

#并行复制
binlog_transaction_dependency_tracking = WRITESET
transaction_write_set_extraction = XXHASH64
slave1
# vim /etc/my.cnf
[client]
port    = 3306
socket  = /mysql/data/mysql.sock

[mysqld]
port      = 3306
basedir   = /usr/local/mysql
datadir   = /mysql/data
socket    = /mysql/data/mysql.sock
pid_file  = /mysql/data/mysqld.pid
log_error = /mysql/log/mysqld.log
log_bin   = /mysql/log/mybinlog
server_id = 42
character_set_server = utf8mb4
collation_server = utf8mb4_general_ci
max_connections = 1000
binlog_format = row
default_storage_engine = innodb
read_only=1

innodb_buffer_pool_size = 4096000000
innodb_log_file_size = 1024000000
innodb_log_files_in_group = 3
innodb_io_capacity = 4000
innodb_io_capacity_max = 8000

#开启GTID模式
gtid_mode = on
enforce_gtid_consistency = 1

#并行复制
slave_parallel_type = LOGICAL_CLOCK
slave_parallel_workers = 4
2.6 初始化实例
/usr/local/mysql/bin/mysqld --defaults-file=/etc/my.cnf --initialize --user=mysql
2.7 启动实例
/usr/local/mysql/bin/mysqld_safe --defaults-file=/etc/my.cnf --user=mysql &
注:管理员用户的临时密码在 mysqld.log 中,第一次登陆后需要修改管理员用户的密码。
3、部署StoneDB
3.1 下载安装包
https://stonedb.io/zh/docs/download/
从官网下载 StoneDB 5.7 的安装包。
3.2 上传tar包并解压
# cd /
# tar -zxvf stonedb-ce-5.7-v1.0.0.el7.x86_64.tar.gz
用户可根据安装规范将安装包上传至服务器,解压出来的目录是 stonedb57,示例中的安装路径是 /stonedb57。
3.3 检查依赖文件
# cd /stonedb57/install/bin
# ldd mysqld
# ldd mysql
如果检查返回有关键字\"not found\",说明缺少文件,需要安装对应的依赖包。例如:
libsnappy.so.1 => not found
在 Ubuntu 上使用命令 \"sudo apt search libsnappy\" 检查,说明需要安装 libsnappy-dev。在 RedHat 或者 CentOS 上使用命令 \"yum search all snappy\" 检查,说明需要安装 snappy-devel、snappy。
3.4 创建目录
mkdir -p /stonedb57/install/data
mkdir -p /stonedb57/install/binlog
mkdir -p /stonedb57/install/log
mkdir -p /stonedb57/install/tmp
mkdir -p /stonedb57/install/redolog
mkdir -p /stonedb57/install/undolog
chown -R mysql:mysql /stonedb57
3.5 配置参数文件 my.cnf
# vim /stonedb57/install/my.cnf
[client]
port    = 3306
socket  = /stonedb57/install/tmp/mysql.sock

[mysqld]
port      = 3306
basedir   = /stonedb57/install/
datadir   = /stonedb57/install/data
socket    = /stonedb57/install/tmp/mysql.sock
pid_file  = /stonedb57/install/data/mysqld.pid
log_error = /stonedb57/install/log/mysqld.log
log_bin   = /stonedb57/install/binlog/binlog
server_id = 46
character_set_server = utf8mb4
collation_server = utf8mb4_general_ci
max_connections = 1000
binlog_format = row
default_storage_engine = tianmu
read_only=1

innodb_buffer_pool_size = 2048000000
innodb_log_file_size = 1024000000
innodb_log_files_in_group = 3
innodb_io_capacity = 4000
innodb_io_capacity_max = 8000
innodb_log_group_home_dir   = /stonedb57/install/redolog/
innodb_undo_directory       = /stonedb57/install/undolog/
innodb_undo_log_truncate    = 1
innodb_undo_tablespaces     = 3
innodb_undo_logs            = 128

#开启GTID模式
gtid_mode = on
enforce_gtid_consistency = 1

#并行复制
slave_parallel_type = LOGICAL_CLOCK
slave_parallel_workers = 8
3.6 初始化实例
/stonedb57/install/bin/mysqld --defaults-file=/stonedb57/install/my.cnf --initialize --user=mysql
3.7 启动实例
/stonedb57/install/bin/mysqld_safe --defaults-file=/stonedb57/install/my.cnf --user=mysql &
注:管理员用户的临时密码在 mysqld.log 中,第一次登陆后需要修改管理员用户的密码。
4、配置主从
4.1 创建复制用户
create user \'repl\'@\'%\' identified by \'mysql123\';
grant replication slave on *.* to \'repl\'@\'%\';
4.2 备份主库
/usr/local/mysql/bin/mysqldump -uroot -pmysql123 --single-transaction --set-gtid-purged=on -B aa > /tmp/aa.sql
4.3 传输备份文件
scp /tmp/aa.sql root@192.168.30.42:/tmp
scp /tmp/aa.sql root@192.168.30.43:/tmp
注:如果数据较大,建议使用 mydumper.
4.4 slave1节点
/usr/local/mysql/bin/mysql -uroot -pmysql123 -S /mysqldb/data/mysql.sock
source /tmp/aa.sql
注:恢复前需要确保 gtid_executed 为空。
4.5 slave2节点
在恢复前,需要修改存储引擎,注释锁表语句。
sed -i \'s/UNLOCK TABLES/-- UNLOCK TABLES/g\' /tmp/aa.sql
sed -i \'s/LOCK TABLES `/-- LOCK TABLES `/g\' /tmp/aa.sql
sed -i \'s/ENGINE=InnoDB/ENGINE=tianmu/g\' /tmp/aa.sql

/stonedb57/install/bin/mysql -uroot -pmysql123 -S /stonedb57/install/tmp/mysql.sock
source /tmp/aa.sql
注:恢复前需要确保 gtid_executed 为空。
4.6 建立主从复制
slave1节点
CHANGE MASTER TO
MASTER_HOST=\'192.168.30.40\',
MASTER_PORT=3306,
MASTER_USER=\'repl\',
MASTER_PASSWORD=\'mysql123\',
MASTER_AUTO_POSITION = 1;

start slave;
show slave status\\G
slave2节点
CHANGE MASTER TO
MASTER_HOST=\'192.168.30.40\',
MASTER_PORT=3306,
MASTER_USER=\'repl\',
MASTER_PASSWORD=\'mysql123\',
MASTER_AUTO_POSITION = 1;

start slave;
show slave status\\G
5、配置ProxySQL
5.1 安装ProxySQL
# mkdir -p /home/ProxySQL
# cd /home/ProxySQL
# yum install proxysql-2.2.0-1-centos7.x86_64.rpm
# rpm -qa|grep proxysql
# rpm -ql proxysql
注:/etc/proxysql.cnf 为 ProxySQL 的配置文件。
5.2 启动ProxySQL
# systemctl start proxysql
# netstat -lntp|grep proxysql
tcp        0      0 0.0.0.0:6032            0.0.0.0:*               LISTEN      17957/proxysql
tcp        0      0 0.0.0.0:6033            0.0.0.0:*               LISTEN      17957/proxysql
注:6032是管理端口,6033是服务端口。
5.3 管理员登录ProxySQL
# mysql -uadmin -padmin -h127.0.0.1 -P6032 --prompt=\'ProxySQL>\'
mysql: [Warning] Using a password on the command line interface can be insecure.
Welcome to the MySQL monitor.  Commands end with ; or \\g.
Your MySQL connection id is 1
Server version: 5.5.30 (ProxySQL Admin Module)

Copyright (c) 2000, 2021, Oracle and/or its affiliates.

Oracle is a registered trademark of Oracle Corporation and/or its
affiliates. Other names may be trademarks of their respective
owners.

Type \'help;\' or \'\\h\' for help. Type \'\\c\' to clear the current input statement.

ProxySQL>show databases;
+-----+---------------+-------------------------------------+
| seq | name          | file                                |
+-----+---------------+-------------------------------------+
| 0   | main          |                                     |
| 2   | disk          | /var/lib/proxysql/proxysql.db       |
| 3   | stats         |                                     |
| 4   | monitor       |                                     |
| 5   | stats_history | /var/lib/proxysql/proxysql_stats.db |
+-----+---------------+-------------------------------------+
5 rows in set (0.00 sec)
注:ProxySQL 的用户名和密码默认都是 admin,加参数 prompt 是为了便于区分环境。
5.4 创建ProxySQL所需用户
在 master 上创建 ProxySQL 的监控用户和对外访问用户,其中监控用户只需要有 replication client 权限即可。
###监控用户
create user \'monitor\'@\'%\' identified by \'MySQL_123\';
grant replication client on *.* to \'monitor\'@\'%\';

###对外访问用户(用于连接ProxySQL)
create user \'proxysql\'@\'%\' identified by \'MySQL_123\';
grant select,delete,update,insert on *.* to \'proxysql\'@\'%\';
5.5 配置ProxySQL主从分组信息
1)创建分组
表 mysql_replication_hostgroups 的字段 writer_hostgroup、reader_hostgroup 分别代表写组和读组,都要大于0且不能相同,该环境中定义写组为10,读组为20。
ProxySQL 会根据 read_only 的取值将 server 进行分组,read_only=0为 master,被分到编号为10的写组,read_only=1为 slave,被分到编号为20的读组。
###创建分组
insert into mysql_replication_hostgroups(writer_hostgroup,reader_hostgroup,comment) values(10,20,\'proxy\');
load mysql servers to runtime;
save mysql servers to disk;

###查看三层配置系统是否都写入数据
ProxySQL>select * from mysql_replication_hostgroups;
+------------------+------------------+------------+---------+
| writer_hostgroup | reader_hostgroup | check_type | comment |
+------------------+------------------+------------+---------+
| 10               | 20               | read_only  | proxy   |
+------------------+------------------+------------+---------+
1 row in set (0.00 sec)

ProxySQL>select * from runtime_mysql_replication_hostgroups;
+------------------+------------------+------------+---------+
| writer_hostgroup | reader_hostgroup | check_type | comment |
+------------------+------------------+------------+---------+
| 10               | 20               | read_only  | proxy   |
+------------------+------------------+------------+---------+
1 row in set (0.00 sec)

ProxySQL>select * from mysql_replication_hostgroups;
+------------------+------------------+------------+---------+
| writer_hostgroup | reader_hostgroup | check_type | comment |
+------------------+------------------+------------+---------+
| 10               | 20               | read_only  | proxy   |
+------------------+------------------+------------+---------+
1 row in set (0.00 sec)
2)添加主从节点
insert into mysql_servers(hostgroup_id,hostname,port) values(10,\'192.168.30.40\',3306);
insert into mysql_servers(hostgroup_id,hostname,port) values(20,\'192.168.30.46\',3306);
load mysql servers to runtime;
save mysql servers to disk;

###查看状态
ProxySQL>select * from mysql_servers;
+--------------+---------------+------+-----------+--------+--------+-------------+-----------------+---------------------+---------+----------------+---------+
| hostgroup_id | hostname      | port | gtid_port | status | weight | compression | max_connections | max_replication_lag | use_ssl | max_latency_ms | comment |
+--------------+---------------+------+-----------+--------+--------+-------------+-----------------+---------------------+---------+----------------+---------+
| 20           | 192.168.30.40 | 3306 | 0         | ONLINE | 1      | 0           | 1000            | 0                   | 0       | 0              |         |
| 20           | 192.168.30.46 | 3306 | 0         | ONLINE | 1      | 0           | 1000            | 0                   | 0       | 0              |         |
+--------------+---------------+------+-----------+--------+--------+-------------+-----------------+---------------------+---------+----------------+---------+
2 rows in set (0.00 sec)
3)为ProxySQL创建监控用户
###创建监控用户(在ProxySQL创建)
set mysql-monitor_username=\'monitor\';
set mysql-monitor_password=\'MySQL_123\';
load mysql variables to runtime;
save mysql variables to disk;

###对连接用户监控
ProxySQL>select * from monitor.mysql_server_connect_log;
+---------------+------+------------------+-------------------------+------------------------------------------------------------------------+
| hostname      | port | time_start_us    | connect_success_time_us | connect_error                                                          |
+---------------+------+------------------+-------------------------+------------------------------------------------------------------------+
| 192.168.30.40 | 3306 | 1664183920198998 | 0                       | Access denied for user \'monitor\'@\'192.168.30.41\' (using password: YES) |
| 192.168.30.46 | 3306 | 1664183920926981 | 0                       | Access denied for user \'monitor\'@\'HAMI02\' (using password: YES)        |
| 192.168.30.46 | 3306 | 1664183970671663 | 1616                    | NULL                                                                   |
| 192.168.30.40 | 3306 | 1664183971672625 | 2089                    | NULL                                                                   |
+---------------+------+------------------+-------------------------+------------------------------------------------------------------------+
4 rows in set (0.00 sec)

注:在没有创建监控用户前,会有很多的connect_error,这是因为没有配置监控信息时的错误,配置后如果connect_error的结果为NULL,则表示正常。

###对心跳信息的监控
ProxySQL>select * from mysql_server_ping_log limit 10;
+---------------+------+------------------+----------------------+------------------------------------------------------------------------+
| hostname      | port | time_start_us    | ping_success_time_us | ping_error                                                             |
+---------------+------+------------------+----------------------+------------------------------------------------------------------------+
| 192.168.30.40 | 3306 | 1664183880229349 | 0                    | Access denied for user \'monitor\'@\'192.168.30.41\' (using password: YES) |
| 192.168.30.46 | 3306 | 1664183880427787 | 0                    | Access denied for user \'monitor\'@\'HAMI02\' (using password: YES)        |
| 192.168.30.40 | 3306 | 1664183890229405 | 0                    | Access denied for user \'monitor\'@\'192.168.30.41\' (using password: YES) |
| 192.168.30.46 | 3306 | 1664183890336793 | 0                    | Access denied for user \'monitor\'@\'HAMI02\' (using password: YES)        |
| 192.168.30.40 | 3306 | 1664183900229529 | 0                    | Access denied for user \'monitor\'@\'192.168.30.41\' (using password: YES) |
| 192.168.30.46 | 3306 | 1664183900357491 | 0                    | Access denied for user \'monitor\'@\'HAMI02\' (using password: YES)        |
| 192.168.30.46 | 3306 | 1664183910229710 | 0                    | Access denied for user \'monitor\'@\'HAMI02\' (using password: YES)        |
| 192.168.30.40 | 3306 | 1664183910406115 | 0                    | Access denied for user \'monitor\'@\'192.168.30.41\' (using password: YES) |
| 192.168.30.46 | 3306 | 1664183920229740 | 0                    | Access denied for user \'monitor\'@\'HAMI02\' (using password: YES)        |
| 192.168.30.40 | 3306 | 1664183920346638 | 0                    | Access denied for user \'monitor\'@\'192.168.30.41\' (using password: YES) |
+---------------+------+------------------+----------------------+------------------------------------------------------------------------+
10 rows in set (0.00 sec)

###对read_only值监控
ProxySQL>select * from mysql_server_read_only_log limit 10;
+---------------+------+------------------+-----------------+-----------+------------------------------------------------------------------------------------------------------------+
| hostname      | port | time_start_us    | success_time_us | read_only | error                                                                                                      |
+---------------+------+------------------+-----------------+-----------+------------------------------------------------------------------------------------------------------------+
| 192.168.30.46 | 3306 | 1664183876942878 | 0               | NULL      | timeout on creating new connection: Access denied for user \'monitor\'@\'HAMI02\' (using password: YES)        |
| 192.168.30.40 | 3306 | 1664183876961694 | 0               | NULL      | timeout on creating new connection: Access denied for user \'monitor\'@\'192.168.30.41\' (using password: YES) |
| 192.168.30.46 | 3306 | 1664183878441697 | 0               | NULL      | timeout on creating new connection: Access denied for user \'monitor\'@\'HAMI02\' (using password: YES)        |
| 192.168.30.40 | 3306 | 1664183878461063 | 0               | NULL      | timeout on creating new connection: Access denied for user \'monitor\'@\'192.168.30.41\' (using password: YES) |
| 192.168.30.46 | 3306 | 1664183879941587 | 0               | NULL      | timeout on creating new connection: Access denied for user \'monitor\'@\'HAMI02\' (using password: YES)        |
| 192.168.30.40 | 3306 | 1664183879961993 | 0               | NULL      | timeout on creating new connection: Access denied for user \'monitor\'@\'192.168.30.41\' (using password: YES) |
| 192.168.30.46 | 3306 | 1664183881441750 | 0               | NULL      | timeout on creating new connection: Access denied for user \'monitor\'@\'HAMI02\' (using password: YES)        |
| 192.168.30.40 | 3306 | 1664183881461890 | 0               | NULL      | timeout on creating new connection: Access denied for user \'monitor\'@\'192.168.30.41\' (using password: YES) |
| 192.168.30.40 | 3306 | 1664183882942044 | 0               | NULL      | timeout on creating new connection: Access denied for user \'monitor\'@\'192.168.30.41\' (using password: YES) |
| 192.168.30.46 | 3306 | 1664183882958866 | 0               | NULL      | timeout on creating new connection: Access denied for user \'monitor\'@\'HAMI02\' (using password: YES)        |
+---------------+------+------------------+-----------------+-----------+------------------------------------------------------------------------------------------------------------+
10 rows in set (0.00 sec)

注:monitor就会开始监控后端的read_only值,然后按照read_only的值将某些节点自动移到读写组。
4)为ProxySQL配置对外访问用户
insert into mysql_users(username,password,default_hostgroup) values(\'proxysql\',\'MySQL_123\',10);
insert into mysql_users(username,password,default_hostgroup) values(\'proxysql2\',\'*0815E74A768849A6CCF0E9C1C5B940FB4D9F839E\',20);
load mysql users to runtime;
save mysql users to disk;

ProxySQL>select * from mysql_users\\G
*************************** 1. row ***************************
              username: proxysql
              password: MySQL_123
                active: 1
               use_ssl: 0
     default_hostgroup: 10
        default_schema: NULL
         schema_locked: 0
transaction_persistent: 1
          fast_forward: 0
               backend: 1
              frontend: 1
       max_connections: 10000
            attributes:
               comment:
*************************** 2. row ***************************
              username: proxysql2
              password: *0815E74A768849A6CCF0E9C1C5B940FB4D9F839E
                active: 1
               use_ssl: 0
     default_hostgroup: 20
        default_schema: NULL
         schema_locked: 0
transaction_persistent: 1
          fast_forward: 0
               backend: 1
              frontend: 1
       max_connections: 10000
            attributes:
               comment:
2 rows in set (0.00 sec)
mysql_users 表最主要的三个字段 username、password、default_hostgroup 解释。
username:前端连接 ProxySQL 的数据库用户
password:用户对应的密码,即可以是明文密码,也可以是 hash 密码,如果想使用 hash 密码,可以先在某个节点上执行 select password(\'password\'),然后将加密结果复制到该字段。
default_hostgroup:用户默认的路由目标,例如:若用户 proxysql2 是个只读用户,则该字段值可以设置为20,表示所有的SQL语句默认情况下将路由到 hostgroup_id=20 的组;若用户不是只读用户,则该字段必须设置为10,表示 DML 语句会路由到 hostgroup_id=10 的组,查询语句即会路由到 hostgroup_id=10 的组,也会路由到 hostgroup_id=20 的组。
5.6 配置读写分离策略
ProxySQL 的路由规则配置比较灵活,可以基于用户级别,数据库级别等。由于 StoneDB 提供的是 OLAP 分析型查询业务场景,建议将聚合类查询、即席查询、复杂查询等分发到 StoneDB。由于只是测试,因此只配置了几个简单的路由规则。
与查询规则有关的表有两个:mysql_query_rules 和 mysql_query_rules_fast_routing,表mysql_query_rules_fast_routing 是 mysql_query_rules 的扩展,并在以后评估快速路由策略和属性(仅在ProxySQL 1.4.7+中可用)。
mysql_query_rules 表的几个字段解释。
active:是否启用这个规则,1表示启用,0表示禁用
match_pattern:设置规则
destination_hostgroup:默认指定的分组
apply:真正执行应用规则
###创建规则
这里我创建两个规则:
1)把所有以select开头的语句分配到编号为20的读组中;
2)把select...for update语句分配到编号为10的写组中,其他所有操作都会默认路由到写组。
insert into mysql_query_rules(rule_id,active,match_pattern,destination_hostgroup,apply) values(1,1,\'^select.*for update$\',10,1);
insert into mysql_query_rules(rule_id,active,match_pattern,destination_hostgroup,apply) values(2,1,\'^select\',20,1);
insert into mysql_query_rules(rule_id,active,match_pattern,destination_hostgroup,apply) values(3,1,\'^select*sum\',20,1);
load mysql query rules to runtime;
save mysql query rules to disk;

###查看规则
ProxySQL>select * from mysql_query_rules\\G
*************************** 1. row ***************************
              rule_id: 1
               active: 1
             username: NULL
           schemaname: NULL
               flagIN: 0
          client_addr: NULL
           proxy_addr: NULL
           proxy_port: NULL
               digest: NULL
         match_digest: NULL
        match_pattern: ^select.*for update$
 negate_match_pattern: 0
         re_modifiers: CASELESS
              flagOUT: NULL
      replace_pattern: NULL
destination_hostgroup: 10
            cache_ttl: NULL
   cache_empty_result: NULL
        cache_timeout: NULL
            reconnect: NULL
              timeout: NULL
              retries: NULL
                delay: NULL
    next_query_flagIN: NULL
       mirror_flagOUT: NULL
     mirror_hostgroup: NULL
            error_msg: NULL
               OK_msg: NULL
          sticky_conn: NULL
            multiplex: NULL
  gtid_from_hostgroup: NULL
                  log: NULL
                apply: 1
           attributes:
              comment: NULL
*************************** 2. row ***************************
              rule_id: 2
               active: 1
             username: NULL
           schemaname: NULL
               flagIN: 0
          client_addr: NULL
           proxy_addr: NULL
           proxy_port: NULL
               digest: NULL
         match_digest: NULL
        match_pattern: ^select
 negate_match_pattern: 0
         re_modifiers: CASELESS
              flagOUT: NULL
      replace_pattern: NULL
destination_hostgroup: 20
            cache_ttl: NULL
   cache_empty_result: NULL
        cache_timeout: NULL
            reconnect: NULL
              timeout: NULL
              retries: NULL
                delay: NULL
    next_query_flagIN: NULL
       mirror_flagOUT: NULL
     mirror_hostgroup: NULL
            error_msg: NULL
               OK_msg: NULL
          sticky_conn: NULL
            multiplex: NULL
  gtid_from_hostgroup: NULL
                  log: NULL
                apply: 1
           attributes:
              comment: NULL
*************************** 3. row ***************************
              rule_id: 3
               active: 1
             username: NULL
           schemaname: NULL
               flagIN: 0
          client_addr: NULL
           proxy_addr: NULL
           proxy_port: NULL
               digest: NULL
         match_digest: NULL
        match_pattern: ^select*sum
 negate_match_pattern: 0
         re_modifiers: CASELESS
              flagOUT: NULL
      replace_pattern: NULL
destination_hostgroup: 20
            cache_ttl: NULL
   cache_empty_result: NULL
        cache_timeout: NULL
            reconnect: NULL
              timeout: NULL
              retries: NULL
                delay: NULL
    next_query_flagIN: NULL
       mirror_flagOUT: NULL
     mirror_hostgroup: NULL
            error_msg: NULL
               OK_msg: NULL
          sticky_conn: NULL
            multiplex: NULL
  gtid_from_hostgroup: NULL
                  log: NULL
                apply: 1
           attributes:
              comment: NULL
3 rows in set (0.00 sec)
注:select...for update 规则的 rule_id 必须要小于普通的 select 规则的 rule_id,因为 ProxySQL 是根据 rule_id的顺序进行规则匹配的。
5.7 读写分离测试
1)读操作
# mysql -uproxysql -pMySQL_123 -h127.0.0.1 -P6033
mysql: [Warning] Using a password on the command line interface can be insecure.
Welcome to the MySQL monitor.  Commands end with ; or \\g.
Your MySQL connection id is 6
Server version: 5.5.30 (ProxySQL)

Copyright (c) 2000, 2021, Oracle and/or its affiliates.

Oracle is a registered trademark of Oracle Corporation and/or its
affiliates. Other names may be trademarks of their respective
owners.

Type \'help;\' or \'\\h\' for help. Type \'\\c\' to clear the current input statement.

proxysql@HAMI02 17:21:  [(none)]> select sum(money) from aa.ttt;
+------------+
| sum(money) |
+------------+
|    88888.8 |
+------------+
1 row in set (0.01 sec)

proxysql@HAMI02 17:21:  [(none)]> select @@server_id;
+-------------+
| @@server_id |
+-------------+
|          46 |
+-------------+
1 row in set (0.00 sec)
2)写操作
# mysql -uproxysql -pMySQL_123 -h127.0.0.1 -P6033
mysql: [Warning] Using a password on the command line interface can be insecure.
Welcome to the MySQL monitor.  Commands end with ; or \\g.
Your MySQL connection id is 19
Server version: 5.5.30 (ProxySQL)

Copyright (c) 2000, 2021, Oracle and/or its affiliates.

Oracle is a registered trademark of Oracle Corporation and/or its
affiliates. Other names may be trademarks of their respective
owners.

Type \'help;\' or \'\\h\' for help. Type \'\\c\' to clear the current input statement.

proxysql@HAMI02 19:53:  [(none)]> begin;
Query OK, 0 rows affected (0.00 sec)

proxysql@HAMI02 19:54:  [(none)]> insert into aa.t1 values(7);
Query OK, 1 row affected (0.00 sec)

proxysql@HAMI02 19:54:  [(none)]> select @@server_id;
+-------------+
| @@server_id |
+-------------+
|          40 |
+-------------+
1 row in set (0.00 sec)
6、建议项
1)建议设置为 GTID 模式,好处是从库发生 crash 后,不需要去找位点,系统会自动拉起复制线程;
2)在从库的并行 worker 相同的情况下,从库 StoneDB 相比从库 InnoDB 会消耗更多的CPU资源,如果未来上生产环境,建议 StoneDB 的配置略比 InnoDB 的配置高;
3)若从库 StoneDB 的延迟较高,可临时关闭参数 tianmu_enable_rowstore,待追上主库后再开启参数。关闭该参数带来的风险是如果在同步过程中 StoneDB 发生重启,重启后会出现丢数据的情况;
4)建议将聚合类查询、即席查询、复杂查询等分发到 StoneDB。
来源:https://www.cnblogs.com/yangwilly/p/16776449.html
本站部分图文来源于网络,如有侵权请联系删除。